Quick Links
Whether you need to replace your optical drive or swap it out with a solid-state drive, here's how to remove the DVD drive from an older iMac.
After the optical drive died in my 2008 iMac, I decided to just simply remove it altogether and have just an empty drive bay sitting there for now, hoping for better airflow. There are kits you can buy that allow you to place a storage drive in the optical drive bay, but for now, I just wanted to remove the dead optical drive.
If you know your way around screws and connectors, the process is actually fairly easy, mostly because older iMacs aren't heavily glue together like newer models are, so everything is held in place with Torx screws.
What You'll Need
Before you begin, you'll need a few tools that you might not already have.
- Suction cups (iFixit sells a pair specifically for this kind of work)
- A small Phillips-head screwdriver
- A T6 Torx screwdriver
- A T8 Torx screwdriver
- Tweezers (Useful for when you accidentally drop screws in tight areas)

Depending on what year your iMac is, you might need different sizes of Torx screwdrivers, which is why it's a good idea just to get a small set of specialty precision bits, that way you'll have all the bits you need no matter what. For this how-to, I'm working on a 2008 iMac, and the specific tools listed above are the ones needed for this particular model, but it's possible that yours might have different sizes of Torx screws. This page will help you find out what you need.
Step One: Disassemble Your iMac
Unplug everything from your iMac and lay the machine down on a flat surface with the screen pointing up. The iMac will angle up a bit because of the stand, but that's completely fine.

On the bottom edge of the iMac, take your Phillips screwdriver and remove the lone screw, which will allow the memory access plate to come off. The screw won't come all the way out, so just loosen the screw and then pull the plate out.

Next, take your suction cups and place them in opposite corners of the screen, making sure to lock them in place so that they grab on to the glass. The glass is simply held on by magnets, so all you have to do is lift straight up and the glass panel will come right off.

Place the glass panel off to the side. If you're worried about scratching it, place it on a soft surface away from the work area and then lay a towel or sheet over it to prevent it from collecting dust.

Next, there are twelve T8 Torx screws around the edge of the display that need removed. These hold the aluminum bezel in place. Be aware that the four screws along the bottom are longer than the rest, so make sure you put them back in the correct locations.

After you remove these screws, it's time to remove the whole front bezel. The best way to do this is by starting in the upper corners. Place your thumb on the edge of the display unit and your fingers on the back side of the iMac. From there, push your thumb down as your pull up your fingers. This will loosen the bezel and you can begin to work your way down until the whole bezel lifts up. Do this very slowly and carefully, as there is a cable you'll need to disconnect!

Before you can completely remove the bezel, you'll need to disconnect the microphone cable at the top.

Place the bezel off to the side, and you'll now have access to the bottom portion of the internal components. Take this time to use some compressed air and clean out any dust that has collected.

Next, remove the "LCD Temp" connector located just to the right of the left-hand side cooling fan toward the bottom.

After that, locate the connection for the display cable and remove the two T6 Torx screws on either side of the connector.

After that, pull up on the black tab to disconnect the display cable from the iMac's logic board.

Now it's time to remove the whole display unit. Unscrew the eight T8 Torx screws around the outer edge of the display. There are four screws on each side.

Next, from the left side, lift up on the display unit and open it like a book, leaving the right-side portion resting on the iMac. Either have a friend hold it up like that or use a stick or something to keep it propped it up.

This is because the display is still connected to the iMac via four inverter cables. Simply unplug these.

After that, you can completely remove the display unit and set it off to the side. This will finally get you access to all of the internal components, including the optical drive.
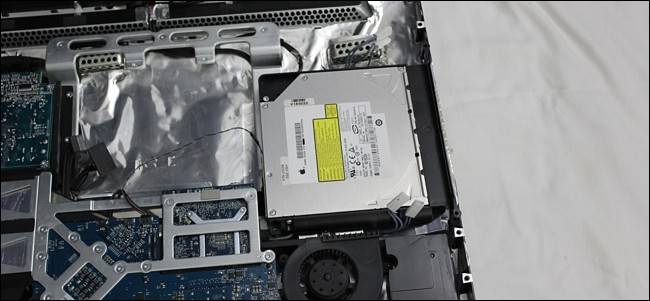
Step Two: Remove the Optical Drive
To remove the optical drive, there's just two T8 Torx screws holding it in place that you'll need to remove.

Next, you can slightly lift out the optical drive, but it will still be connected by the thermal sensor and the optical drive data and power connector. To remove the latter, simply remove the two T6 Torx screws holding the connector in place.

You'll want to leave the thermal sensor plugged in (marked "ODD Temp" on the logic board), but you can remove the connection on the optical drive itself.

It's connected to the drive with adhesive, so remove the foam covering the sensor and then use a spudger or something with a flat edge to pry off the temperature sensor assembly from the optical drive's surface. Remember to leave the other end plugged into the logic board.

Next, you'll need to remove the black bracket that holds the optical drive in place inside of the iMac. It's held together with four T8 Torx screws, two on each side.

If you're replacing the optical drive (either with another optical drive or a hard drive bay), screw it into the bracket now. Even if you aren't, you'll then need to take this bracket and install back into the iMac and secure it using the two original screws that you removed in order to take the optical drive out, since the bracket is integrated into the iMac's assembly.

Step Three: Reassemble Your iMac
Now that you've removed the optical drive and put the bracket back in place (with or without something in it), it's time to put everything back together. Luckily, reassembling it really isn't any harder than taking it apart.
Start by placing the display unit back on top, making sure to rest the right edge on the iMac first as you prop up the left side, since you'll need to plug the inverter cables back in. Luckily, these inverter cables are interchangeable, so it doesn't matter which of the two you plug into the connectors on above and below the optical drive bay.

After you plug the inverter cables back in, you can mount the display unit back on the iMac and screw it all in. If it doesn't sit flush, it's likely the inverter cables getting in the way, so check to make sure they're tucked in between components and sitting out of the way.

Next, Plug the display cable back in and screw in the two T6 Torx screws to secure it.
Don't forget about the LCD temperature sensor cable as well. If you don't plug this back in, your iMac's cooling fans will run at max speed nonstop.
Next, place the bezel back on and remember to reconnect the microphone cable.
When placing the bezel back on, remember that the four screws along the bottom are longer than the rest.

After the bezel in back in place, screw back in the memory slot plate on the bottom edge of the iMac.
Now it's time to place the front glass panel back on, but before you do this, make sure there aren't any fingerprints or dust on the display unit and on both sides of the glass. It's not a huge issue if you forget to do this, since you just need to get the suction cups back out, but it's better to do it now while it's still torn apart.
With the suction cups still on the glass panel, slowly place it on the screen until the magnets take over and lock it into place.
Remove the suction cups and you're good to go! Place the iMac back on your desk, reconnect any cables and power it up.