Quick Links
As of Mac OS X Yosemite, you can mark up email attachments, including PDF files and image files, in Apple Mail on the Mac, making Mail a powerful productivity app. Now, that feature is also available in the iOS Mail app.
That means you can add your signature to a document, make notes on a document or image, and otherwise mark up the file any way you want--all within the Mail app. Markup works on both incoming and outgoing attachments, which means you can mark up files you receive and files you attach and send out.
I’ll show you how to mark up both a PDF file and an image file directly in iOS Mail.
NOTE: If you’re using an iPhone 6S/6S Plus or 7/7Plus, when I say to tap and hold on an item, do so lightly to avoid activating the 3D touch feature.
How to Mark Up a PDF File Attachment in iOS Mail
To mark up a PDF file in iOS Mail, tap and hold on the attached file in the email message.

Swipe left on the bottom row of icons on the share sheet and tap “Markup and Reply”.

If this is an attachment you're sending, rather than receiving, you may not see the share sheet when you tap and hold on the attachment. If a popup displays, tap "Select" to select the attachment file.

Then, tap "Markup" on the next popup.

The PDF file displays and some markup tools are available at the bottom of the screen. In my example, I'm first going to draw some arrows on the document using the freehand drawing tool. Tap the pen tool at the bottom of the screen.

Colored circles display above the toolbar. Tap on a color to draw with that color.

To change the width of the pen, tap the horizontal lines icon on the right. There are three widths from which you can choose and the middle width is the default. Tap the width you want.

Use your finger or a stylus to draw on the attachment.
I drew arrows pointing to each line requiring information.

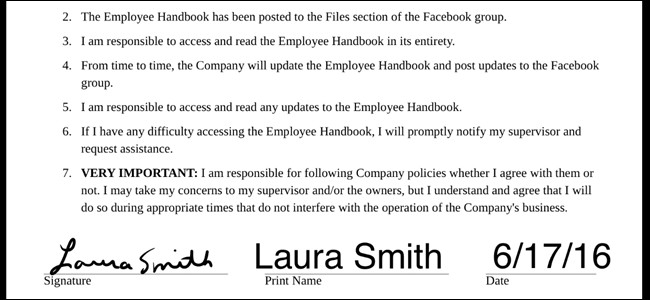
Now, in my example, say I receive the email with the attachment pointing to where I need to sign and fill out information. Open the attachment for markup using one of the methods described above. First, I'll sign the document, and then I'll print the name and add the date. To sign the document, tap the signature icon.

The New Signature screen displays in landscape orientation. Sign your name with your finger or with a stylus. If you’re not happy with your signature, tap “Clear” and redo it. When you’re satisfied, tap “Done”.

A box with your signature is added to the document. Initially, it will probably be a bit big. To make it smaller, tap and hold on one of the corners of the box and drag it in. To move the signature to the correct place on the PDF file, tap and hold inside the box and drag it to the desired location.

Now, I'll add my printed name. To add text to the PDF file, tap where you want the text to be inserted.

A box displays and the keyboard activates. You’ll also see a Paste option in case you copied text from elsewhere that you want to paste here. Type your text or paste it.

Move the text box to where you want it the same way you moved the signature.

I added the date the same way I added the printed name.

However, I got the date wrong, but I can tap on the date text box and then tap “Edit” on the popup to correct it.

You can also change the font, size, and alignment of the text. To do so, tap on the icon with the different sized letter “A”. There’s a sans serif font (Helvetica), a serif font (Georgia), and a handwriting-style font (Noteworthy). Use the slider bar to change the size of the text and tap on one of the four buttons below the slider to change the alignment.

Once you’re happy with your markups, tap “Done” at the top of the screen.

An email reply is automatically created and the marked up attachment is added to the reply. If you decide to change the markups you made, add more, or delete some, tap on the attached file in the email reply.

The PDF file displays, but notice that there are no options to do anything on the PDF file. To access options, tap once on the PDF file.

Now, you’ll see the Share Sheet and the Markup and Reply icons at the bottom of the screen. Use these buttons to make your changes and share the file if you want. When you’re finished, tap “Done” at the top of the screen. You are returned to the email reply where you can send your message with the marked up PDF file attachment.

How to Mark Up an Image Attachment in iOS Mail
Marking up an image attachment is similar to marking up a PDF file. An image file generally displays in the body of the email. To mark up an image file attachment, tap and hold on the image in the email message.

On the share sheet, tap “Markup and Reply”.

To add your signature, tap the signature button at the bottom of the screen.

Because we already added a signature to another attachment, that signature is available to be added to this attachment. If you want to use the same signature again, tap on it. Otherwise, tap on “Add or Remove Signature” to create a new signature.

If you tapped Add or Remove Signature, the Signatures screen displays. Tap the plus icon to add a new signature. To delete an existing signature, tap the red minus icon on the left and then tap “Delete” on the right. When you’re finished, tap “Done”.

You can resize and move the signature on an image attachment just like you can on a PDF attachment.

One difference between marking up an image file and marking up a PDF file is how you add text to the image. You can’t just tap on the document to add a text box. You’ll end up with a mark in the color selected at the bottom. To add a text box, tap the text box icon at the bottom of the screen. A text box is added in the middle of the document. Move it to approximately where you want it. You may have to move it again once you type your text.

To add your text to the text box, tap once on it and then tap “Edit” on the popup. Type your text and the adjust the location of the text box if needed. Add the date or any other text the same way.

If you want to call attention to a specific area of your document, you can magnify part of it. To do this, tap the magnifier tool at the bottom of the screen.

A circular magnifier is added to the document. Move the circle over the part of the document you want to magnify. Drag the blue dot on the circle border to change the size of the circular magnifier and drag the green dot to change the level of magnification.

If you make a mistake or change your mind about any markup on your document, simply tap on the drawing, signature, or text and tap "Delete" on the popup that displays. You can also duplicate items using this popup.

Once you’ve added all your markups, tap “Done”.

An email reply is automatically created and the image file is attached to it. Tap “Send” to send the email.

When you send an email with an image attachment, Mail gives you the choice of changing the size of the file. This is useful if you’re sending a really large image. You don’t have to use another app to reduce its size first. Tap “Small”, “Medium”, or “Large” to reduce the size, or tap “Actual Size” to send the image as is.

The email is sent. When the recipient views the email in iOS Mail, they’ll see the marked up image directly in the message. If they open the message in another email app or on an email program on a PC, the marked up file may be only visible as an attached file that can be downloaded or opened.

The markup feature in iOS Mail makes the app even more useful, now that you don’t have to use your Mac to mark up email attachments.