Quick Links
NVIDIA's ShadowPlay, now known as NVIDIA Share, offers easy gameplay recording, live streaming, and even an FPS counter overlay. It can automatically record gameplay in the background--just on the PlayStation 4 and Xbox One--or only record gameplay when you tell it to.
If you have a PC with modern NVIDIA graphics hardware, there's a good chance you have access to this feature. It's similar to Windows 10's Game DVR, but has more features--and it works on Windows 7, too.
Yes, ShadowPlay Impacts Game Performance
Before we start, however, we should note: Recording with ShadowPlay will decrease your game performance by a bit. NVIDIA notes that a performance penalty of 5% is typical, while it could be 10% in more demanding games.
If you have a fast enough PC, this shouldn't necessarily matter. All gameplay recording solutions take system resources, including Windows 10's Game DVR feature. But you may want to disable ShadowPlay when you're not using it.
Update: How to Record GamePlay With NVIDIA Share
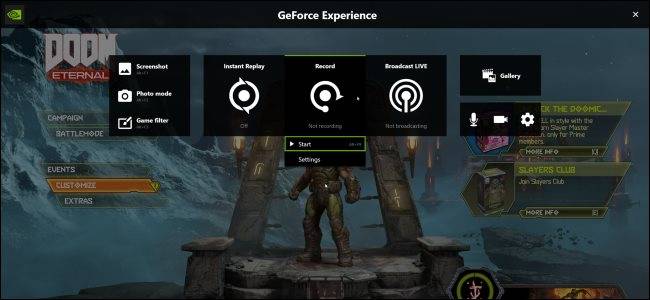
NVIDIA has rebranded "ShadowPlay" as "NVIDIA Share" and changed how the interface looks. You can control NVIDIA Share (ShadowPlay) from the NVIDIA GeForce Experience overlay. To open the overlay, press Alt+Z.

If you don't see anything, open the "GeForce Experience" application from your Start menu. Click the green "Share" button to the left of the settings button on the toolbar to open the overlay.
If this application isn't yet installed, download and install the GeForce Experience application from NVIDIA. In addition to ShadowPlay, this application also offers NVIDIA graphics driver updates, one-click game settings optimization, and game streaming from your PC--all rather useful features.

To activate Instant Replay mode, where ShadowPlay will automatically record all your gameplay in the background, click the "Instant Replay" icon and click "Turn On."
With Instant Replay mode enabled, you can press Alt+F10 to save the last five minutes of gameplay to a file. If you don't manually save, NVIDIA Share will automatically discard the recorded gameplay.

To start recording right now, click the "Record" button and click "Start" or press Alt+F9. NVIDIA ShadowPlay will record until you stop.
To stop recording, press Alt+F9 again or open the overlay, click the "Record" button, and click "Stop and Save."
To choose whether or not a video from your webcam or audio from your microphone is included in the recording, click the microphone and camera buttons on the right side of the overlay.

To customize your ShadowPlay settings, click the "Instant Replay" or "Record" buttons in the overlay and select "Settings." You can choose quality, length, FPS, bitrate, and resolution options.
To change the keyboard shortcuts the overlay uses---from the Alt+Z shortcut that opens it to the Alt+F9 and Alt+F10 shortcuts for recording---click the "Settings" icon at the right side of the overlay and select "Keyboard Shortcuts."
Other settings are also available in the settings menu. For example, you can click Settings > HUD Layout to choose where (or whether) your webcam or an FPS counter is displayed on the screen.

Your recordings will appear in a game-specific folder inside your user account's Videos folder by default. For example, if you're recording your desktop, you'll find the recordings at C:\Users\NAME\Videos\Desktop.
To choose a different folder, click Settings > Recordings in the overlay and change the "Videos" directory.

Check if Your PC Supports ShadowPlay
Update: We've updated this article with new information about how ShadowPlay (now known as NVIDIA Share) works in 2020. Consult the instructions above to learn how it works on the latest versions of NVIDIA's software. We're leaving the original instructions for older versions of ShadowPlay here for historical reference.
You can check NVIDIA's website to see a list of NVIDIA graphics hardware that supports ShadowPlay. However, if you have NVIDIA hardware, you can just check on your PC too.
To do so, open the "GeForce Experience" application from your Start menu. If it isn't yet installed, download and install the GeForce Experience application from NVIDIA. In addition to ShadowPlay, this application also offers NVIDIA graphics driver updates, one-click game settings optimization, and game streaming from your PC--all rather useful features.
Under the "My Rig" tab in the application, click the "ShadowPlay" tab and check if your PC meets the system requirements. If it does, ShadowPlay will be "Ready." If it doesn't, the application will tell you why.

How to Record or Stream Gameplay With ShadowPlay
By default, ShadowPlay is off and not doing anything in the background. To enable it, you'll need to launch the NVIDIA GeForce Experience application and click the "ShadowPlay" button at the top right corner of the window.

Click the switch at the left of the ShadowPlay window to flip it to on. A green light will appear, indicating NVIDIA ShadowPlay is enabled.

By default, ShadowPlay uses "Shadow & Manual" mode. Shadow Mode will automatically record your gameplay and keep the last five minutes. When you press the Alt+F10 keyboard shortcut, ShadowPlay will save a clip of the last five minutes of gameplay to your Videos folder.
With Manual mode, you can press the Alt+F9 keyboard shortcut to start manually recording a clip, then press Alt+F9 to stop the clip when you're done recording. ShadowPlay also allows you to press Alt+F12 to view a live FPS counter in any game, even if you aren't recording.
You can tweak these settings after enabling ShadowPlay (as described later in this guide), but if they look fine to you, you can start recording now. Just launch a game and use the above hotkeys to record gameplay and show the FPS counter.

Recordings will appear in a game-specific subfolder of your Videos folder by default.

How to Record OpenGL Games (and Your Entire Windows Desktop)
Not every game will work with NVIDIA ShadowPlay by default. ShadowPlay only directly supports with games that use Direct3D, and not OpenGL. While most games do use Direct3D, there are a few that use OpenGL instead. For example, DOOM, which we used as an example above, uses OpenGL, as does Minecraft.
To record OpenGL games that don't work with ShadowPlay, head to NVIDIA GeForce Experience > Preferences > ShadowPlay and activate the "Allow Desktop Capture" option. ShadowPlay will now be able to record your Windows desktop, including any OpenGL games running in a window on your desktop.
Automatic background "Shadow" recording and the FPS counter don't work in this mode. However, you can still start and stop manual recordings using the hotkeys.

How to Configure NVIDIA ShadowPlay
To change ShadowPlay's settings, just click the icons at the bottom of the ShadowPlay window. You can select "Shadow" mode to only use the last-five-minutes method for recording or "Manual" to only record gameplay manually. You can also select the "Twitch" option here to use NVIDIA ShadowPlay to live broadcast your gameplay to Twitch rather than saving it to your hard drive.
The "Shadow time" option allows you to choose how much gameplay ShadowPlay saves in its buffer. You can choose any time between 1 and 20 minutes. Bear in mind that a longer time requires more hard disk space. How much more disk space depends on the quality level you choose.
The "Quality" option allows you to configure the quality of your recording. By default, it's set to High, and will record the video at in-game resolution, 60 frames per second, 50 Mbps quality, and as H.264 video. You can select the Low or Medium profiles, or pick Custom and change the individual settings manually.
The "Audio" option allows you to choose which audio tracks are included with your recorded video. By default, the recording will include will include all in-game audio. You can also select "In-game and microphone", allowing you to speak into your microphone and have that inserted into the recording, or select "Off" to disable all audio recording.

Below the switch on the left, the two buttons open your recording folder (your user account's "Videos" folder by default) and the ShadowPlay preferences window. This window can also be accessed from Preferences > ShadowPlay within the GeForce Experience application.
The preferences screen allows you to choose overlays--you can overlay your webcam, status indicator, or an FPS counter and choose where the appear. You can also choose between "Always On" and "Push-to-talk" for your microphone, if you opt to include your
The hotkeys for recording, broadcasting, toggling your camera, and activating push-to-talk on your microphone are configurable from here. You can also select a different save location for your video recordings, if you don't want them dumped in your normal Videos folder.

AMD doesn't have its own ShadowPlay-like feature, so you'll need a third-party game-recording application to do this with AMD graphics hardware.