Even in these times of fast internet connections, huge hard drives, and loads of free cloud storage, file size sometimes matters. You might have a limit to the size of files you can send or receive via email, or you might be running low on thumb drive space. Whatever the reason, if you have Office documents that include images, you might be able to significantly reduce the size of those files.
Office already works behind the scenes to help keep files sizes small. The newer DOCX file type essentially acts as a ZIP file, compressing the contents of the file. Pictures and text that appear more than once in a document are only stored once in the actual file. So, at least in more recent versions of Office apps, you'll find that large file sizes are usually a result of having lots of different pictures in your documents.
The good news is that Office apps also offer some handy tools for keeping those image sizes in check. In this article, we're using Office 2016 (more specifically, Word 2016) as our example. But you'll find the same tools we discuss in other Office apps, like Excel and PowerPoint, and in previous versions of Office going back to at least Office 2010.
Compress Pictures in Your Office Document
The first step you should take in trying to reduce the file size of a document with pictures is to compress those pictures. Each Office app offers a handy tool for doing just that. We're using Word here (and that's what we'll refer to in the following steps), but you'll find the features in the same place in other Office apps.
In your document, click any picture to select it. Click the Format menu that appears on the Office toolbar when you select a picture.

On the Format menu, click the Compress Pictures button.

In the Compress Pictures window, click "Apply only to this picture" if you want to compress only the picture you selected. When this option is not checked, your actions will apply to all pictures in the document. Select "Delete cropped areas of pictures" if you have cropped pictures in your document and want to remove the areas you've cropped out. Just note that if you select this option, you will not be able to undo the cropping later unless you reinsert the original picture. You can also choose a resolution to which to compress pictures. Choose the lowest resolution that will cover your needs. Click OK when you're done.

Depending on the number of pictures in your document, Word may take a few moments to compress them all. When it's finished, save your document and check the new file size. If you're not sure you want to stick with the changes, you can always save your document as a new file and then compare file sizes with the original version.
Remove Editing Information from Pictures
Office apps offer all kinds of great picture editing tools built right in. When you use them, Word retains the original picture and keeps track of the edits you've made so that you can undo them or return to the original picture should you need to. If you're happy with the way you've formatted your images, all that saved editing information just increases the size of your file. If compressing the pictures in your document didn't get your file size down far enough, you can also have Word delete the saved formatting information. Again, you might want to save the document as a new file before you get started so that you can revert to the original if necessary.
With your document open, click the File menu.

On the File menu, click Options.

In the Word Options window, from the selections on the left, click Advanced.

In the Advanced Word Options window, scroll down to the "Image Size and Quality" section on the right. Select the "Discard editing data" option to have Word discard the formatting information when saving the file. The other options in this section allow you to safeguard the document against having images compressed and select a default resolution for when images are compressed (although you can always select a new resolution when you do the compressing).

When you've done that, save your file (or save as a new file) and then check out the new file size. It will likely have gone down a good bit.
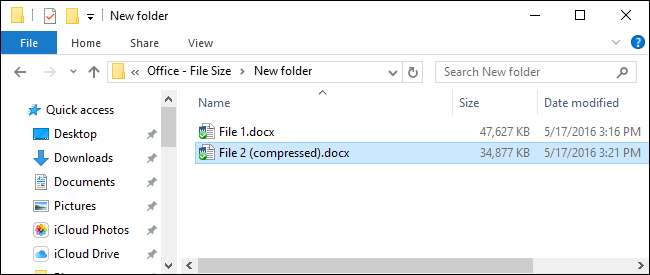
In our example, we've taken a Word file ("File 1.docx" in the following image) that contains about 20 good quality images and weighed in at nearly 48 MB in size. Many of those images were cropped, some were resized, and several were edited in other ways. After compressing the images and removing the saved formatting information, the new file ("File 2 (compressed).docx" in the following image) is now just under 35 MB, a roughly 27% reduction in file size. And to illustrate built in compression in the DOCX format, we also zipped that file. As you can see, the difference in size between the zipped and unzipped files is negligible.

And that's it! Images are big and they can rapidly increase the size of your Office documents. But by using the built in compression tools in Office apps and removing old editing information, you can significantly decrease the size of Office documents that contain images without much effort.