Quick Links
Nexus OTA updates are a bit of an enigma—they come straight from Google, but they also depend on carrier approval before they can be sent to devices on certain networks. Getting the latest OTA update meant either waiting a few weeks, or manually flashing a full factory image, which can be a bit janky. Now, however, the process is more streamlined, so you can flash the latest update with one command, no waiting necessary.
While the old factory image method was simple in theory, it wasn't always very reliable--sometimes Google's script wouldn't work, so you'd have to flash a bunch of files manually from the Command Prompt. Furthermore, it required an unlocked bootloader, which the new method does not.
This new method uses the adb sideload command to flash the latest update in one fell swoop. If you haven't used this command before, it can be a bit daunting at first—but it's actually pretty easy. And, on top of that, it's faster than waiting for the OTA to hit your device. It's a win-win.
Step One: Get Your Computer and Device Ready
Before you get started with this, you’ll need to have ADB and fastboot set up on your computer. For ease of use, you'll also need to have ADB set up in your Windows System PATH. Once you’ve got that all set up, you’re ready to push some OTAs to your Nexus device. Sweet.
Next, if you haven’t already, you’ll need to access your phone’s Developer Options menu and enable USB debugging. Again, this is simple, and once it’s done, you won’t have to do it again (unless you factory reset the device).

With all the prep stuff out of the way, head over to Google’s OTA files page. There’s a legal agreement you have to accept before you can access the files, but it’s just the typical mumbo jumbo: these files are provided by Google, you agree to the terms, blah blah blah. Once you agree, the downloads will show up.

Since this feature just launched, only the most recent OTA files are available for each device. I’m going to use the latest security patch update on my Nexus 6P for this tutorial—that’s build MTC19T for those following along at home.
Once you have access to the downloads, go ahead and find the build for your device. Click the “Link” link to start the download. These are full OTA packages, so they’re still just a big as a Factory Image—the one for my 6P is a whopping 910MB.

With the file downloaded and ADB installed, you’re ready to get started.
Step Two: Connect Your Device and Reboot into Recovery
Go ahead and connect the device to your computer. The first time you do this, you’ll have to approve USB debugging on this PC—if this is your personal computer (which I hope it is, since you just installed a bunch of stuff on it), then tick the “Always allow from this computer” box.

Next, navigate to the folder where you saved that OTA file. Shift+right click in the folder, making sure that no files are selected first. Select “Open command window here.” Unsurprisingly, a command window will open.

In the command window, make sure the computer can see the device with the following command:
adb devices

If it’s properly connected, you’ll see an alphanumeric identifier and the word “device.” You’re ready to go.
Use this command to reboot the device into recovery:
adb reboot recovery

Your device should begin rebooting.
Step Three: Sideload the OTA Update
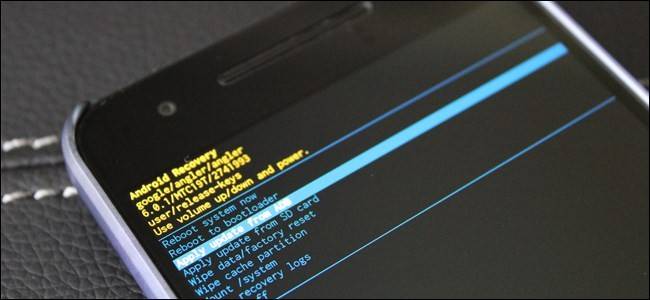
The device will reboot into a screen with a little Android guy and a red exclamation mark. Press the Volume Up button while holding the Power button to expose the hidden recovery menu.

Once the menu shows up, use the Volume Down button to navigate to the “Apply update from ADB” option, then press the Power button. This will get the device ready to accept the OTA file.

Back on the computer, type the following:
adb sideload <ota zip updatefile.zip>
...where updatefile.zip is the file name of your OTA.

Once properly executed, the file will begin pushing to the device. A completion percentage will show up in the command prompt, giving you some sort of idea when it will be finished. It’ll take a bit, so go grab a coffee.
When it's finished, the recovery menu will show up again on your phone, with the “Reboot system now” option already highlighted. Hit the Power button to commence reboot.
You can go ahead and unplug the phone from the computer while it’s rebooting. It’ll likely take a bit to boot fully, because Android has to “Optimize apps” after an update. This can take a while, depending on how many apps you have installed. (Thankfully, starting with Android N, optimization times will be dramatically improved.)
And that’s it—you’re finished. Congrats.
While adb sideload isn’t necessarily new, this is one of the first real, everyday uses for it—especially for non-rooted users. It’s an easier way to manually flash OTA files, especially since you don’t have to go through all the trouble of flashing a new bootloader, recovery, radios, or system files—one command, and that’s it. I like autopilot.