Quick Links
When you click Send on an email, it is typically sent immediately. But what if you want to send it at a later time? Outlook allows you delay the sending of a single message or all email messages.
For example, maybe you’re sending someone an email message late at night and they are in a time zone that’s 3 hours ahead of you. You don’t want to wake them up in the middle of the night with an email notification on their phone. Instead, schedule the email to be sent the next day at a time when you know they will be ready to receive the email.
Outlook also allows you to delay all emails by a certain amount of time before sending them. We’ll show you how to delay sending a single message and how to create a rule to delay the delivery of all messages.
How to Delay the Delivery of a Single Email Message
To delay sending a single email message, create a new message, enter the email address of the recipient(s), but don’t click “Send”. Instead, click the “Options” tab on the Message window.

In the More Options section, click “Delay Delivery”.

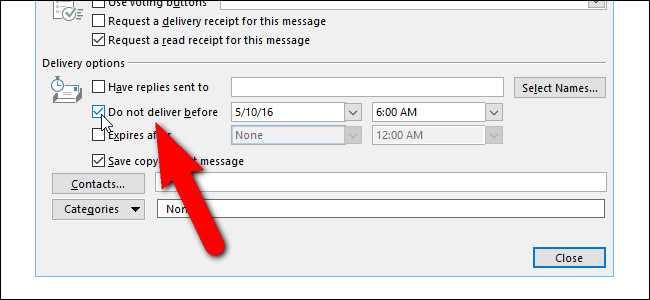
In the Delivery options section on the Properties dialog box, click the “Do not deliver before” check box so there is a check mark in the box. Then, click the down arrow on the date box and select a date from the popup calendar.

Click the down arrow on the time box and select a time from the drop-down list.

Then, click “Close”. Your email message will be sent on the date and at the time you chose.
NOTE: If you are using a POP3 or IMAP account, you must leave Outlook open until the message is sent. To determine the type of account you are using, see the last section in this article.

How to Delay Sending All Email Messages Using a Rule
You can delay sending all email messages by a certain number of minutes (up to 120) using a rule. To create this rule, click the “File” tab on the main Outlook window (not the Message window). You can save your message as a draft and either close the Message window or leave it open and click on the main window to activate it.

On the backstage screen, click “Manage Rules & Alerts”.

The Rules and Alerts dialog box displays. Make sure the E-mail Rules tab is active and click “New Rule”.

The Rules Wizard dialog box displays. In the Step 1: Select a template section, under Start from a blank rule, select “Apply rule on messages I send”. The rule displays under Step 2. Click “Next”.

If there are any conditions you want to apply, select them in the Step 1: Select conditions list box. If you want to apply this rule to all email messages, click “Next” without selecting any conditions.

If you clicked “Next” without selecting any conditions, a confirmation dialog box displays asking if you want to apply the rule to every message you send. Click “Yes”.

In the Step 1: Select actions list, select the “defer delivery by a number of minutes” check box. The action is added to the Step 2 box. To define how many minutes to delay sending all email messages, click the “a number of” link under Step 2.

On the Deferred Delivery dialog box, enter the number of minutes to delay delivery of email messages in the edit box, or use the up and down arrow buttons to select an amount. Click “OK”.

The “a number of” link is replaced with the number of minutes you entered. To change the number of minutes again, click the number link. When you’re satisfied with the rule settings, click “Next”.

If there are any exceptions to the rule, select them in the Step 1: Select exception(s) list box. We’re not going to apply any exceptions, so we click “Next” without selecting anything.

On the final rule setup screen, enter a name for this rule in the “Step 1: Specify a name for this rule” edit box, then click “Finish”.

The new rule is added to the list on the E-mail Rules tab. Click “OK”.
All emails you send will now stay in the Outbox for the number of minutes you specified in the rule and then will be sent automatically.
NOTE: As with delaying a single message, IMAP and POP3 messages will not be sent at the specified time unless Outlook is open.

How to Determine What Type of Email Account You Are Using
If you want to find out what type of account you are using, click the “File” tab on the main Outlook window, then click “Account Settings” and select “Account Settings” from the drop-down menu.

The E-mail tab on the Account Settings dialog box lists all the accounts you’re added to Outlook and the type of each account.

You can also use an add-in to schedule or delay email messages, such as SendLater. There is a free version and a pro version. The free version is limited, but it does provide a feature not available in the built-in methods in Outlook. The free version of SendLater will send IMAP and POP3 emails at the specified time even if Outlook is not open.