Quick Links
Microsoft has confirmed that Windows 10's free upgrade offer will expire on July 29, 2016. After that, you'll have to pay $119 to upgrade on any computer that hasn't already made the leap. But with a few simple steps, you can "reserve" that free copy now, so you can upgrade after July 29 without paying.
We know not everyone wants to upgrade to Windows 10 right now, and that's fine. But one day, you'll probably have to. And you don't want to have to pay $119 for it. By upgrading a computer now and then rolling back to Windows 7 or 8, you'll get to keep your original version of Windows, but "reserve" that free Windows 10 license for all your PCs.
How This Works
When you upgrade to Windows 10 from a PC running a genuine and activated Windows 7 or Windows 8.1 operating system, your PC receives a "digital entitlement." Basically, Microsoft notes on its servers that your particular PC's hardware is eligible for Windows 10 going forward.
Once your PC is eligible, it's always eligible--you can reinstall Windows 10 from scratch and it'll automatically activate, without you even entering a product key. You can even install a different operating system--like Windows 7 or Linux--and reinstall Windows 10 later, fully activated and genuine.
Note that this is tied to your computer's specific hardware, not your Microsoft account. The free Windows 10 license you receive will only work on that PC--if you upgrade the motherboard or try to install Windows 10 on another PC that doesn't have the digital entitlement, it won't work.
So, in order to "reserve" Windows 10, we're going to walk you through the steps of upgrading to Windows 10 on your machine, then reverting to Windows 7 or 8. You get to keep the version of Windows you love, but your PC will be entitled to Windows 10 at any point in the future, without having to pay $119.
We'll walk you through two methods: A simple method that involves upgrading and rolling back, and a slightly more complex method that involves cloning your current disk, so everything is exactly how you left it.
The Easy (But Imperfect) Method: Upgrade and Roll Back
The easiest way to do this is use the "roll back" feature to uninstall Windows 10 and get your old Windows 7 or Windows 8.1 system back. However, this may not always work perfectly. Some programs may be removed during the upgrade and you may have to reinstall them afterwards, for example. If you want to be extra sure everything stays exactly as you left it, head to the next section for the slightly more complicated option.
However, if you'd like to live dangerously (and don't want to waste much time), the upgrade and roll back method is simple. First, download the Windows 10 upgrade tool, run it, and agree to upgrade your PC to Windows 10.

After Windows 10 is installed, click the "Start" button and select "Settings." Navigate to Update & Security > Activation. Ensure it says "Windows 10 on this device is activated with a digital entitlement." If it does, your PC is registered with Microsoft and you can install Windows 10 on it whenever you like. You may need to wait a while for Windows to contact the activation servers.

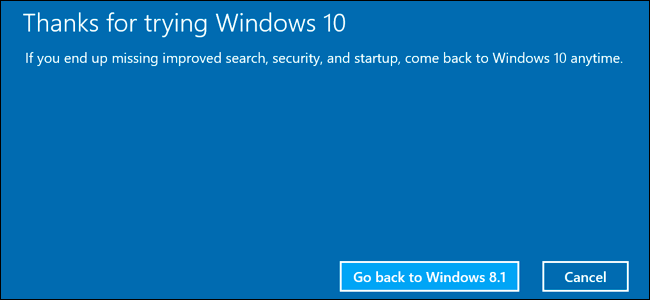
Once your activation looks good, go to the Recovery tab and click the "Get started" button under "Go back to Windows 7" or "Go back to Windows 8.1."

Windows 10 will automatically uninstall itself and restore your old Windows system to your hard drive. Congratulations! You're now back to Windows 7 or 8, but are eligible to upgrade to Windows 10 for free, even after the July cutoff date.
The Complicated (But More Exact) Method: Image and Restore Your System Drive
For maximum safety, you'll want to create an image your Windows 7 or 8.1 system drive before upgrading. Then, after upgrading, you can restore that cloned image to your computer, ensuring you'll get your system in the exact state it was in before.
You'll need an extra hard drive to accomplish this, at least as big as the one in your computer. (Alternatively, you can use several discs, but that could take a very long time.)
You'll also need a third-party tool to image your drive. We recommend Macrium Reflect for this. So download and install the free version on this page and launch it. You'll be prompted to create rescue media, which you can use to restore your backup image later. If you aren't, click Other Tasks > Create Rescue Media. Go through the wizard, selecting the default options and then choosing the device you want to use for your boot media. You can either create a bootable USB stick or burn this rescue media to a disc.

Next, in the main Macrium Reflect window, click the "Create an image of the partition(s) required to backup and restore Windows" option in the sidebar. On the Disk Image window that pops up, make sure the entire disk is checked under "Source"--you don't want to miss any of those partitions. Under Destination, choose your spare hard drive as the "Folder".

Click "Next" to go through the wizard, ignoring all the advanced settings about templates and scheduling. Click "Finish" at the end of the wizard and then wait for Macrium Reflect to image your drive.
If you run into any bumps during the process, check out our full guide to creating an image backup of Windows for more detailed instructions.
When Macrium Reflect is done cloning your drive, download and run the Windows 10 upgrade tool. Allow it to upgrade your PC to Windows 10. This may take a while, so give it time.
Once the upgrade finishes, your computer should, in theory, be permanently eligible for Windows 10.
To make sure, click the "Start" button in Windows 10 and select "Settings." Navigate to Update & Security > Activation. Ensure it says "Windows 10 on this device is activated with a digital entitlement." If it does, your PC is registered with Microsoft and you can install Windows 10 on it whenever you like. You may need to wait a while for Windows to contact the activation servers.
All good? Good. Now it's time to roll back to your old setup.
Boot your computer from that Macrium Reflect recovery drive we created during the initial setup. You can do this by entering the boot menu when your computer starts, or changing your computer's boot drive order.
Once in the recovery tool, connect the external drive you backed up to. Select the "Restore" tab and use the "Browse for an image file" option to select the image you created earlier. Click "Restore Image" to restore the cloned image back to your computer.

Now, carefully select the system drive you imaged earlier--the original one you had Windows installed on. If your computer has multiple disks, be sure you're restoring the image back to the same drive you originally cloned. If you don't, you could lose data!
Use the "Copy selected partitions" option to copy the partitions from your image back to the disk. Finally, click "Next" and finish going through the wizard. Macrium Reflect will restore your image, overwriting Windows 10 with your original Windows installation.

The Clean Slate Option: Upgrade to Windows 10, then Reinstall 7 or 8
If you don't mind reinstalling Windows fresh and losing everything on your computer, you can always upgrade to Windows 10, then do a fresh install of Windows 7 or 8 afterward. Be sure you have backups of your important files before doing this!
Just download and run the Windows 10 upgrade tool and let it upgrade your PC. After you're done, download Windows 7 or 8.1 installation media from Microsoft's website, place it on a USB flash drive or DVD, and boot from it. Go through the normal process of reinstalling Windows and wipe your hard drive, replacing Windows 10 with the older version of Windows.

You'll need a valid Windows product key for this. The Windows product key that came with your computer should usually work, but Microsoft doesn't guarantee that "OEM" or "Original Equipment Manufacturer" keys can always be used to reinstall Windows. (If you run into errors, try activating it with Microsoft over the phone--that often works.)
When you want to use Windows 10 in the future, just download the Windows 10 installer files from Microsoft and create a bootable USB drive or burn a DVD. You can then install Windows 10 from scratch and it'll activate automatically thanks to that digital entitlement.