Your Nest Thermostat can learn your preferences over time and automatically adjust the temperature accordingly. But if you'd rather program specific temperatures for specific times, here's how to set a schedule on your Nest.
Of course, a feature like this can be found on any programmable thermostat, but the Nest makes it rather quick and easy to set a schedule and do it right from your smartphone within the Nest app, but you can also do it right on the thermostat itself. Here's how to do it both ways.
In the Nest App
Start by opening the Nest app and tapping on your Nest Thermostat on the main screen.

Tap on "Schedule" at the bottom.

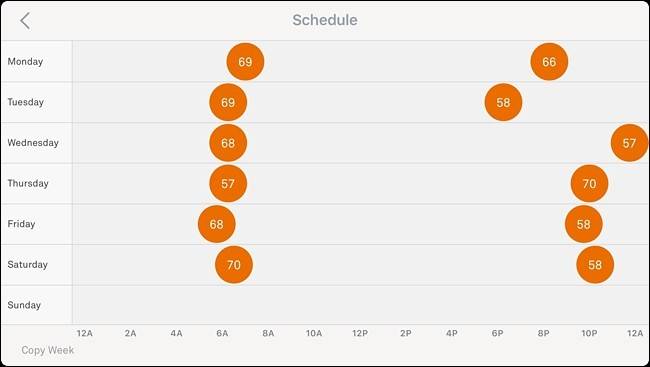
This will bring up a blank spreadsheet of sorts, which looks similar to what you'd find in any calendar app. Tap on a day of the week. We'll start with "Monday".

Tap "Add" in the bottom-right corner of the screen.

This will make a grid appear. Next, tap anywhere on the vertical axis above the time that you want to set to a specific temperature. So if you want it to be 72 degrees at 6 AM, tap anywhere right above "6A".

When you tap, a dot will appear with a temperature and a time below that.

To adjust the temperature to 72 degrees, tap and hold on the dot, and then drag it up until it reads "72".

Next, to adjust the time, tap and hold on the dot and drag it from left to right to set the specific time that you want to set it to. Times can be set on the hour or at 15-minute intervals, like 6:00, 6:15, 6:30, etc.

Once that's finished, you're done setting that specific temperature and time setting. If you want to add more, just repeat that same process.

You scan swipe your finger to the left to scroll into the next day and set that day's temperature/time preferences, so if you want it to be 72 degrees at 6AM every day, you'll need to repeat the above steps six times to finish out the week, but you can create custom settings for each individual day if you want.
To remove an entry, simply tap on "Remove" in the bottom-right corner and then tap on an entry to delete it.

To change an existing entry, tap and hold on it and adjust it accordingly by sliding it up or down and left or right.
On the Nest Thermostat
You can also set and adjust a schedule right from the Nest Thermostat itself using the scroll wheel and the display.
Start by clicking on the unit to bring up the main menu.

Use the silver scroll wheel to navigate to "Schedule" and click on it.

When you get to the Schedule screen, click on the unit to begin setting a scheduled temperature for your Nest Thermostat and select "New".

Use the wheel to scroll to the time of the day that you want and click on the unit to select it.

Next, turn the wheel to select the specific temperature that you want it set to at that time. Click on the unit to select it.

From there, that entry will be saved and you can continue to make more entries.

To change an existing entry, scroll over to it until you hover over it and click down. From there, select "Change" and make any adjustments. You can also select "Remove" to delete the entry.

That's all it takes to set a schedule for your Nest Thermostat, and it's certainly a lot easier to do than on most non-smart programmable thermostats for sure.