If you’re a salesperson, a marketing specialist, or anyone else who collects a lot of business cards, you'd probably like a better way to store all those cards. Well, it’s time to go paperless and use your iPhone to turn those cards into contacts.
There’s a app called CamCard Free in the App Store that allows you to scan your business cards directly into the contacts on your iPhone. It scans each card and stores the relevant information in a new contact. I’ll use my own How-To Geek business card to show you how to use CamCard to reduce the amount of paper clutter you have to drag around with you.
Install CamCard Free from the App Store and then tap the “CamCard” app icon on your Home screen to open the app.
The first time you open the app, a helpful message points at the camera button at the bottom of the screen, prompting you to take photos of your business cards. Before taking a picture of a business card, make sure it's sitting on a surface that provides good contrast from the main color of the card. Then, tap the camera icon.
CamCard activates your phone’s camera. Move your phone around a bit to center the business card on the screen. When the image is in focus and the app finds the edges of the card, the picture is automatically taken.

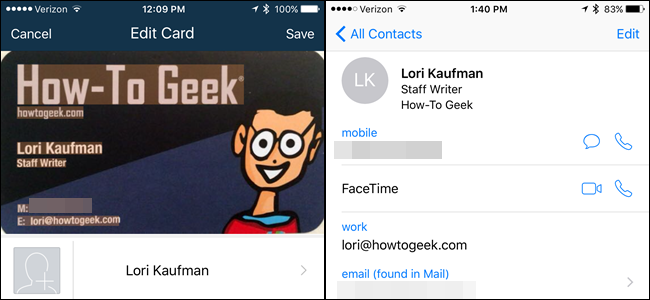
The Edit Card screen displays with the recognition results. CamCard does a fairly good job of reading the information from the card, but it’s not perfect. The app didn’t get our company name right, so we'll fix that. To edit any of the information gathered from the card, tap on the field you want to change…

…and enter the correct information.

You can specify into which accounts the information from the business card is saved. Currently selected accounts are listed under Card saved to. To add or remove any accounts, tap “Card Saved To”.

Select or deselect accounts on the Card saved to screen, depending on your preference, by tapping the circles on the right. Circles with check marks and filled with green indicate accounts to which the business card information will be saved. If you want these to be the default choices every time you save a business card’s information to your contacts list, tap the “Auto save to selected accounts” slider button at the bottom of the screen. Then, tap “Confirm”.

When you’re finished editing the information and choosing where to save it, tap “Save” at the top of the screen. If the “Auto save to selected accounts” option (the slider button is NOT blue), the Card saved to screen displays so you can choose where to save the information and confirm your choices.

If the business card is two-sided, you can store an image of the back of the card as well. To do this, tap the business card in the list on the CardHolder screen.

The first time you access the information screen in CamCard, a helpful message tells you to pull down to view the card image. So, swipe down from the top of the screen.

The front of the business card displays with two lines under it. Currently, the left one is blue indicating the front of the card is displayed. Either tap the gray bar on the right or swipe left on the business card image.

Tap “Add Backside”.

If you already have a picture of the back of the business card on your iPhone, tap “Choose Existing Photo” and select the photo from the Photos app. Otherwise, tap “Take Photo” and line up the back of the business card in the camera lens until the photo is automatically taken.

The back of the business card displays in the right spot and the right bar below the photo is blue. To go back to the list of scanned business cards, tap the back arrow as shown in the image below.
Once you have multiple business cards scanned into CamCard, there are some sorting options available and an option for selecting multiple cards on which you can perform various actions. To access these options, tap the settings button in the upper-right corner of the screen.

You can choose to sort the cards by date, name, or company name (default). To select multiple cards, tap “Select”. You are returned to the list of cards, where you can select cards to share through email, send an email or text to, or export as a vCard or to Excel. You can also delete multiple cards at once.
Tap the “X” in the upper-right corner of the screen to close the menu without making a selection.

To access additional options, tap the menu button in the upper-left corner of the screen.

You can find nearby contacts, add a card manually, import your contacts, create a signature for emails you send through CamCard, and manage groups. Tap the menu button again to close the menu without selecting anything.

To edit the card, tap the card in the list.
Tap the menu button in the upper-right corner of the screen.

Tap “Edit” on the popup menu. You can also share the card from this menu, as well as save the card or delete it.

Once you’ve scanned in your business cards and saved them to your phone’s contacts list, you can view and edit them there and email, call, or text them from there as well.

Sign up for a free account with CamCard to be able to manage your scanned business cards in a web browser on your PC or Mac. You can also merge duplicate contacts from the web interface.

The free version of CamCard limits the number of cards that you can recognize; while the full version does not have any limit. If you know you’re going to have a lot of business cards to scan, you might want to upgrade to the full version which is currently $.99 as of the time this article was published.