Quick Links
Do you have a pile of remotes on your coffee table for each of the items in your home theater? Tired of universal remotes that don't have enough buttons? Here's how to solve all your remote control woes with a single Logitech Harmony remote.
Logitech's Harmony line is designed to take the hassle out of controlling your home theater (and, on certain higher-end remotes, your smarthome devices, too). While it doesn't really eliminate the hassle entirely--since Logitech's setup software is a little awful--it does give you far more control over the movies, music, and other devices in your living room. Here, we'll show you how to set up your Harmony remote to control everything at once.
NOTE: If you can, try to follow these instructions as closely as possible. While Logitech makes some great hardware, their software is not very good, and things can go wonky and get confusing very easily (especially when it comes to remotes with the Harmony Hub). The closer you follow these instructions to the letter, and in the proper order, the less chance you have of running into a problem.
First: Choose Your Remote Model
Logitech has a few different remotes available, and they're all ideal for different situations. Their current lineup consists of:
- The Harmony 350 ($40, $37 on Amazon): This is Logitech's most basic remote, offering control of eight devices through four buttons (one set with short presses, one set with long presses). It works like most universal remotes do, but offers the advantage of programmable buttons. It has one macro for "Watch TV" that will turn on multiple devices at once, but other than that, it doesn't offer any other advanced functionality.
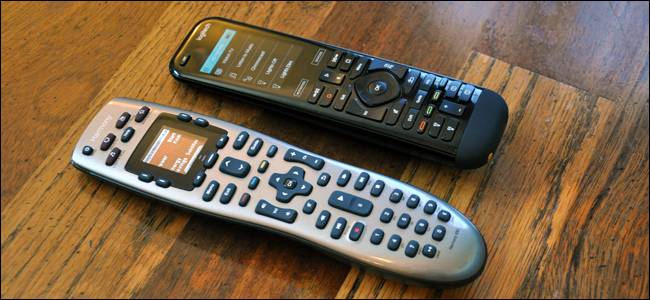
- The Harmony 650 ($80, $52 on Amazon): This is my personal favorite of the bunch--it offers a great balance between functionality and price. It can control up to eight devices, you can create different "macros" that turn on multiple devices at once, and it has a screen for any functions that aren't available as remote buttons. That means you can re-create just about any device's remote with the Harmony 650, and press fewer buttons to turn them on...all for about $50. Never root through that drawer full of remotes again.
- The Harmony Companion ($150, $125 on Amazon): The Harmony Companion foregoes the 650's on-screen buttons, but adds smarthome control with the inclusion of the Harmony Hub. This is Logitech's cheapest and most basic smarthome remote. Not only can you control your home theater, but you can dim your smart lights, turn on a smart outlet, or even operate your motorized blinds with the press of a button. The remote has four smart home buttons--any more devices than that, and you'll have to use the Harmony app on your phone or tablet that connects to the Hub.
- The Harmony Elite ($350, $312 on Amazon): The Harmony Elite is Logitech's top-of-the-line remote, with full custom control of your home theater and smarthome devices. The Elite can control up to 15 devices through programmable buttons, as well as a screen, so you can add any custom controls the buttons don't cover. That also means that unlike the Companion, you can control more smarthome devices than the four "Home" buttons allow for. Since it also comes with the Harmony Hub, you can use the Logitech app to control all your devices too, but the remote is advanced enough that you probably don't need to.
- The Harmony Ultimate One ($250): The Harmony Ultimate One is cheaper than the Elite, but we're listing it last because it occupies a very weird space between the Companion and the Elite. It's essentially the old version of the Elite, that Logitech still makes (for some reason). Its functionality is nearly the same as its successor (see above), but the touch screen is a little slower, and the play, pause, and rewind buttons are inexplicably above the touch screen. It costs $250 on Amazon when bundled with the Harmony Hub, which gives you smarthome control and use of the Harmony mobile app. However, you can buy it on its own for $190 and use it as a standard infrared remote--though I don't know why you would, when the Harmony 650 does the same for only $50.
Which remote you choose is up to you, but if you want control for smarthome devices, you'll definitely need one of the latter three. You can see Logitech's smarthome compatibility list here. The hub that comes with the latter three remotes works with quite a few devices, but the Harmony Home Hub Extender extends that support to many ZigBee and Z-Wave devices for $100.
If you only want home theater control, I recommend the Harmony 650--it's well worth the extra $15 over the Harmony 350. If you have smarthome devices, the Companion is okay, but the Ultimate One and Elite will be much more versatile thanks to their touch screens. You can probably save money by going with the Ultimate One, provided you can get over the weird button placement and less responsive touch screen.
For the purposes of this guide, we'll only walk through the initial setup of home theater devices--well cover smarthome devices in a separate guide very soon.
All About Activities, the Central Function of Harmony Remotes

Most cheaper universal remotes--like the one that probably came with your cable DVR, or the one you got for $20 at RadioShack--let you control multiple devices from the same remote by pressing a device button, then using the remote to control that device. But most can only control one device at a time.
Logitech's remotes are different. They let you control each device separately, if you want, but they expect you to primarily use multi-device "Activities". So, instead of turning on your TV, then pressing the DVD button to control the DVD player, you'd press "Watch a Movie" on your Logitech remote, which will turn on the TV, set it to the correct input, and turn on the DVD player. You can assign some buttons to the DVD player, and some to the TV for that Activity to fit your use case best. If you want to switch to another activity--say, "Listen to Music"--it'll re-adjust the buttons (and on-screen functions, if applicable) to music rather than movies.
If that sounds confusing, don't worry--you'll get the hang of it once you start setting up your remote. Suffice to say, if you've only used cheaper universal remotes up until now, try to forget your old instincts. It'll feel weird at first, but once set up, you'll have a fully-customized remote designed around what you're doing, not what devices you have.
NOTE: The Harmony 350 is the only exception here, since it only allows for one activity. For the most part, using the Harmony 350 is like using a normal remote--you'll press a device button like "DVD", then use the remote buttons to control the DVD player.
How to Set Up Your Initial Devices and Activities
Alright, at this point you're probably itching to get started. Here's how to set up your remote using Logitech's MyHarmony software.
Step One: Download and Install the MyHarmony Software
To start, head to Logitech's Download page and download the MyHarmony software for your platform--Windows Vista/7, Windows 8/10, or Mac OS X. Double-click the EXE to install the program, then launch the MyHarmony program when its finished.
You'll be prompted to sign in with your Logitech account. If you don't have one, create one now. (Don't worry, a Logitech account is quite handy--it backs up all your configurations, and if you ever buy a new remote, you can migrate customizations from a previous remote which is awfully handy.)

If you have a remote with a Harmony Hub, like the Harmony Elite or Ultimate One, you can also set up your remote using the Harmony app for iOS or Android. But frankly, we still think the MyHarmony desktop software--as flawed as it is--is easier and more powerful for basic home theater setup, so we'll be using it for this tutorial.
Step Two: Add a Remote
On the welcome screen, you'll a list of remotes connected to your account, along with an "Add a remote" button. If this is your first time signing in, you'll obviously just see the Add button. Click it to add a new remote.

When instructed, connect your remote to your computer with the included USB cable.

MyHarmony will walk you through some of the initial setup. If you have a previous Harmony remote, you'll be given the option to copy your settings, which--depending on the remotes you have--works decently well. For the purposes of this guide, we'll be doing a "New Setup".
Step Two Point Five: Add Your Harmony Hub
If you have a remote with a Harmony Hub, like the Harmony Elite or Ultimate One, you'll need to set up the hub during this process as well. (If you don't have a Harmony Hub, skip down to Step Three.)
First, pick a place for your Harmony Hub to sit. It will use infrared to communicate with most of your devices, but that doesn't mean it needs direct line of sight to them. Unbeknownst to many, infrared commands will bounce off walls and surrounding objects, so you can put the Harmony Hub under your TV or in your entertainment cabinet, and it'll probably work fine. If you're putting it behind a closed door--like in a closet or enclosed entertainment center--plug in one or both of the included infrared blasters and make sure one of them resides outside that enclosed space.
I found that I didn't need the blasters at all--just putting the hub on top of my receiver was enough for it to control my entire home theater.
Back in the MyHarmony software, you'll need to accept the license agreement, after which you'll be prompted to name your Harmony Hub. Click Next when you're done.

Next, MyHarmony will present you with a list of nearby Wi-Fi networks. Select the one you want to use to communicate with the Harmony Hub from the list, and click Next.
MyHarmony will search for and connect to your hub. If it doesn't find it, it will return to the "Name Your Hub" screen. I found that I had to go through this step on a laptop, connected to Wi-Fi, and sitting right next to my Harmony Hub in order for it to work properly.
Next, you'll be asked if you want to continue the process from your computer or use the Harmony mobile app. I recommend sticking with the desktop app for now. Again, the desktop software has its flaws, but it's still easier to use than the mobile app thanks to the mouse and keyboard. You'll need to use the mobile app to control a PC or smarthome devices on a higher-end remote, but those are instructions for another guide. Today, we'll just be adding your standard home theater devices.
MyHarmony will walk you through some of the initial setup. If you have a previous Harmony remote, you'll be given the option to copy your settings, which--depending on your remote models--works decently well. For the purposes of this guide, we'll be doing a "New Setup".
If your remote supports smarthome devices, they'll show up in a list now. You can select them to add them to your remote, or do it manually later. For now, we'll discuss adding home theater devices, and add smarthome devices at the end of this guide, so you can skip this step.
When you reach the "Add Your Devices" screen, click the "Add Device" button and continue with the next step below.
Step Three: Add Your Devices
MyHarmony will ask you to enter the information for your first device. For this example, we'll start with our TV--a Samsung UN55H6203AF. Look for your model number on your TV (or its manual), enter it in, and click the "Add" button.

If it recognizes your device's model number, it will show up in your list of devices. Click "Add Device" to repeat this process for the other devices in your setup--your receiver, your DVD or Blu-ray player, your cable box, and so on.

When you're finished, click Done.
Step Four: Create Your Activities
Next, MyHarmony will walk you through setting up your Activities. You'll tell it which devices are involved in a given activity, and what inputs those devices should be set to.
To start, we'll set up a "Watch TV" activity. For this, we want to turn on our TV and our AV receiver. We use an antenna to watch TV, so we don't need anything else--though if you have cable, you'll want to enable your cable box as well. Click Next.

MyHarmony will ask you which device you use to control the volume. If you have an audio or AV receiver, you'll probably want to select it here. If not, select your TV.

Next, you'll tell MyHarmony which input to set on your TV and receiver. For us, this is easy--we'll set the input on both to "TV", since we're using an antenna.
This will be different for everyone, of course, and different for each activity. If you were setting up a "Watch a Movie" activity, you might set your TV's input to "HDMI1", where your receiver is plugged in, and your receiver's input to "DVD", where your Blu-ray player is plugged in.

When you're finished, MyHarmony will ask you to confirm your settings, at which point you can go back and change them if something looks wrong. Otherwise, click Done.
When finished, you'll see a list of your activities. You can click "Add Activity" to add more in the same fashion as above (like watching a movie, listening to music, or watching your Chromecast.

When you're finished, click Done. You'll be asked any lingering questions, and prompted to sync your remote over USB. This will take a minute or two, but when you're done, you can move onto the next step.

How to Customize Your Remote's Buttons
Adding your devices and activities is only the first part of setting up your remote. The thing that really makes Harmony remotes worthwhile is the customization. With a few clicks, you can reassign any button to any function you want. MyHarmony will assign some automatically--like your TV's Menu function to Harmony's Menu button--but if any button names don't quite correspond, can remap them in the Harmony software.
To start, open the MyHarmony app and click your remote from the list.
From the main menu, you can click "Devices" in the sidebar to add or edit devices, like you did in step three above. You can also select "Activities" in the sidebar to repeat step four. To customize individual buttons, however, click the "Buttons" option in the sidebar.

How to Customize the Physical Buttons
Your remote has multiple "sets" of buttons. It has the standard physical buttons (play, pause, up down, menu, etc.), it has the Activity buttons ("Watch TV", "Watch a Movie", etc.), it has the on-screen buttons (if your remote has a screen), and it has the smarthome buttons (if your remote supports that function).
From this screen, you can customize any of those sets of buttons. Let's start by customizing the physical Remote Buttons. Click the "Select an Activity or Device" dropdown under "Remote Buttons" and select an activity from the list, like "Watch TV". Click "Go".

You'll now see a close-up layout of your remote. You can hover over a button to see what action it currently has assigned to it. For example, in the "Watch TV" activity, we can hover over the Menu button to see that it invokes the TV's Menu function. If we hover over the volume buttons, however, we see that they invoke the AV receiver's volume function.

You can also reassign buttons. For example, let's say I want the "Guide" button to show a channel list, instead of the TV guide. From the "Device" dropdown on the left, I'd select "Samsung TV"...

...then drag the "ChannelList" function over to the "Guide" button to assign it.

On some of Logitech's higher-end remotes, you can assign functions to both short and long presses for each button. In those cases, you'll need to click on a button to see what it does in the upper right-hand corner. To reassign it, you can hover over a function in the right sidebar, and choose "Short Press", "Long Press", or "Both" to assign it to the button.
Repeat this process for any functions you want buttons for on the remote. (Any functions in bold are unassigned, greyed-out functions are already assigned to a button.) You can also do this for your other activities, or for specific devices, for the rare occasions you'll be controlling that device separately from an activity.
How to Customize the On-Screen Buttons (on Supported Remotes)
If your remote has a screen, you can use it to add any functions that don't have obvious button assignments. For example, my receiver has a "Night Mode" that lowers the audio's dynamic range, so I can watch at a comfortable volume without waking my neighbors. My remote doesn't have a physical "Night Mode" button, but I can add it to the screen very easily.
From the main Buttons page, select an activity (or device) from the dropdown menu under "Screen Options". In this case, I'm going to edit the "Watch a Movie" activity (since I need this feature most commonly with movies). Press Go.

MyHarmony will likely have added a few options to your screen already. You can remove them by clicking the "X" next to them. (This screen may look a little different depending on the remote you have, but the process is the same for all remotes.)

To add a new function, click the "Select a Device" dropdown on the right, and choose the device that contains the function you want to add. Since I want to add my receiver's "Night Mode" to my Watch a Movie activity, I'm going to choose my receiver from this list.

Then, I'll scroll down to the "Night" option (which is my receiver's Night Mode), and drag it over to the screen.

And voila! It shows up on the screen with the other functions. You can rename it by clicking it and adding a new name to the "Label" box.

Repeat this process for any other functions you want added to the screen, and for your other activities or devices.

Don't Forget to Sync Your Remote!
Once you've made your button customizations, you need to sync those changes to your remote. Plug in the included USB cable and the "Sync" button on the MyHarmony page should turn from yellow to blue.

Click the "Sync" button to sync the changes to your remote. It'll take a few moments, but your changes should sync to your remote, ready to be used.

If you have a remote that connects to a Harmony Hub, you don't have to sync over USB (though you can if you want to). Since your remote customizations are stored online, you can just tap the Settings button on your remote's screen and go to Settings > Sync Remote. Your remote and its hub will sync with Harmony's servers and your latest changes should appear when its finished.

If you have one of Logitech's higher-end remotes, you can also change the icons that correspond to different activities from the remote's on-screen settings (or through the Harmony app for iOS and Android).

That seems like a long, complicated process, but believe it or not, those are just the basics. You can also create complex sequences of functions to assign to a button, or add or fix commands that don't work. But for most devices, the above instructions should serve 99% of your needs. When you're finished, you should have a sleek remote that controls your entire home theater with ease--and with far fewer button presses.