Quick Links
Booting into Safe Mode has long been a staple when troubleshooting Windows computers. Safe Mode starts Windows with only a limited set of files and drivers so you can figure out what's wrong with your PC. But for some reason, Windows 8 and 10 make Safe Mode hard to get to. Here's a fix for that.
Before Windows 8 came along, you could press F8 right before Windows started loading to open a text-based Advanced Boot Options menu. That menu featured handy troubleshooting tools like booting into Safe Mode and starting Windows with the last known good configuration. Starting with Windows 8, that menu was removed in favor of a graphical menu that you could access in a few different ways--all more cumbersome than the original F8 shortcut.
Fortunately, with a little Command Prompt wizardry, you can add Safe Mode right back to a boot menu that's always available when you start up. Of course, if you just want to return to accessing the classic menu with the F8 key, we've got you covered there, too.
What Is a Boot Entry?
A boot entry is really just a file that contains parameters defining how an operating system loads. When you install Windows, it creates a standard default boot entry that it loads each time you start your computer. If that boot entry is the only one on your computer, it loads automatically. If you have additional boot entries (maybe you dual-boot with a different operating system, for example), Windows shows you a boot options menu when you start your computer where you can choose which operating system to load.
Adding a Safe Mode option to Windows 8 or 10 involves creating a new boot entry and then setting it up to do what you want. This takes two steps. First, you'll use the Command Prompt to make a copy of the existing default Windows boot entry. Then, you'll use the System Configuration tool to modify the options for that boot entry.
Step One: Add Safe Mode Options to the Boot Menu with the Command Prompt
First, you'll need to create one or more new boot entries by making copies of the existing boot entry using an elevated Command Prompt. Press Windows+X to open the Administrative Tools menu and then click "Command Prompt (Admin)." You can also use this nifty keyboard shortcut.

At the Command Prompt, type (or copy and paste) the following command and then hit Enter. This copies the current boot entry and names the copy "Safe Mode:"
bcdedit /copy {current} /d "Windows 10 Safe Mode"

If you want, you can also create new boot entries for other options that used to be on the Windows boot menu. Create an entry for running Safe Mode with networking support using this command:
bcdedit /copy {current} /d "Safe Mode with Networking"
Create an entry for running Safe Mode with a Command Prompt (instead of loading the GUI) using this command:
bcdedit /copy {current} /d "Safe Mode with Command Prompt"
Note that it doesn't really matter what you name the new boot entries, as long as it helps you recognize them. So, if instead of "Windows 10 Safe Mode," you want to name your entry "Safe Mode" or even "Dorothy," we won't judge.
Step Two: Configure Your New Boot Options with the System Configuration Tool
What you've done so far is to create one or more copies of the current boot entry. You haven't done any configuration yet, so if you were to boot your computer using one of them it would be the same as your regular Windows boot. To modify those entries to do what you want, you'll use the System Configuration tool. Hit Start, type msconfig, and then select System Configuration.

In the System Configuration window, switch over to the Boot tab. You'll see the default OS, plus the new entries you created.

Click the new entry you created for Windows 10 Safe Mode (or whatever you named it). Enable the "Safe boot" check box and make sure that the Minimal option is selected underneath it. Enable the "Make all boot settings permanent" option if it isn't already. And, if you want, you can modify the Timeout value to specify how long you have to choose a boot option before the default OS is started. By default, timeout is always set to 30 seconds, but you can change it to any value between 0 and 9999 seconds. You can also set the value to -1 if you want the Boot Options screen to remain until you pick an OS. When you've selected your options, click OK.
You'll be asked to confirm the changes with a scary warning about everything you've done being permanent. Go ahead and click Yes.

When you're asked if you want to restart your computer, go ahead and choose "Exit without restart." That way, you can go ahead and configure any other boot entries you've made.
- If you created a Safe Mode with Networking entry, follow those same instructions to modify it, but after enabling "Safe boot" select the Network instead of the Minimal option.
- If you created a Safe Mode with Command Prompt entry, turn on the "Alternate Shell" option instead of the Minimal option.
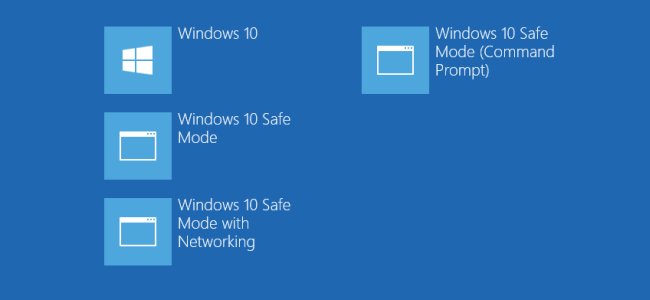
After you've configured everything, go ahead and restart your computer to test it out. At boot, you should see the "Choose an operating system" screen with your new choices.

How to Remove Safe Mode Options from the Boot Menu
If you decide you no longer need a boot entry, it's very easy to remove. Just run the System Configuration tool again by typing msconfig at the Start menu. Select any of your additional boot entries and then click Delete. Just make sure you select an entry you actually want to delete. Deleting the entry for the default OS can render your computer unable to start.

And that's about it. It does take a little setup to get Safe Mode back on your boot screen, but doing so will make things a whole lot easier the next time you need to troubleshoot your computer.