Quick Links
Newer Linksys routers have a File Server feature that allows you to plug in a USB drive and access its files from anywhere--ensuring you'll never be too far away from your library of favorite movies, music, and pictures, no matter where you are in the world.
Once successfully set up, you'll be able to remotely access any of your media files through Linksys' "Smart Wi-Fi" feature, without the need for a separate desktop-based server. It may not be as feature-filled as a full home server, but it can do quite a bit--all for just the cost of a USB drive.
Step One: Format Your Hard Drive
To begin, you'll need an external hard drive or USB flash drive, as well as some movies, music, or photos.
Linksys routers are only compatible with drives formatted in either FAT32 or NTFS, so you'll need to make sure your drive uses one of those file systems. (You'll want to use NTFS if you have any files over 4GB you want on the drive).
First, plug the drive into your computer, and locate it in Windows' File Explorer. Next, right-click the drive icon, and click "Properties" from the drop-down menu.

You want to look for the type of file system the drive is using to partition its volumes, which can be found in the space highlighted below.

If your drive is using the correct file system for your needs, go ahead and skip to the next section. If you need to re-format it, you can do so by right-clicking on the drive again, and choosing the "Format" option. NOTE: This will erase everything on the drive.

Next, choose either "FAT32" or "NTFS" from the following drop-down menu.

Step Two: Add Movies, Music, and Photos to Your Drive
Once your drive is formatted, it's time to add your movies, music, and photos that you want shared over the server. To move the media from your PC to the flash drive, drag the files to the drive using File Explorer, shown below as "SampleVideo.mp4".

Be sure ahead of time that any media you want to watch is supported on the device you plan to view it on before you copy anything over. This means that if you want to watch a .mov file, it won't work on an Android device, since Android doesn't support .mov files. Similarly a .flv movie won't play on an iPhone, and so on. To learn how to convert your media files to the appropriate format, you can check out our guide here.
Step Three: Plug Your Drive Into Your Linksys Router
Once the drive is loaded with your media, plug it into the back of your Linksys router. Then, sign into your Smart Wi-Fi dashboard by visiting "http://www.linksyssmartwifi.com" in your preferred web browser, and logging in with the details you set up when you originally bought your router. If you don't have an account, click the "Don't have an account?" link, located directly below the sign in box.

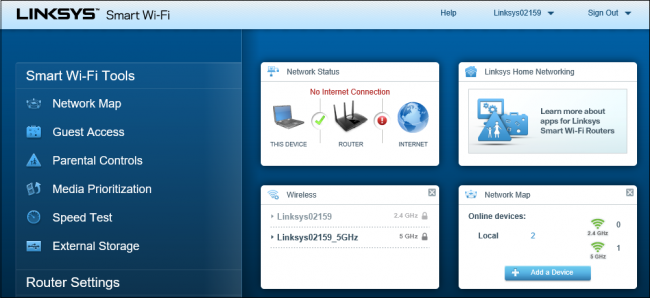
If your USB drive has been properly recognized, you should see a window like what we've hightlighted below.

This is a small widget that tells you how much space is on the drive, and whether the media and FTP servers are switched on or off. Click the button to "Manage External Storage", and you'll be taken to the following overview screen.

This is where you'll be able to see the status of all the different ways to access the drive, including the Media Server.
How to Access Your Files on the Network with Folder Sharing
The simplest way to access your files is with simple folder sharing, over your home network. After plugging in your drive, your router will automatically share its files over the network. You can open Windows Explorer on your computer, see all your files, and play them as if they were sitting right there, on your computer--as long as you're connected to your home network.
From the External Storage page in the Smart Wi-Fi dashboard, you can find your router's IP address on the right side under "PC Access", as shown below.

In this example, you can see the router has already set itself as "\\192.168.1.1". Open Windows Explorer, punch that into the address bar...

...and press Enter. You'll see your shared folders show up. You can open them just like normal folders, and view the files inside of them on your computer.

By default, these will be visible and accessible to anyone who's linked to the local network, with no username or password required.
How to Password-Protect Your Shared Folders
Chances are you don't want anyone on the network to be able to access your movies willy-nilly--and you definitely don't want everyone to have free access if you make them accessible over the internet (which we'll do later in this guide). This is where the Linksys "Secure Folder Access" system comes in, which gives you the ability to control who can and can't view your media on a folder-by-folder basis.
To create a username and password for your media content, start by clicking the "Folder Access" tab in External Storage on the Smart Wi-Fi dashboard, where you'll see the following window.

Here you can add, remove, and manage users who have access to your media server, as well as customizing which folders they'll be able to see. Start by typing a new username into the box (seen above as "New User2"), give them a password, and designate whether they can read & write files, or just read them. To control what media they see, click the "Select share" link. From the prompt, select the folders you want that user to be able to access.
Now, when anyone tries to access a specific folder, they'll be asked to enter their credentials before getting through.
How to Stream Your Movies to DLNA Devices like an Xbox One or PlayStation 4
The best way to take your media off the small screen and into a full theater setting is with a DLNA-compatible device. DLNA stands for "Digital Living Network Alliance", and includes any device that's already set up to recognize networked media servers without any additional software or firmware updates necessary. Some examples include popular gaming consoles like the Xbox One and Playstation 4, as well as streaming boxes/sticks like the Roku.
To make the drive visible to DLNA devices, start by clicking on the "Media Server" tab along the top of the External Storage window. From there, you can turn the media server on by switching over the toggle, highlighted below.

Next, you'll need to tell Linksys what folders to put up for sharing. To do this, click on the "Add New Folder" button, after which you'll be greeted by the following prompt.

When we moved our media to our flash drive, for example, we placed it in a folder called "All My Media", which Smart Wi-Fi has detected above. Select the folder that contains your media, and press the "Ok" button, which will apply your new shares.
You'll see the name of the share at the bottom of the External Storage page. Make a mental note of it, as this is what you'll look for on your DLNA devices.

If your streaming device is DLNA-compatible, this Linksys Media Server folder should automatically appear the next time you use the media player on the device. Finding this folder will change from device to device though, depending on its own interface.
For example, we tested our DLNA server with an Xbox 360. To get the Xbox 360 to play the content, first we had to sign into Xbox Live, then open up the "Movies and TV" app, downloaded with the latest update to the console's firmware.
Next, we scrolled down to "Connected Devices", where the router had tagged the folder containing the files as "Linksys02159:TMS". All the media was already visible, and would play with only a short amount of buffering time.

Again, this process will differ depending on if you're using an Roku, an Xbox, or any other DLNA-compatible streamer, so be sure to consult the user manual to find out how it works for your own device first.
How to Access Your Files from the Internet with FTP
So what if you're not connected to your home network, and still want to catch up on one of your favorite films?
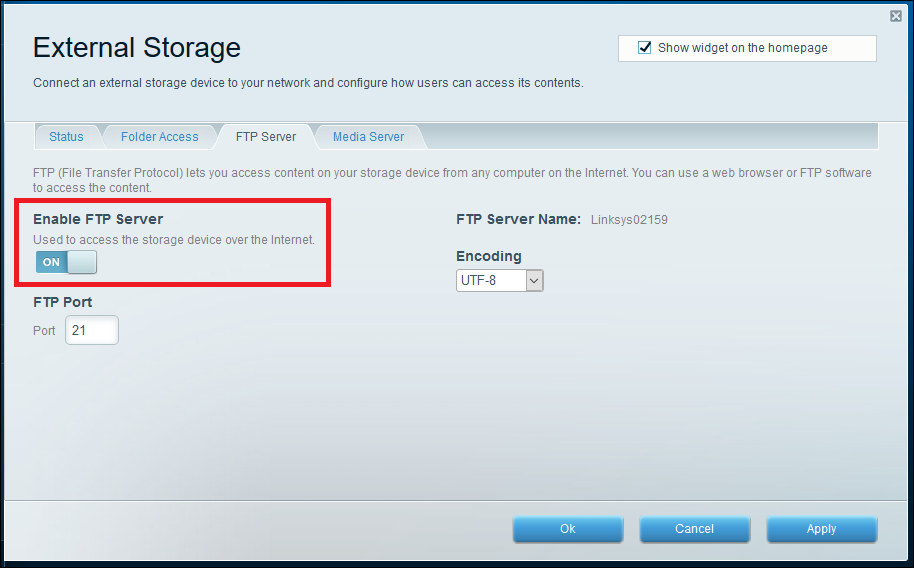
This is where an FTP server comes in, allowing you to access your router's media drive even when you're far from home. Enabling it is a one-step process. First, navigate to the "FTP Server" tab, and then toggle the "Enable FTP Server" option on.
Next, you'll need to retrieve the FTP access address that the router has automatically set up for you. You can find this on the External Storage overview window, in the section labeled "FTP Server".
On cable and DSL lines, the router should automatically detect the correct address for you, and create a public IP that you can use as a login point. If you're on fiber, however, right now there are no methods to bridge this type of connection due to the method the modems use to decode their signal.
This IP will change from time to time, so be sure before you try to log in that you double-check it by remotely logging into the router via Smart Wi-Fi and looking at the External Storage status page first. You can also use DynDNS to remotely access the router with an easier-to-remember address that never changes, if you prefer.
Once you have the address, it's time to access the FTP server remotely. Start by going into File Explorer on the machine you want to watch the content on, and type the IP of your FTP server into the address bar (this also works inside a web browser).

You'll be greeted with a login that will ask for the details you set up in the Secure Folder Access panel.

Enter your credentials, and depending on your permissions, you'll see any media folders you've moved to the storage drive beforehand.

From here, you can either download the media to your computer, or stream it to your device directly with a double-click. Be sure your computer has the proper default apps installed to play the media as well, otherwise it will only work as a direct download.
Once the file is done transferring or buffering, prepare to kick back, relax, and enjoy your movie!
Netflix is great and Hulu can pass the time just fine, but when you want to access your own personal collection of movies and media from anywhere in the world (or just a computer in a different room), the Linksys Smart Wi-Fi system makes setting up a new media server a breeze.