Quick Links
Most people have the basics of throwing a movie night down: you get a movie, you get snacks, you get comfortable, and boom, you're done. When it comes to throwing a movie party in the backyard, however, things get a little trickier. Read on as we show you how to do it stress free.
Sure, you can watch your movie indoors. There will be no bugs, no waiting for dusk, and likely zero prep work, but there also won't be that magic of projector light, the glow of the screen against the twilight sky, or the sheer excitement kids (and adults alike for that matter) get when watching a movie outside in the fresh air.
That said, hosting an outdoor movie night is significantly more challenging (at least the first time you do so) than simply popping in a DVD for the kids and leaving them in the living room. Further, there's a bit more that goes into a successful movie night than your average article implies. As veterans of backyard movie madness, we're more than happy to walk you through the details big and small to help ensure you have the perfect movie night experience.
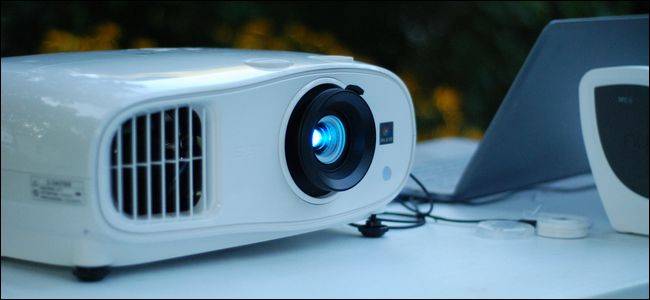
The Projector
You could host a movie night outside by hauling a big screen HDTV out the back door and setting it up on the patio, but we'll be frank with you: it simply doesn't have the same magic feeling. Sure it's novel and a nice change of pace (and the kids might be entertained by the new viewing arrangement) but to really capture the essence of backyard movie magic, to reclaim the spirit of the drive-in movie theater and the open air, you need that bright-shining-point-of-light-in-the-darkness effect that only a project can provide.

Although projectors are certainly pricey investments, there's good news: you don't need a top of the line projector for your backyard movie night. Although you can spend $1000+ on a projector (or haul your nice indoor projector from your movie room outside) you don't need to spend that much. You can grab a smaller, cheaper one on Amazon, or--if you're really thrifty--find an old one on Craigslist. (Spring is a good time to search for used models, as many offices and schools are clearing theirs out.)
When considering a projector for use in the backyard, you should consider the following factors.
Lumens
The lumen rating of a projector is indicative of how much light is can output. The more light a projector can put out, the sooner you can start your movie, and the better it can cut through ambient light (like light from street lamps, light from the tiki torches on your patio, etc.)
At minimum, you want at least 2,000 lumens. Every step up from there is a huge boost and as you creep closer to 3,000+ lumens you really increase the power of the projector and it becomes possible to start the movie shortly after sunset instead of waiting another 30-40 minutes for it to get much darker.
Diverse Inputs
It's no fun if the thing you want to plug into the project can't be plugged into the projector because it lacks the correct ports. You can always correct for those kind of problems by hooking up a full blown audio-visual receiver to the setup but that adds expense, bulk, and complexity.
It's oft overlooked, but when you're looking for a project make sure it has the kind of connection input on it that works with the device you want to use (e.g. your laptop, a Blu-ray player, etc.). If they don't match (say, a new laptop with HDMI and your old projector with VGA), make sure you get an adapter so everything can fit together.
Keystone and Lens Shift
Lower-end projectors have electronic keystoning (you can adjust the image thrown by the projector to make up for the angle of the projector in relationship to the screen) and more expensive cinema-style projectors have physical controls which allow you to shift the actual lens to correct for image distortion.
These features are very important for outdoor projection as you'll likely be putting the projector on a card table or the like wherever you can fit in your outdoor setup and you'll need to immediately and on the fly adjust the image to fit the projection surface.
Maximum Size & Throw Distance
One of the most fun aspects of outdoor movie viewing is that you can go big without much expense. An HDTV with a 144" diagonal could cost you $100,000 but a projection setup at the same size and resolution could run you less than a $1000.
The first consideration, and one to keep in mind when making or buying a screen, is how big of an image your projector and project and how far away it needs to be to accomplish that. The specifics of those factors (maximum screen size and the required "throw distance") are a function of the particular model and how it's bulb and lens are arranged. To that end, we recommend studying your space and then consulting the manufacturer specifications. If you want to project a 200" image, for example, but the projector you plan on using needs 30 feet between the projector and the screen to accomplish that, then you'd better make sure you've got the backyard that will house such an arrangement.

Unlike indoor installations, it's pretty easy to move the pieces of an outdoor projection setup around (we've adjusted the spacing of our projector and screen by just picking them up and scooting them around more than a few times), but it's still handy to use a calculator to figure things out ahead of time. To that end, we recommend the throw distance calculator over at Projector Central. You can see, in the screenshot above, how we used it to calculate the optimum distance to get the maximum size. You can also use the calculator to figure out the perfect spacing for the size screen you'll be using.
Resolution
Most people would expect to see resolution at the top of the list--after all, resolution is super important to picture quality, right? The reality is that resolution isn't as important as you think. In your house? Sure. On an HDTV you're sitting relatively close to? Sure. But in these cases, you're using your projector or HDTV under optimum conditions, where the quality of the image is going to attract close scrutiny.
During a backyard movie night, however, you aren't viewing a movie under optimum viewing conditions. You're viewing the movie under optimum fun conditions. The last light of sunset will impart a haze. There will be ambient light of a greater or lesser degree that may or may not pollute the purity of the projected image. The screen might have wrinkles in it. There might be kids running around casting shadows everywhere.
Under those kind of conditions, it matters more than the image is bright and crisp (because you have lots of lumens and have adjusted the focus/keystone/shift correctly) than it is the highest resolution available.
If you have a 1080p projector with good light output then by all means use it. But don't write off a business-class projector that only has VGA or XVGA resolution just because it isn't capable of "HD" output. Even a business projector is still capable of outputting at a higher rate than old broadcast TV and DVDs and it still looks nice.
Aspect Ratio
Again, like resolution, aspect ratio is something to consider but not mission critical. Ideally, your projector will output at a ratio of 16:9, which is the widescreen format favored by the vast majority of movie releases. This way, your output matches up perfectly with a 16:9 screen and there is no light bleed or masking required.
Your cinema-class projector will do this, no questions asked, because that's what it was build to do: show movies. Your business class projector likely will not do native wide screen projection but it will provide a digital mask for 16:9 projection. The trade off is that you'll have "light bleed" at the top and the bottom of the screen because the business-class projector will mask the area simply by projecting black and not actually physically masking the space off.
While that's less than ideal, it's also not a deal breaker. Most people won't even notice the light bleed, especially if you're using a widescreen sized screen and the light bleed just falls into the darkness behind the screen.
Do the Differences Matter?
With all those factors in mind, let's look at some real world examples to show you how certain factors matter (or don't).
We've hosted many outdoor movie nights over the years and just leading up to writing this article we conducted a wide range of tests and scrutinized the results. We conducted these tests using two very different digital projectors: the Epson HC600 and the Epson HC3000. In their respective tiers, they're both great projectors, but they're certainly different.

The HC600 ($360) is one of Epson's entry-level cinema projectors. It's bright (3000 lumens) but it has a low resolution (only 800x600), and it offers no manual lens shift (but has digital keystoning). Although the HC600 is a perfectly solid (and very bright) projector in its price range, it has more in common with projectors you'd find in board rooms and classrooms than high-end home theaters.
The HC3000 ($1150) is a cinema-class projector designed for home theater use. It's still pretty bright (2300 lumens) and we had no problems with a dim image while using it, it has true 1080 resolution in native 16:9 projection, and has very smooth and easy to use manual lens shift adjustment knobs.

As you can imagine, the HC3000 projector did, in fact, look better. If you focused even a modest amount of scrutiny on the images in comparison the Cinema 3000 unit was the clear winner (and at a cost three times higher, it should be).
While a discriminating adult who is really analyzing image quality will definitely see the difference, not one kid during our backyard movie night spree was like "Wait a minute! Who switched out the 1080p projector for a mere VGA projector? I want my money back!" As long as the projector was bright, the image was properly focused, and the movie was rolling, they were all completely enraptured by the magic of the screen.
If you can afford the HC3000, it's a beautiful projector that provides a beautiful image (and you'll certainly want to put a projector mount in your house and use it all the time). If you can't afford a $1,000+ projector, don't write off hosting a movie night. Projectors like the HC600 are more affordable, and if a new projector is totally outside of your budget you can almost always find used business-class projectors on Craigslist as companies, schools, and other institutions churn through their stock. If you're willing to spend $50-100 on a replacement bulb, you can almost always find a business-class projector dirt cheap.
In short: by all means get a nice cinema-class projector for your backyard movie (and home) experience if you can, but don't let a high price tag stand in your way as there are very economical options available.
The Media Player
What will play your movies? A disc-based system like a DVD or Blu-ray player? Your laptop? A dedicated media player like an Apple TV or Amazon Fire TV? The media player you select is, paradoxically, almost entirely unimportant and really important for two different reasons.

On one hand, it's almost unimportant as long as it plays what you want: once the movie is running smoothly, nobody is going to care if it's fed into the projector from a disc, a flash drive, or streamed from your home network as long as it looks nice.
On the other hand, the media player you select (because of the available video inputs/outputs) can either make setting up your outdoor theater easier or harder (often adding a significant amount of complexity to wiring up your sound system).
If you plan on using media you have stored locally--purchased on iTunes, ripped from your DVD collection, streamed what Netflix, or whatever--a laptop is a great choice, as you can play a diverse range of stuff on it, it typically has an HDMI and/or VGA output for the projector, and it has a headphone jack ready to pipe into somewhere.
Further, you can run all sorts of apps like Kodi Media Center and VLC, you can easily do slideshows or pull up YouTube videos, and so on. While we do like the geek cred aspect of setting up a little Raspberry Pi media box and using that, you really can't beat a laptop for diversity (and it has a built-in screen for the projector operator to use which other options, like an Apple TV, do not).
The Sound System
"The sound system? What about the screen!" you say. Don't worry, we'll get to the screen. The reality is that the projector and the screen aren't as finicky and complicated as the sound system. The projector comes down to "go big, go bright", and you'd be amazed at the variety of things we can project on (we once hosted a Super Smash Bros. tournament that was projected onto a white garage door and it worked out just fine).
The sound system, on the other hand, requires a little more planning. While it's easy enough to take a Blu-ray player and plug it into the HDMI port on a projector, where's the sound? This is the element of the evening you need to spend the most time thinking about and planning for because, logistically, it's the most complex. If the projection is a teensy bit washed out or the screen a little wrinkled, nobody will likely notice or care. If the sound system is too weak, muffled, or hard to understand, the audience will lose interest quickly.
Over the years we've experimented with many, many, different ways to run sound for our outdoor movie nights that range from hauling an entire AV receiver outside, running cable, and setting up 5.1 surround sound in the yard (which is no small undertaking, requires lots of wire, and we were worried about kids tripping on a wire or trashing a speaker the whole time) to using a single but powerful all-in-one speaker.

Although we can attest to having watts upon watts of power setup with a dedicated subwoofer being awesome, we're going to defer to the mindset we highlighted in the projector section: you aren't going for perfect audio fidelity here, you're going for the good-enough-for-fun fidelity. The less wiring, the less fussing, and the less worrying about the setup you have to do the better.
To that end, our current favorite arrangement is one that we find extremely convenient: we use a beefy Bluetooth speaker and pipe the sound wirelessly to the audience. If you're a long-time reader you might recall the beefy tabletop Bluetooth speaker we used as a demo unit in our article The HTG Guide to Portable Bluetooth Speakers, the Nyne Bass. We pair the Nyne, which has a huge amount of sound and rich bass for its size, with a Bluetooth transmitter (the Avantree Priva, which we recommended in the article How to Add Bluetooth Headphones to Your HDTV) hooked to the headphone jack on our laptop.
Now, again, we recommend using what you have on hand to avoid a huge bill for your movie night. We happened to have a nice Bluetooth speaker and a transmitter on hand. If we didn't have those items on hand, we would have used other things we had on hand (like a 20 foot phono-jack cable to the auxiliary input jack on an old boombox we keep out in our workshop). A $4 cable plus a $10 yard sale boombox could work just as well for you.
The Screen
It might seem strange to many readers that we've put the screen this far down in the list of considerations, but honestly compared to the logistics of selecting a projector, setting up some sort of media player, and getting the sound system linked in, the screen is truly (we promise!) almost an afterthought.
Outdoor projection is extremely forgiving when it comes to screen quality, as the brightness of the projector, the potential light pollution from street lamps and the like, as well as just the general excitement and activity of the evening generally smooth over any sort of imperfections (if they are even noticed at all).
When it comes to selecting an outdoor projection screen, your three questions should be, in this order: what is my budget? how big do I want it? do I want rear or front projection? Although we haven't delved into it before this point, rear projection is a really handy tool to have in your backyard movie night toolkit.
Traditionally, you project the image from the back of the audience onto the screen (just like in a regular movie theater). Movie theaters do it that way because it's space efficient. The audience sits in the throw distance so no space is wasted behind the screen accommodating the long throw of a large projector. In your backyard, however, it's often very handy to do a rear projection because no children or guests will get in the way of the light and you can hide the projector, cords, and even speakers all behind the screen out of the way and out of sight.
With all that in mind, let's take a look at some common screen solutions.
Bed Sheets & Blackout Cloth
On the very cheapest side of things, you can get by with a bed sheet. Truly, you can! Iron a bed sheet to get it as wrinkle free as possible, and then secure the sheet in such a fashion that the sheet is kept fairly immobile and under a slight bit of tension. To do so you can do a few different things. Over the years (and before we invested in a real projection screen) we used white sheets without a problem and would secure them either by tying the corners to twine and stretching the fabric pretty tight between supports (like between the wall of the garage and a big tree in the yard) or--and this was a preferred method--we'd clip the top of the sheet to something sturdy like the garage gutters or a swing set and then clip the bottom of the sheet to a broom handle to provide weight and tension. It might not look super professional, but when the lights are out, nobody cares.
If you want to keep things cheap but not splurge too much, we highly recommend going to your local fabric store and getting some blackout cloth. It's a cotton/vinyl blend that is intended to be stitched to the back of curtains to, as the name implies, black out a room. The cloth itself, however, is a nice uniform white color and very sturdy. Two yards worth of blackout cloth is cheap and makes a great projector screen. In fact, when we built a home theater in our basement and didn't want to splurge on a professional screen, we made a giant 200" screen out of nothing but a pinewood frame with blackout cloth stretched over it. Five years later it still works great.
The big upside of using plain old thin white sheets is they are cheap and you can do front or rear projection. The downside is light cotton isn't the best screen around. The upside of using blackout cloth is that it is remarkably well suited for projection, it's relatively cheap, it's very sturdy, and as long as you clip it to something sturdy it resists the wind very well. The downside is you can't do rear projection.
Old Indoor Projection Screens
While your HD projector might be brand new and definitely 21st century, analog projectors have been around forever and projection screen technology has changed very little. If you keep an eye on Craigslist, you can find old and new projector screens for dirt cheap. (As of this article there is a widescreen format roll-down projector screen on our local Craigslist for a mere $40!)
The tradeoff here is that often times the screens you find are 4:3 ratio instead of 16:9, and you'll need to figure out some way to safely hang up the screen (or to weight down the stand if it came with one so it doesn't blow over). The upside is you can find them super cheap and the screen is designed for projection and will have benefits like a semi-reflective coating to make the picture brighter. Rear projection roll-down screens are incredibly rare so if you go this route know that you'll be doing front projection.
Outdoor Projection Screens
Here's where you're getting into the making-an-investment territory. If you're serious about throwing a top-notch outdoor movie night (and you plan on doing it with some frequency), it's absolutely worth getting a nice outdoor movie screen.

Outdoor movies screen come in two primary varieties: inflatable and fixed frame. We have used (and own) both varieties and fixed frames are our favorite. First, let's highlight the good thing about inflatable screens. If you want the biggest backyard screen you can get your hands on then you'll want an inflatable. Smaller models range in size from 120-144" on the small side (10 to 12 feet diagonal!) with a cost of ~$150-200. We own a Gemmy-brand inflatable (a very common and widely sold brand) just like this particular Gemmy Airblow model ($169) except our older model has inflatable legs that elevate the screen. Bigger models can exceed 16 feet across and go all the way up to drive-in-movie-theater size for showing films to hundreds of people. The cost for the larger models quickly climbs from the $500 range for the smaller models to thousands of dollars for the largest.
The upside to inflatables is that they are big, they are economical for their size, they're pretty light to transport (as they're almost all fabric), and they set up really quickly. The downside is that they're bulky (the inflated unit can take up quite a bit of space) and they require electricity to power the blowers. The blowers are also fairly noisy and anywhere within movie viewing range you'll hear the fan hum. Inflatable models generally support front and rear projection.
Fixed frame models like the Camp Chef 120 ($223), seen above, rely on a steel or composite frame to tension the screen and very sturdy construction, guy lines, and tie down stakes to keep the whole affair safely on the ground and not tipping over on a little kid. The biggest benefit, bar none, is that there is no operation noise. It's just a steel frame with a sturdy rip-stop nylon screen stretched tight over it. No electricity needed, no humming, just a beautiful white projection surface (which supports front or rear projection).
We'll admit that we were, at first, rather dubious about whether or not the sturdy and tightly woven rip-stop nylon screen of the Camp Chef screen would work well for rear projection, but it worked beautifully. Technology is downright magical sometimes. Expect to pay $225-350 for a fixed frame model.
Whether you get an inflatable or a fixed frame model, we would discourage you from paying full price if you have the patience. By shopping deal websites like FatWallet! and keeping an eye on discounter sales sites like Woot!, we scored both of our screens at a substantial discount. Movie screens are just one of those products that pops up a few times a year at steep discounts, and it pays to wait if you want to save a lot.
The Extras
At this point, we've covered all the ground necessary to get the screen up, the projector running, and the sound pumping. There are a few additional considerations big and small, however, that we'd encourage you to read over before you finish your movie night planning.
Be Neighborly
The first and most polite consideration is to think of your neighbors. We've been doing backyard movie nights for nearly ten years now and during that period we've had small children of our own and all along the neighbors have had small children of various ages.
Not only is it impolite to keep your neighbors up, it's even worse to watch something inappropriate on your giant movie screen that the tykes next door could catch a glimpse of. As a general rule if you don't live way out in the country, it's a good idea to keep your movie selections PG and certainly free from nudity and any kind of gore.

Speaking of neighbors, the best way to have a hassle free movie night is to invite them. As we like to say when we throw big backyard parties, if anyone that could call the police and complain about the noise is making the noise with you...then the problem is solved! Even if your neighbors don't care to come, it's a nice gesture, it will make them more tolerant of any light or noise coming out of your yard that evening, and it also gives you a chance to make sure you're not creating a disturbance. When you chat with them about the invite over the fence, for example, you might discover your movie night is the same night your neighbor is coming home from a major surgery and opt to not fill your backyard with rowdy children.
Seating Zones
While staying in your neighbors good graces is a top priority in our extra consideration section, there's also a whole pile of practical and fun things to consider. On the practical side of things, how are you going to handle seating? Blankets for the kids and lawn chairs for the adults is a common arrangement. If you have a spacious or at least long and narrow yard you can also split the space up so one part of the yard is the viewing area (typically dominated by kids) and the other part is an adult sit, drink, and chat zone.
One clever idea we came across some time ago and made note of (but have yet to replicate ourselves) is to gather up a pile of decent size boxes and have kids decorate them like little cars to create their own "drive-in" movie theater.
Snacks
We're confident you've got the basics of movie night snacking down pat, but there are a bunch of fun little things you can do to make snacking at your outdoor theater fun. You can pick up old-fashioned popcorn containers dirt cheap on Amazon (about 18 cents a popcorn box). Your local food service store most likely has large and cheap containers of popcorn butter and seasoning salt too; perhaps not the healthiest stuff around but it gives your made-at-home popcorn a movie-quality taste.

Finally, if you're in a super splurging kind of mood, you could even pick up a legitimate popcorn maker. We have one on hand because when we went to rent one for a birthday party we found that it was cheaper to buy one and have it forever than to rent one for a day. Spending around $150 on a popcorn maker might seem crazy but when you consider how much it costs to buy little premade packets of popcorn to feed 20+ people at a party (and then factor in how many movie parties you want to throw), it gets pretty reasonable pretty fast. Further, don't forget our old friend Craiglist. There are always popcorn makers floating around as many organizations come to the same conclusion we did (that it is cheaper to buy a unit and use it for a fundraiser rather than rent it) but then turn around and sell it when they no longer need it.
Lighting and Safety
Our last consideration is practical and fun rolled into one. Although you want to keep ambient lighting to a minimum to not distract from the movie or wash out the screen, do plan for some kind of minimal lighting so that people can move around. We do most of our lighting purchases at the end of seasons (where you can find tiki torches for dirt cheap at the end of summer and rope lighting for dirt cheap after Christmas). Throw some rope lighting down and tack it down with some tent stakes at the end of your movie zone and you've got some nice subtle lighting and great boundary for the smaller kids (it's easy to tell them not to cross over the lights into the darkness but to follow them back to where the adults are seated).
On the fun side of things, kids love glow sticks, and you can get them dirt cheap online. We've bought multiple tubes of these little bracelet glow sticks over the years; at $9 for a 100 of them you can afford to every kid's hands full of the things. You'll be a movie night hero, trust us.
The Pre-Reel
In the last entry in the considerations section, we'll let you in on our best backyard movie night secret: the pre-reel. People are going to be excited about the movie, the experience, and being outside socializing. Kids, especially, are going to be bouncing off the walls. Expect them to ask you every five minutes when it is time for the movie. We totally understand their excitement, but it gets really old really fast when a dozen different kids are asking you over and over.

Our solution to that problem that completely cuts down on people asking when it is time to watch the movie is to run a pre-reel. We set everything up, we test everything, we align the projector properly, and then when the guests arrive near dusk, we spool up something that essentially acts as a gauge for when it is time to watch the movie. Our current favorite clip, because it's really relaxing, kids love it, and it doesn't need sound to be great to watch, is this 2-hour loop of a beautiful HD video clip of the Churaumi Aquarium in Okinawa, Japan. In the photo above you can see the kids playing between the projector and the screen as they wait for the appointed movie time.
We spool up that video, let it roll, and as the twilight deepens the picture becomes increasingly crisp and vivid. Eventually people are just naturally drawn to it, kids sit down hypnotized by the fish swimming by, and without even having to raise your voice and yell "Movie time!" everyone is ready for the show. Better yet, because the kids are so intent on trying to make out what is going on the screen they totally forget to ask you when the movie is starting.
The Final Word On Backyard Movie Night
At this point you're probably like "Guys. Wow. This is a lot of stuff for backyard movie night." Don't worry, this is us dumping years and years of experience with our little backyard projectionist hobby on your lap at one time.
You don't have to go out and drop tons of money to host a backyard movie night. You don't need a premium HD projector. You don't need surround sound. You don't need a dedicated projection screen. While all those things are really great and they increase the quality of the viewing experience it is so much better to score some cheap goodies off Craiglist (like a business projector a local college no longer wants and a cheap boombox for sound) than it is to not have fun goofing around in your backyard and watching movies under the stars. The experience should be about getting your neighbors and friends together, not obsessing about a perfect setup or putting it off for lack of top-tier gear.
Finally, we'll leave you with a parting gift to further whet your appetite for backyard theater life. Around ten years ago we got the backyard theater bug and spent hours poring over the pictures and forum posts over at BackyardTheater.com. The site is still around, still going strong, and still an absolutely fantastic resource for backyard movie enthusiasts brand new or well seasoned. There you'll find information (and incredible pictures) of everything from tiny setups scraped together on a shoestring budget to guys who spend their entire fun-money allotment on building $15,000 backyard theaters over years worth of planning and investing. If the article today has piqued your interest, you owe it to yourself to check the place out.
Have experience building a backyard theater big or small? Have questions about setting your own up? Jump into the forum below and share.