Quick Links
Windows 10 includes OneDrive, but if you'd rather not see it, there are several ways to disable OneDrive and remove it from File Explorer on Windows 10.
Home Users: Uninstall OneDrive Normally
Starting in Windows 10's Creators Update, you can now easily uninstall OneDrive like you would any other desktop program. Only Windows 10 Home users should do this. If you're using Windows 10 Professional, Enterprise, or Education, skip this step and use the below Group Policy Editor method instead.
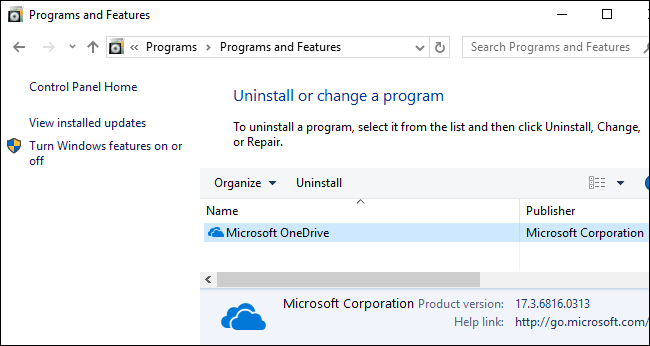
Head to either Control Panel > Programs > Uninstall a Program or Settings > Apps > Apps & features. You'll see a "Microsoft OneDrive" program appear in the list of installed software. Click it and click the "Uninstall" button.
Windows will immediately uninstall OneDrive, and the OneDrive icon will disappear from the notification area.
(If you ever want to reinstall OneDrive in the future, you'll need to run the OneDrive installer buried in the Windows system folder. Just head to the C:\Windows\SysWOW64\ folder on a 64-bit version of Windows 10 or the C:\Windows\System32 folder on a 32-bit version of Windows 10. Double-click the "OneDriveSetup.exe" file here and Windows will reinstall OneDrive.)
There's one problem with uninstalling OneDrive this way: The empty OneDrive folder will still appear in File Explorer's sidebar. If you're fine with that, you can stop now. OneDrive has been removed and is no longer doing anything. However, if the empty OneDrive folder bothers you, you'll need to use the below tricks.
Pro and Enterprise Users: Disable OneDrive with the Local Group Policy Editor
If you're using Windows 10 Professional, Enterprise, or Education, the easiest way to disable and hide OneDrive is by using the Local Group Policy Editor. It's a pretty powerful tool, so if you've never used it before, it's worth taking some time to learn what it can do. Also, if you're on a company network, do everyone a favor and check with your admin first. If your work computer is part of a domain, it's also likely that it's part of a domain group policy that will supersede the local group policy, anyway.
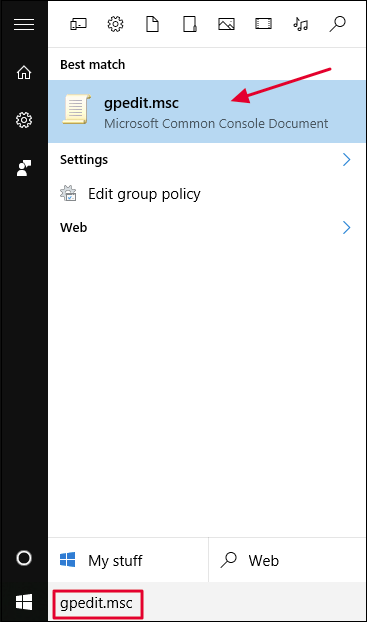
In Windows 10 Pro or Enterprise, hit Start, type
gpedit.msc
, and press Enter.
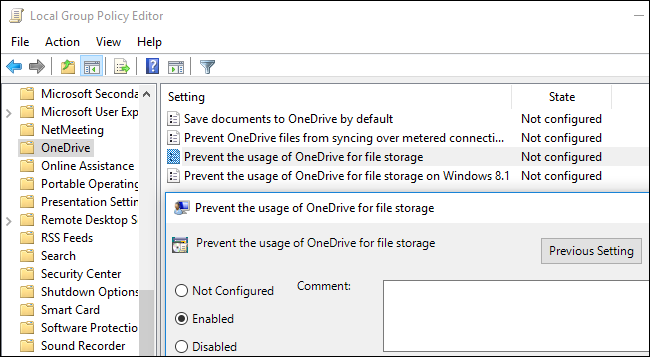
In the Local Group Policy editor's left pane, drill down to Computer Configuration > Administrative Templates > Windows Components > OneDrive. Double-click the "Prevent the usage of OneDrive for file storage" policy setting in the right pane, set it to "Enabled," and click "OK."
This completely disables access to OneDrive. OneDrive will be hidden from File Explorer and users won't be allowed to launch it. You won't be able to access OneDrive at all, not even from within Windows Store apps or use the camera roll upload feature.
You shouldn't uninstall OneDrive from the Control Panel or Settings application if you use this method. If you do, you'll continue to see an empty OneDrive folder in File Explorer. If you see an empty OneDrive folder in File Explorer after changing this group policy setting, you'll need to reinstall OneDrive from the Windows system folder. Once you do, the empty OneDrive folder will vanish from File Explorer.
To undo this change, just head back to here and change the policy to "Not Configured" instead of "Enabled."
There doesn't seem to be an associated registry setting you can modify to get the same effect as the group policy setting on Windows 10. The "DisableFileSync" and "DisableFileSyncNGSC" registry settings that worked on Windows 8.1 no longer works on Windows 10.
Home Users: Remove the OneDrive Folder From File Explorer by Editing the Registry
You no longer have to edit your PC's registry to do this on Windows 10 Home. We recommend uninstalling OneDrive instead.
If you have Windows 10 Home, you can edit the Windows Registry to remove the OneDrive folder from the File Explorer's left sidebar. You can also do it this way on Windows Pro or Enterprise, but the Group Policy Editor method is a better solution for cleanly disabling OneDrive.
Standard warning: Registry Editor is a powerful tool and misusing it can render your system unstable or even inoperable. This is a pretty simple hack and as long as you stick to the instructions, you shouldn't have any problems. That said, if you've never worked with it before, consider reading about how to use the Registry Editor before you get started. And definitely back up the Registry (and your computer!) before making changes.
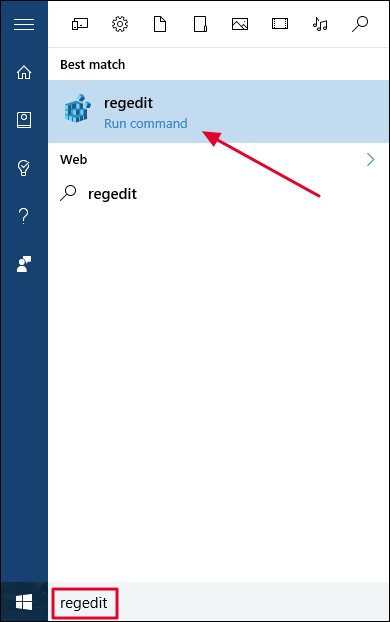
To get started, open the Registry Editor by hitting Start and typing "regedit". Press Enter to open Registry Editor and give it permission to make changes to your PC.
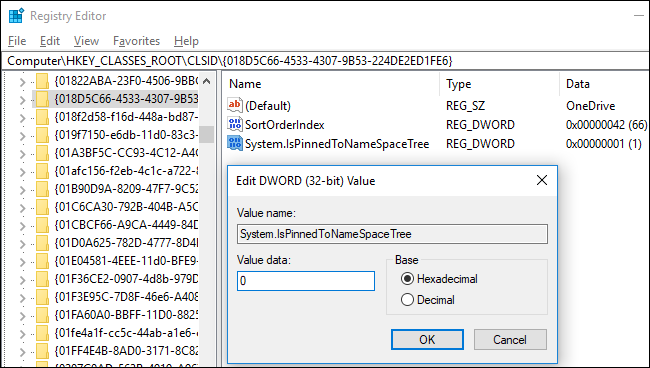
In the Registry Editor, use the left sidebar to navigate to the following key. In the Creators Update, you can also just copy and paste this address into the Registry Editor's address bar.
HKEY_CLASSES_ROOT\CLSID\{018D5C66-4533-4307-9B53-224DE2ED1FE6}
Double-click the System.IsPinnedToNameSpaceTree option in the right pane. Set it to 0 and click "OK".
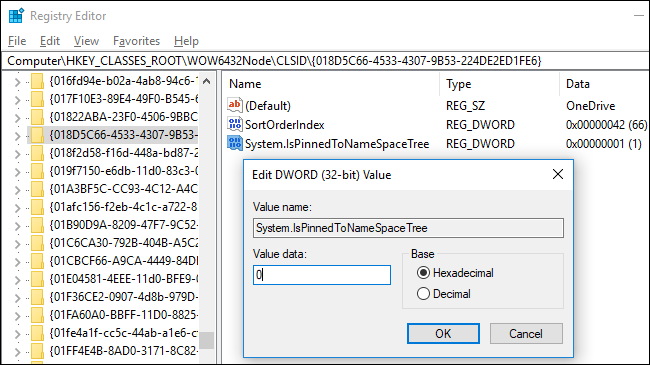
If you're using a 64-bit version of Windows 10, you will also need to navigate to the following key in the left sidebar.
HKEY_CLASSES_ROOT\Wow6432Node\CLSID\{018D5C66-4533-4307-9B53-224DE2ED1FE6}
Double-click the System.IsPinnedToNameSpaceTree option in the right pane. Set it to 0 and click "OK".
The OneDrive folder will vanish from the File Explorer's sidebar immediately. If it doesn't, try rebooting your computer.
Download Our One-Click Registry Hack
You no longer have to edit your PC's registry to do this. We recommend uninstalling the OneDrive client on Windows 10 Home, or using Group Policy on Windows 10 Professional.
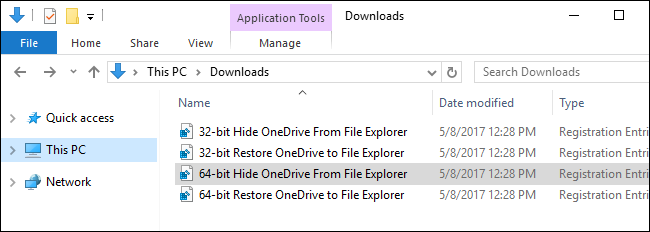
If you don't feel like diving into the Registry yourself, we've created downloadable registry hacks you can use. One hack removes the OneDrive folder from File Explorer, while another hack restores it. We've included versions for both 32-bit and 64-bit versions of Windows 10. Double-click the one you want to use, click through the prompts, and then restart your computer.
Download Remove OneDrive From File Explorer Hacks
To check whether you're using a 32-bit or 64-bit version of Windows 10, head to Settings > System > About. Look at "System type" and see whether it says you're using a "64-bit operating system" or "32-bit operating system."
These hacks just change the same settings we changed above. Running the "Hide OneDrive From File Explorer" hack sets the value to 0, while running the "Restore OneDrive to File Explorer" hack sets the value back to 1. And if you enjoy fiddling with the Registry, it's worth taking the time to learn how to make your own Registry hacks.
If any local copies of your OneDrive files have synced to your PC, you may want to delete them to free up space. Navigate to the C:\Users\NAME\OneDrive folder, which contains your user's downloaded OneDrive files. These won't be automatically deleted when you unlink your account and stop syncing. Deleting them won't delete them from OneDrive if your account is unlinked from OneDrive---they'll just be deleted from your local device.

