Quick Links
Having a home packed with smart devices is great but managing them all in a smooth and unified fashion can be a nightmare: enter the home automation hub. Read on as we field test the Wink Hub and show you how to get your devices working together.
What Is The Wink Hub?
Wink is a smart home/home automation platform created through a partnership between Quirky and GE to manage and control smart home products made by the partnered companies. The platform was later expanded to include more companies and now the Wink system is capable of controlling a wide range of devices from multiple brands including everything from lightbulbs to appliances.
The Wink Hub is the centerpiece of the Wink system and serves as a link both between your smarthome devices (such that your smart bulbs can turn on when triggered by another smart home device like a smoke detector) as well as the smarthome devices and the greater Internet (so you can make adjustments to your home while sitting at your office or on vacation). Further, the Hub uses the Wink mobile software that provides an all-in-one dashboard for controlling all your smarthome devices.
One of the biggest selling points of the Wink Hub is that it features multiple radio sets and supports smarthome devices that use ZigBee, Z-Wave, Bluetooth, Wi-Fi, and a 433 Mhz radio chip used by Lutron and Kidde devices, and it has an open API which makes it easy for companies to make compatible products.
The Wink Hub retails for $50 and the control software is available for Android and iOS devices. For those without Android or iOS devices (or who wish to have a physical control center in their home) there is another device in the Wink stable, the Wink Relay ($200), which is wall-mounted Android-based device that is essentially the Wink Hub on steroids with a touch screen and two physical switches.
As of this review the Wink Hub is available only directly from Wink or from Home Depot.
How Do You Install and Configure It?
The push toward widespread consumer adoption of smarthome products has yielded some really user-friendly installation processes and user interfaces and the setup and use of the Wink is definitely part of this trend. Let's take a look at setup and configuration.
Setting Up the Hub
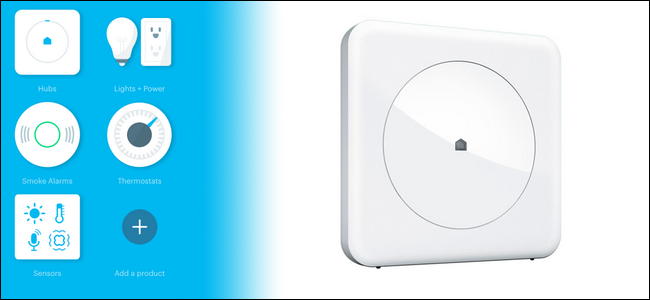
The physical hub is fairly large compared to the form factor of other smart hub type devices. It has an 8"x8" face with a 3" depth and a small easel-like projection at the back to keep it upright. The face has a very slight circular depression in it with the Wink logo in the center and a tiny curved LED window at the top of the circle.

The majority of all setup and configuration occurs via the smartphone app so the extend of physical setup for the hub involves finding a good location in your home and plugging it in. As long as it's within range of your Wi-Fi router one place is as good as another once you factor in whether or not you want to see the hub and your tolerance for the bright LED. When you turn the hub on you might not think the LED is particularly bright when viewed in a daylight room but the continuous "everything's OK" blue LED indicator feels laserbeam bright at night; we were able to easily navigate around a room at night with no other illumination that that of the hub.
The searing brightness of the LED can be easily dampened with a inconspicuous bit of white electrical tape but we will say, as those who like to wall/rack-mount our networking gear, we were disappointed that the device could neither be put flush to a wall nor did it even have wall mounting holes. That's a very minor complaint, mind you, and it's not like it was difficult to tuck the bridge out of sight behind our media center.
Installing the Wink App
Once you have the hub plugged in and the LED is blinking away as it awaits a real network connection and the ability to check for firmware updates and the like, it's time to install the mobile app. To that end, vising the app store for your Android or iOS device and grab the free Wink software (iOS / Android).
Those of you who have been following along with our smarthome product reviews will recognize the app interface (and the initial steps) immediately as both the GE Link smarthome starter kit and the more power Wink Hub use the same Wink control software.
Launch the app and follow the on-screen instructions for creating a Wink account (if you have previous experience with Wink products like the aforementioned GE Link kit you can, and should, use the same credentials).
Once you've logged in with your account it's time to add the Wink Hub to the control software. If smartphone's Bluetooth radio isn't already on, take a moment to do so now as the initial setup process for the hub occurs over Bluetooth.
Linking the Hub to Your Network
With the app installed, your account created, and Bluetooth on, it's time to add your hub to the app and configure its network access.

From the Wink app home screen tap on the "Add a product" + symbol, select Hubs, and then select "Wink HUB". You'll be prompted, in helpful pictorial format, to complete the steps we've already completed (plugging it in, turning Bluetooth on, and so on).

Plug in your Wi-Fi credentials, hit "Connect Now" and feel free to leave the hub alone for a good ten minutes. It will connect to your network, check for updates, download and run any updates, and setup routines all while the LED shifts through a rainbow of colors. When the LED comes to rest at solid blue the process is complete. After click "Done" you'll be kicked over to the Hub page within the Wink app and given a mini overview of how to add a device.
Adding Smart Home Devices to the Hub
The process of adding devices to the Wink Hub is very straight forward and we even made a pleasant discovery along the way (more on that in a moment). To add a device simply select the hub from the Wink sidebar menu (accessible by tapping the menu button in the upper left corner of the user interface).
There you select "Add a Product" and then select whatever product you wish to add to the hub. Let's add a few of the extra GE Link bulbs we haven't gotten around to linking yet.

Once you finish selecting the device you want to add you'll be presented with a step-by-step pictorial process tailored specifically for that device. The process was as easy (and identical) as it was when we added Link bulbs during our review of the GE Link lighting kit. What surprised us was how easy adding other smarthome items was like our Nest Learning Thermostat and Philips Hue Bulbs.
Or, more accurately, we should say that we weren't necessarily surprised that it was easy to add them, but we were very surprised to find that we could add them and retain the full functionality of their individual control applications. We had presumed that we'd need to remove the Hue Bridge from our smarthome network and re-pair the Hue bulbs with the Wink Hub. While we could have done just that, the Wink Hub offered us something even better: the ability to add the Hue Bridge right into the Wink Hub. In this way you can use the Wink Hub to control the Hue bulbs while simultaneously using the Hue Bridge/App (if there are certain features, programmed scenes, or other Hue-specific things you wish to continue using). The same thing happened with the Nest thermostat and Nest Protect smoke alarms; you can control and interact with them via the Wink software but the devices otherwise stay independent and mated to their own applications (which typically over more advanced control for those moments you need to fine tune things).
Given how walled-garden a lot of products can be it was a very pleasant surprised to see that we could add products to the Wink Hub without removing them from other devices first.
Using the Hub
Once you've installed the hub, configured it, and added devices, you're ready to interact with your devices through the Wink Hub and application. There are several manual ways you can interact with your devices as well as semi-automated and automated ways too.

The navigation bar at the bottom of the screen gives you access to the major functions of the hub. The Home page (seen in blue above) showcases the attached hub, lights, and sensors. You can tap on any of the general categories to dig down to individual smart devices and make adjustments to them. Although it's a useful (and necessary) feature to control each individual object in your smarthome stable this is the least powerful section of the Wink software as all it really accomplishes is giving you the ability to control devices from afar (e.g. turning off the lights without going to the switch or adjusting the thermostat from the couch). In the screenshot below you can see both the simple interface for adjusting smart bulbs as well as the sequence, accessed via the upper right menu button, of linking the bulbs into a group for ease of use.

The Shortcuts page is where you can create simple shortcuts like a single button to dim the lights and lower the automated blinds when it's time to watch a movie or to otherwise link together multiple changes in your smart devices. (If you're used to the concept of "scenes" in the Philips Hue smart lighting system the shortcut system is exactly like that.) This is a step up, in terms of usefulness and power, from the individual toggles of the Home interface. Instead of adjusting five different items one at a time, you can tap a single button labeled "Morning Routine" or the like and achieve the same effect.
The Robots page is where you can create simple automated events like having the Wink Hub turn on all your lights and alert your phone in the event that your smoke detector detects smoke or getting a notification when the smart lock is engaged with the dog walker's security code. While the Robots section is very easy to use it might lack the nuance you're looking for: that's where Wink's IFTTT integration comes in handy (check out some of the clever recipes over at IFTTT.com like automatically locking your doors and turnining off the lights when the Nest detects you're away from home). By far the Robots and IFTTT integration is the most powerful element of the Wink experience as it allows you to not only take input from your existing devices (with the Robots function) but it can even use input from external sources (like the Emergency Weather Service) via the IFTTT system.
The Good, the Bad, and the Verdict
After spending a month with the hub what do we have to say about it? Let's take a look at the good, the bad, and the verdict.
The Good
- $50 price point is consumer friendly (and anywhere from $50 to $250 cheaper than other consumer smart hubs).
- No monthly fee/subscription for the service.
- The setup process is very user friendly and the guided steps make it nearly foolproof.
- Accepts smart devices (like the Philips Hue bulbs) without forcing you to pair them directly to the Wink Hub.
- Supports IFTTT protocol.
The Bad
- No web access; you can only control the Wink Hub via your iOS/Android device.
- The hub requires continual Internet access for functionality (if your Internet connection is lost so is the connectivity between the hub and all your devices).
- This is a minor quibble but the LED indicator light on the hub is bright enough illuminate a room at night.
- Another minor quibble: there's no good way to wall mount the device (on account of the missing mount holes and the easel-like shape).
The Verdict
Although we had some minor complaints about the physical design of the hub (did we mention we like wall mounting?), overall our experience with the Wink Hub was a positive one. The setup process was painless, and we spent more time waiting for the device to finish updating than we actually spent adding and configuring our devices. Once configured the hub worked exactly as promised and offered a pleasant and smooth user experience that gave us access to all of our smart home devices without completely taking them over and locking us in to just using the Wink app.
Even the thing that we found most problematic about the Wink Hub, the total reliance on Internet connectivity for functionality, is more of a dislike based on principle than practice. Our cable modem connection in a modestly sized metropolitan area is rock solid and easily has uptime in excess of 99.99%. Realistically the reliance on a live connection isn't a big issue for most people with modern broadband connections, but the device should still perform local functions (like localized shortcuts and automated triggers) without Internet access. There's no reason why smart bulb mood lighting should be dependent on Internet access.
Those minor and major complaints aside, the Wink Hub is a great value at a mere $50 (and with no subscription fees at that). It connects with tons of products across dozens of brands, it supports multiple connection types to get your various devices talking to each other in a useful and meaningful way, and it has a pleasant-to-use interface wrapping it all together. Whether you're just getting started in smart home and home automation or you've got a stable of products you'd like to link together, the Wink Hub currently offers the broadest reach of any smart home hub on the market.
Have a question about or experience with smart home automation? Jump into the forum below learn more or share what you know.