Quick Links
Apple's operating system's menu bar is truly old school; it's been around for as long as there have been Macintoshes. The menu bar is extensible, though some users may not realize just how much, so we'll show you the many ways you can add functionality to it.
If you have ever heard anyone use the phrase "the more things change, the more they stay the same" then they could have been very well talking about Apple's menu bar. It really is an OS relic that just keeps going and going and going.

Of course, the menu bar has changed and its function has evolved, but the basics are all still there and it very much looks the same as it did back in 1984.

Today, the menu bar lets you add all kinds of extra functionality to it. You can easily check your Mac's energy status (particularly helpful if you're using a laptop), or you can start Time Machine backups, or log into another account with fast user switching, etc.
In fact, many of the System Preferences have icons you can add, and many applications will also use the menu bar so users have convenient access to features and functions.
In this article, we're going to show and talk about all the different things you can add to the menu bar using only what you'll find in the system preferences. This includes not only the things we've already mentioned, but all the other preference menu bar items we could find.
It's helpful to know all about these because if you hold the "Command" key down, you can move and rearrange them. If you drag one out of the menu bar it will be removed. If you didn't mean to do that, or want it back, then here's how to restore it.
Left to Right, Top to Bottom
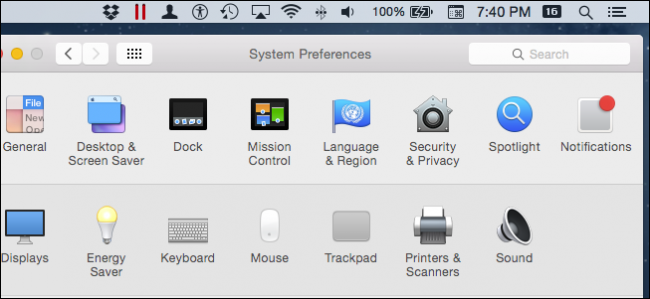
These are our System Preferences as they appear on an early 2014 Macbook Air running Yosemite (10.10.3). Anything enclosed with a red square has an option to add a menu bar icon, some even allow for further customization.

The preferences are laid out in four rows, representing the following (more or less) categories: personal, hardware, Internet and wireless, and system. There may also be a fifth row (not pictured) with third-party applications and utilities, if you have installed any.
We're going to go through each row, from top to bottom and talk about every system preference that has any kind of menu bar extensibility options.
Personal Preferences
The personal preferences consist mainly of things that will appeal to your OS X use and sense of style. You can alter the system's appearance (a little), change dock behavior, and configure how notifications appear, if at all.

There a two items in this row of preferences that have can affect the appearance or place an icon on the menu bar: Language & Region and Security & Privacy.
Language & Region
The Language & Region preferences are for setting your system language (which appears on menus and dialogs), as well as the way dates, times, and currencies are formatted.

There's only one notable menu bar item here, which is to change the clock to 24-hour time (some might call it Military Time).

If you're using the analog clock feature, then you can click on it and still see the time in 24-hour format.

That's the extent of Language & Region's influence on the menu bar. Let's turn to the next item in the Personal row, Security & Privacy.
Security & Privacy
Like Language & Region, the Security & Privacy preferences don't do a whole lot to the menu bar, but Location Services still uses it to announce its presence from time to time.

An arrow will sometimes appear on the menu bar, such as when Safari or the Weather widget on the Today pane needs to update itself.

More often than not, you won't see Location Services requesting information, or it will happen very briefly, and the little arrow will then disappear. If you want to turn this off, then uncheck the box next to "Enable location services".
Hardware Preferences
The second row consists of all things hardware-related. If you need to change how your laptop consumes energy on battery, or the way the keyboard or trackpad behaves, or all things printer-related, the Hardware preferences are the place to go.

Of the seven items on the Hardware preferences, we're going to focus on Displays, Energy Saver, Keyboard, and Sound.
Displays
The Displays preferences allow you to change stuff with your system's displays, both built-in and attached. This can include the arrangement of your multi-monitor setup, rotation, and resolution.

If you have an AirPlay display or device, you can mirror your desktop to it, and you can select to show mirroring options in the menu bar.

In our case, we have an Apple TV to which we can mirror our desktop, and since we have a second display connected to the Mini DisplayPort, there are several choices you can make here as to which displays are mirrored, or whether you want to extend you desktop.
Energy Saver
Laptop users will be most concerned with the Energy Saver options, though desktop users will likely want to make changes to how their system consumes or conserves power.

In the menu bar, we can click on the battery icon and and see its charging status, and you can also display the remaining life as a percentage.

Note that, if your battery doesn't seem like it's lasting as long as you would like it to, the battery icon will show which apps are using the most energy, then you can close those apps to eke more time out of a charge.
Keyboard
The Keyboard preferences have two options for the menu bar. On the "Keyboard" tab, you can elect to "Show Keyboard & Character Viewers".

With the keyboard and character viewers enabled, you gain easy access to the onscreen keyboard, symbols, arrows, and more.

Here we see both as they might appear on your display. The character viewer in particular is handy for inserting Emoji into your text exchanges.

The keyboard and character viewers actually share the same icon with the "Input menu". When the former is hidden, the latter is the shown (unless it too is hidden).

With the input menu item enabled, if you have multiple keyboards (US English, UK English, Spanish, Russian, etc.), you will see them displayed here when you click on the flag icon on your menu bar, so you can effortlessly switch between them.

There's no way to access the input sources when the keyboard and character viewers are shown, but you can always "Open Keyboard Preferences..." if you need to change to another input source.
Sound
The Sound (volume slider) icon is basic, and whether you show it will probably depend on whether your keyboard has media keys (it likely does) to quickly adjust the volume.

Honestly, the volume slider in and of itself is pretty mundane. It doesn't even have a simple way to mute your sound other than completely sliding it to the bottom.

That said, if you use the versatile "Option" key once again, you can conveniently access your output and input devices, so you can change them on the fly.

Obviously the Sound preferences have a lot more to offer than volume control, so if you have various inputs and outputs connected to your Mac (Bluetooth, HDMI, AirPlay, etc.), take a minute to learn more about the options available to you for switching and controlling them.
Internet and Wireless Preferences
The third row of system preferences don't all fit into the neat and tidy "Internet and Wireless" category but there's only two that have menu bar icons.

Of the six items available here, we're going to discuss the Network and Bluetooth preferences.
Network
First, the Network preferences menu bar presence can be found in Wi-Fi. If you're on a desktop Mac and/or plugged into a wired network, then this won't matter as much.

For everyone else using a wireless desktop or Macbook (which is a lot of Apple users), the Wi-Fi status is more than likely a staple icon on your menu bar.

So while ultimately simple in purpose, it's also fairly indispensable.
If you're in need of other pertinent and advanced connection information, such as your IP address, MAC address, or you want to enable/disable Wi-Fi logging, then you can use the "Option" key for further options.
Bluetooth
Bluetooth is another item, which if you have Bluetooth devices, be they phones, tablets, speakers, or audio receivers, then you're going to want to be able to control them using the menu bar.

With the Bluetooth icon shown, you can change to another Bluetooth device, send and browse for files, and turn it off (ultimately saving a little more battery).

Pressing the "Option" key will give you choices to create a diagnostic report, see its MAC address, and ascertain whether your computer is discoverable.
System Preferences
Finally, the fourth row of preferences, are aptly categorized as System preferences because they affect things across the whole system. This includes stuff like users, groups, parental controls, accessibility, and more.

Of the eight items on this row, we're going to discuss Users & Groups, Date & Time, Time Machine, and Accessibility.
Users & Groups
The Users & Groups preferences feature a "fast user switching menu" that you can configure to your liking.

When you then click on the fast user switching menu bar icon, it will show your accounts (if you have more than one on your system) as well as the option to open the login window.

Beyond hiding or showing the fast user switching menu, you can decide whether it appears as an icon, your full name, or your account name.
Date & Time
The clock is another item that is unlikely to be hidden, though you can if you want by unchecking the "Show date and time in menu bar" box.

When you turn on all the options, you can see time separators, seconds, the date, and day of the week.

One final note, you can change the clock to 24-hour format versus AM/PM but obviously you can't have both (that wouldn't make sense). Don't forget, you can also enable the 24-hour clock in the Language & Region settings.
Time Machine
If you're using Time Machine, which is highly recommended, then you can show its icon on the menu bar.

The Time Machine menu bar icon will let you start and skip backups and enter Time Machine.

If you hold the "Option" key you can verify backups and browse other backup disks.

We're almost finished, we have just one more system preference menu bar item to talk about.
Accessibility
The Accessibility options include an array of tools for zooming, showing captions, setting sticky keys, and much more.

Clicking on the Accessibility status icon will simply show you which accessibility features are off and which ones are on. Beyond that, it provides the usual quick shortcut to the preferences if you need to make any changes.

That then brings us to the end of the menu bar extensibility found in OS X's system preferences. By now, you've likely noticed other icons on our menu bar, which let us control third-party applications - things like Skitch, Dropbox, Parallels, and many more.
However, if you never add anything else to your system, then these menu bar items are what you get. That's not to say there aren't other things you can show, but if there are, they don't appear on this particular Macintosh.
On that note, we'd like hear from you. Did we miss something? Is there anything else that OS X lets you add to the menu bar that you can tell us about? We encourage you to leave your feedback such as comments, questions, and suggestions, in our discussion forum.