Photos was released as part of a larger OS X system update (10.10.3). The app is meant to supplant iPhoto as most Mac user's go-to photo application. As such, it's got quite a few basic but necessary photo-editing tools in it.
UPDATE: For a newer version of this article, check out our guide to editing your pictures using the macOS Photos app.
We've previously introduced Photos when we discussed how to move its library to a different location, as well as what every user should know about its iCloud sharing settings. But up to this point, we've not really talked about the application itself.
When you first start using Photos on OS X for the first time, it doesn't become immediately apparent that you can edit with it. You still need to select a photo or photos and open them in editing mode.
On the "Photos" view, everything will be arranged by date. This view only allows you to edit photos one at a time.

The backwards arrows will let you take a much wider view of things, which is useful for quickly sorting through your library if you have a lot of content.

If you click on the "Albums" view, then you can select "All Photos" (or any other album in which you've sorted them). This is the easiest way to edit a group of photos, rather than having to select each one separately.

In your All Photos album view for example, double-click on any photo to make it bigger. From here, you can use the arrow keys to move through your photos.

Here, you see you can show or hide the split view, which displays all the photos in your album. Use the slider to zoom in or out.

With a photo selected, there are options in the upper-right corner to mark it as a favorite, see its info, and most importantly, "Edit" it.

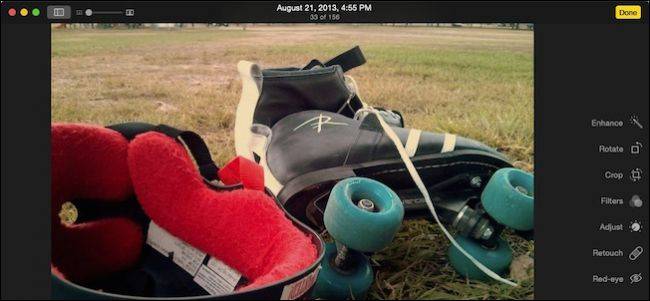
Editing mode is much different from view mode. When you click "Edit,, the application turns dark and tools appear along the right edge of the window.

Note, there are generally a lot of similarities between OS X's Photo's editor and iOS's Photo's editor. Both share a single-click "Enhance" button, a "Crop" button, filters, adjustment options, and a "Red-eye" remover.

Just about everything is the same except OS X's Photos separates crop and rotate functions, and adds a "Retouch" button, which gives you the ability to smudge out little blemishes and imperfections.

When you edit your pictures, you can click the button "Revet to Original" to undo your changes, or click "Done" to exit and/or commit to them.

Note, when you click "Done" you're not necessarily finished. You can still go back into the photo you just edited and revert to the original.
Perhaps you want to edit your photos and save it as a new one. Click the "File" menu while you're viewing your photo (doesn't matter if it's in View or Edit mode) and select "Export." You can then export that photo (or as many as you have selected) or the unmodified original(s).

As you can see, using Photos to edit your pictures is really easy and it gives you enough tools to do all but the most advanced functions.
Yes, they are very basic and won't approach the kind of power you have with applications like PhotoShop, Gimp, or even something like Picasa. But that's okay, just being able to do simple crops, or apply filters, or adjust brightness and contrast, is often more than enough for most of us.
Best of all, and this is where the application really shines, whenever you make any changes, they are replicated across all your devices connected to your iCloud account. This means that if you want to use your Mac to edit your photos quickly, your new changes will appear on your iPad, iPhone, or iPod Touch.
If you have any comments or questions you would like to offer, please leave your feedback in our discussion forum.