Quick Links
Most users have a smooth and trouble free experience with the Google Chromecast, but when it misbehaves the experience quickly goes from flawless to nearly unusable. Read on as we highlight the simply tweaks and fixes you can apply to get an underperforming Chromecast zipping along again.
Note: Although we've focused on the Chromecast due to its popularity and the number of reader requests for assistance we receive based on that popularity, most of the following tips and tricks can be applied to just about every streaming HDMI stick including the Amazon Fire TV Stick and the Roku, as they address quite a few issues that apply to the entire hardware category.
In the realm of streaming HDMI sticks the ease of use and application integration the Google Chromecast enjoys is as-of-yet unparalleled. We loved it when we reviewed it back in 2013, and we still love it. That said, the user experience of the Chromecast usually falls into two distinct categories: unbelievably easy to setup and use or very frustrating.
It shouldn't be very frustrating, however, so let's run through a list of things you can do to troubleshoot a misbehaving Chromecast to get the smoothest user experience possible. The following tricks are focused on improving your general Chromecast experience; if your Chromecast is giving you specific error messages we recommend using Google's handy error troubleshooting menu here.
Chromecast Spontaneously Restarts
If your Chromecast's video output is blacking out sporadically (as opposed to pausing to buffer), the Chromecast restarts altogether, or the Chromecast is stuck in a loop of rebooting constantly, this is the section for you.
Check the Power Supply
If your Chromecast isn't stuck outright in an endless reboot loop the culprit is almost always a poor quality power supply.
Many users hijack the USB service port on their television as a very convenient way to provide power. While we don't fault you for doing it this way (and we, in fact, used to do it this very way as evidenced by the photos in our original Chromecast review) it's not actually the most ideal way to power your Chromecast.
Not only do most HDTV sets cut the power to the USB port when the television is off (therefore you have to wait for your Chromecast to restart and potentially download an update every time you start your TV) but not all USB ports are created equal on HDTV sets and it's possible that the port, especially on cheaper sets, is out of spec, poorly grounded, or otherwise not provided clean and steady power to your Chromecast.
If you're using the USB port on your HDTV to power your Chromecast, your first troubleshooting stop should be to plug it into the power supply that came with the Chromecast and power it off wall current.
If, after switching the cable from the TV to USB port to the included charger, you find that this doesn't resolve the spontaneous restarting or video blackouts the next step would be to replace both the charger and the USB cord. While most of us have extra cellphone chargers laying around, if you want a brand new one you can always pick up a highly rated charger like this Samsung OEM travel charger. You'll spend a few bucks more than a generic charger but you'll get a higher quality product with a safer and more consistent power supply.
Factory Reset
While unpredictable black screens and reboots are typically the result of a poor power supply it's a significantly less likely (but not impossible) culprit when it comes to reboot loops.
If your Chromecast gets stuck in a permanent reboot loop that isn't resolved by simply unplugging the unit's power source for a few minutes and plugging it back in, there's a good chance that something went awry during a firmware update or a key bit of data on the device was corrupted (potentially as a result of a the kind of poor power supply problems we highlighted in the previous section).
To resolve your issue you can perform a soft or hard reset (although if it is cycling quickly a soft reset is generally out of the question). The short of it is this: hold the physical button on your Chromecast (near the power port) for 25 seconds until the power light blinks. If you want more information about the ins and outs of soft and hard resets, check out our guide here.
If neither swapping out the power source nor factory resetting the device solves the blackouts and/or reboot loop, you'll need to return your Chromecast (if it's less than one year old for a new unit or 90 days for a refurbished unit). You can find the return instructions here.
Video Stutters or Drops Out
Less serious than the outright failures outlined in the previous section, stuttering video, excessive buffering, or temporary blackouts in the video stream are still annoying and greatly reduce your viewing enjoyment. Fortunately they're much easier to iron out. Let's take a look at the common causes.
Poor Wi-Fi Signal
The Chromecast and HDMI streaming friends are all Wi-Fi only which means a lackluster Wi-Fi signal is the outright death of them. The simplest, albeit not the most sophisticated, way to check the Chromecast's signal strength is to look at the Chromecast's splash screen (the screen displayed when there is no video playing and the device is idle).
In the lower lefthand corner a small amount of rotating text is displayed. Wait for your Wi-Fi network name to appear and then check the signal strength indicator beside it. The indicator uses the common 4-bars representation to display signal strength.
If you have poor signal strength, per the Chromecast's reporting, there are two primary approaches you can take. To decide which approach is most appropriate, take another Wi-Fi enabled device like a phone, tablet, or laptop over by your HDTV and check the signal strength.
Extend the Chromecast for Less Interference
If your other device has a strong signal by the television but the Chromecast does not, there's a good chance that the position of the Chromecast itself is the culprit. To that end you need to get your Chromecast away from the body of the TV and/or away from the wall.
The easiest way to that is to use the small HDMI extender included with the Chromecast (which you should be using anyway because it protects your Chromecast from shearing damage if anyone or thing puts pressure on the connection point). In extreme cases where you, say, have a very thick and well- shielded plasma HDTV or the like against a lathe plaster wall at the edge of your router's reach, you might need to extend your Chromecast further away from the body of the TV and wall with a longer HDMI extension cable.
Boost Your Wi-Fi Signal
Speaking of your router, if both the Chromecast and the mobile device you put near your HDTV to test the signal have poor signal strength it's likely that your Chromecast is on the edge of your router's range and the only real solution is to either move the whole setup, TV included, closer to the router, to move the router closer to the TV, to upgrade the router to increase signal strength and range, or to use some sort of Wi-Fi extender (like the recently reviewed Netgear EX1600) to extend your Wi-Fi network.
Full featured extenders like the EX1600 that include an ethernet port for LAN-to-Wi-Fi extension are especially useful if you have an ethernet drop near your entertainment center as you can create a strong and very local Wi-Fi access point just for your Chromecast and other media center devices.
Congested Network
If you have a strong Wi-Fi signal per the Chromecast and your proximity-to-HDTV test and, importantly, you know you have a speedy enough broadband connection to deliver the content you want to watch, the most likely culprit is network congestion. This congestion can take two distinct forms that require two distinct solutions.
Enforce Quality of Service (QoS)
The first kind of congestion is the kind of congestion you inflict upon yourself: heavy local traffic. If you have a lot of connected devices in your home chewing up bandwidth in their various ways (people gaming, downloading updates, file sharing, etc.) the performance of individual activities can suffer and in the case of more time/lag sensitive activities like streaming video the quality of playback and suffer greatly.
This is where Quality of Server (QoS) rules come into place. QoS rules allow you to prioritize certain types of traffic over other types of traffic to provide a better user experience. While many new routers are quite good at automatically recognizing types of traffic and automatically prioritizing streaming services over other services to ensure they have enough bandwidth, not all routers do this and most older routers do not.
While the QoS setup is slightly different on each router, the general premise is the same: find the things you want prioritize and give them a high ranking so when those things (like the Chromecast) demand more bandwidth they get it and don't have to compete with other less important data streams.
Change Your Wi-Fi Channel
The other kind of network congestion is not a bandwidth congestion issue as we just highlighted but an wireless spectrum congestion issue. The Chromecast, unfortunately, doesn't support 5GHz Wi-Fi and is stuck on the 2.4GHz band; the 2.4GHz band is quite congested with traffic (especially if you live in a big apartment complex where there may be dozens of routers right around you).
In such a case you can have a strong Wi-Fi signal but when it comes to consistent data transmission (the kind you want for smooth video playback) a heavy use 2.4GHz band can cause problems. Alas you can't switch the Chromecast to the 5GHz band but you can check which channels (the subdivisions of the 2.4GHz band used by 2.4GHz routers) are the most optimal for your location.
To that end you'll want to check out our guide to finding the best Wi-Fi channel and use the tools therein to determine which channel is the least congested.
Tab Casting Lag
Our final trick, unlike the prior tips that can be broadly applied with a little tweaking to the Fire TV Stick and the Roku stick, is very Chromecast centric: how to improve local tab casting.
One of the experimental, but widely used, features the Chromecast sports is the ability to cast pretty much anything from the Chrome web browser tab to your Chromecast. While that's a fantastic feature, it definitely lives up to its beta tag and doesn't always provide the same perfectly smooth experience a well-configured Chromecast provides when, say, streaming YouTube.
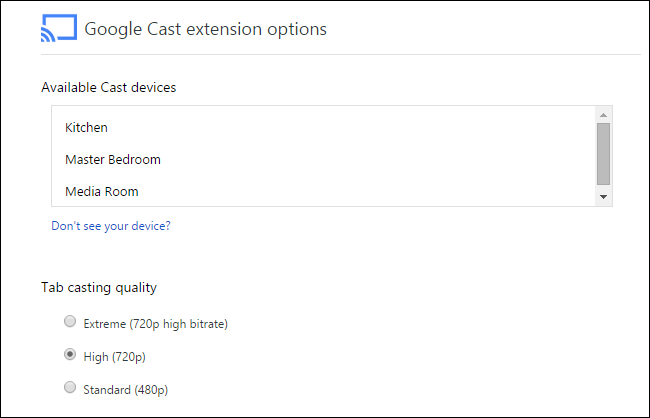
Although it doesn't necessarily make your casting experience any prettier, if you've already done your best to rule out Wi-Fi problems, and you're still having issues with tab casting, the best option is to hop into the options for the Chrome extension and adjust the video quality. By right clicking on the Chromecast extension in Chrome and selecting options you can access this menu (note: the prior direct link only works if you're using Chrome with the Chromecast extension installed).
Here you can dial it down as low as 480p. Your cast might not look as pretty, but a loss of resolution to ensure no dropped frames and smooth playback, is a small price to pay.
With a few simple tweaks and careful troubleshooting you can get your Chromecast up and running to enjoy the smooth experience you'd expect. Have a Chromecast and want to do more with it? Shoot us an email at ask@howtogeek.com with your Chromecast inquiries and we'll do our best to help.


