Wouldn’t it be nice to be able to try a new version of Ubuntu while knowing you can return to the previous version if you don’t like it? We’ll show you a tool that allows you to take a snapshot of your system at any time.
TimeShift is a free tool that is similar to the System Restore feature in Windows. It allows you to initially take a snapshot of your system and then to take incremental snapshots at regular intervals. TimeShift protects only system files and settings, not user files such as documents, pictures, and music. You can use a tool like Back In Time to backup your user files.
NOTE: When we say to type something in this article and there are quotes around the text, DO NOT type the quotes, unless we specify otherwise.
Recently, we showed you how to back up your applications and PPAs using a tool called Aptik, which is included in the same PPA as TimeShift. First, press Ctrl + Alt + T to open a Terminal window. If you haven’t installed Aptik, type the following two commands (separately) at the prompt, pressing Enter after each command, to add the PPA and update it. For more information, see our article about Aptik. Note: you may have to remove the -y switch to get it to work.
sudo apt-add-repository -y ppa:teejee2008/ppasudo apt-get update
If you have installed Aptik, you are ready to install TimeShift and do not need to enter the previous commands. Type the following text at the prompt and press Enter.
sudo apt-get install timeshift
Type your password when prompted and press Enter.

Once the installation is finished, close the Terminal window by typing “exit” at the prompt and pressing Enter or by clicking the “X” button in the upper-left corner of the window.

To open TimeShift, click the “Search” button at the top of the Unity Launcher bar.

Type “timeshift” in the search box. Results of the search display as you type. When the icon for TimeShift displays, click on it to open the application.

A dialog box displays asking for your password. Enter your password in the edit box and click “OK.”

The main TimeShift window displays and the system size is estimated. The “Backup Device” drop-down list allows you to select a different drive or partition to be backed up, if you have more than one.

The amount of space needed for the snapshot is listed on the bottom status bar. Snapshots are saved on the selected device so be sure you have enough space to store the snapshot. To back up the selected “Backup Device,” click “Backup” on the toolbar.

While the snapshot is being created, a “Synching files...” message displays in the bottom status bar.

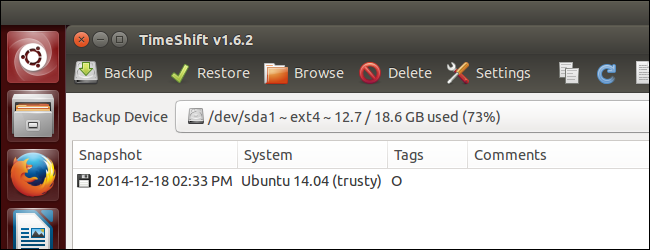
When the snapshot is finished, it is listed with the date and time and the name and version of the system. The status bar states how much space is free on the system after the snapshot is taken and states when the last snapshot was taken.

Moving the mouse over the “Backup Device” drop-down list shows you the path where the snapshots are saved on the selected device.

The “timeshift” directory contains the various snapshots taken using TimeShift, including scheduled snapshots, which we will discuss later in this article.

The “snapshots” folder contains snapshots taken manually. We recommend that you copy the folder for your snapshot to a USB flash drive, network drive, or a cloud service, such as Dropbox or Google Drive, in case it gets corrupted or deleted.

You can see what’s in the snapshot by clicking the “Browse” button.

The snapshot directory is opened in a Files Manager window and the directories and files from your system (no user files) are listed.

There are various settings you can customize, such as setting up automatic backups and choosing when older snapshots will be automatically removed. To access the settings, click “Settings” on the toolbar.

The “Schedule” tab allows you to specify times when snapshots will be performed. Click or slide the ON/OFF slider button to turn on the “Scheduled Snapshots”. Select the check boxes in the “Enable” column to specify the time interval for the snapshots.

The “Auto-Remove” tab allows you to automatically remove older snapshots so you don’t run out of space on your hard drive. There is a “Rule” for each type of snapshot. Enter a “Limit” for each type to tell TimeShift to remove snapshots older than the specified limit, including a limit for when free space is less than a certain amount.

The “Advanced” tab allows you to exclude specific files, directories, and directory contents from and include specific files and directories in the snapshots.
When you’ve finished customizing the settings, click “Save.”

When you want to restore a snapshot, open TimeShift, select a snapshot and click “Restore.”
NOTE: Depending on the state of your system, you might have to install TimeShift again.

The “Target” tab on the “Restore” dialog box allows you to specify the device to which you will restore the selected snapshot. Moving the mouse over the device in the list reveals more information about the device for restoring the snapshot. Select the “Device for Restoring Snapshot” and the “Device for Bootloader Installation.”

Use the “Exclude” tab to select applications for which you want to keep the current settings and not restore the previous settings.

The “Advanced” tab allows you to exclude specific files, directories, and directory contents from and include specific files and directories in the restored system.

To close TimeShift, click the “X” button in the upper-left corner of the main window.

TimeShift is a useful tool if you like experimenting with upgrades to your system or if something goes wrong with your system. Just like System Restore in Windows, you can simply restore your system to a previous working state rather than reinstalling your system.