If you need to reinstall Ubuntu or if you just want to install a new version from scratch, wouldn’t it be useful to have an easy way to reinstall all your apps and settings? You can easily accomplish this using a free tool called Aptik.
Aptik (Automated Package Backup and Restore), an application available in Ubuntu, Linux Mint, and other Debian- and Ubuntu-based Linux distributions, allows you to backup a list of installed PPAs (Personal Package Archives), which are software repositories, downloaded packages, installed applications and themes, and application settings to an external USB drive, network drive, or a cloud service like Dropbox.
NOTE: When we say to type something in this article and there are quotes around the text, DO NOT type the quotes, unless we specify otherwise.
To install Aptik, you must add the PPA. To do so, press Ctrl + Alt + T to open a Terminal window. Type the following text at the prompt and press Enter.
sudo apt-add-repository –y ppa:teejee2008/ppa
Type your password when prompted and press Enter.

Type the following text at the prompt to make sure the repository is up-to-date.
sudo apt-get update

When the update is finished, you are ready to install Aptik. Type the following text at the prompt and press Enter.
sudo apt-get install aptik
NOTE: You may see some errors about packages that the update failed to fetch. If they are similar to the ones listed on the following image, you should have no problem installing Aptik.

The progress of the installation displays and then a message displays saying how much disk space will be used. When asked if you want to continue, type a “y” and press Enter.

When the installation if finished, close the Terminal window by typing “Exit” and pressing Enter, or by clicking the “X” button in the upper-left corner of the window.

Before running Aptik, you should set up a backup directory on a USB flash drive, a network drive, or on a cloud account, such as Dropbox or Google Drive. For this example, will will use Dropbox.

Once your backup directory is set up, click the “Search” button at the top of the Unity Launcher bar.

Type “aptik” in the search box. Results of the search display as you type. When the icon for Aptik displays, click on it to open the application.

A dialog box displays asking for your password. Enter your password in the edit box and click “OK.”

The main Aptik window displays. Select “Other...” from the “Backup Directory” drop-down list. This allows you to select the backup directory you created.
NOTE: The “Open” button to the right of the drop-down list opens the selected directory in a Files Manager window.

On the “Backup Directory” dialog box, navigate to your backup directory and then click “Open.”
NOTE: If you haven’t created a backup directory yet, or you want to add a subdirectory in the selected directory, use the “Create Folder” button to create a new directory.

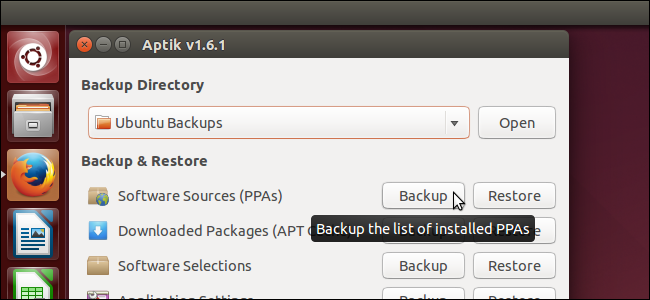
To backup the list of installed PPAs, click “Backup” to the right of “Software Sources (PPAs).”

The “Backup Software Sources” dialog box displays. The list of installed packages and the associated PPA for each displays. Select the PPAs you want to backup, or use the “Select All” button to select all the PPAs in the list.

Click “Backup” to begin the backup process.

A dialog box displays when the backup is finished telling you the backup was created successfully. Click “OK” to close the dialog box.
A file named “ppa.list” will be created in the backup directory.

The next item, “Downloaded Packages (APT Cache)”, is only useful if you are re-installing the same version of Ubuntu. It backs up the packages in your system cache (/var/cache/apt/archives). If you are upgrading your system, you can skip this step because the packages for the new version of the system will be newer than the packages in the system cache.
Backing up downloaded packages and then restoring them on the re-installed Ubuntu system will save time and Internet bandwidth when the packages are reinstalled. Because the packages will be available in the system cache once you restore them, the download will be skipped and the installation of the packages will complete more quickly.
If you are reinstalling the same version of your Ubuntu system, click the “Backup” button to the right of “Downloaded Packages (APT Cache)” to backup the packages in the system cache.
NOTE: When you backup the downloaded packages, there is no secondary dialog box. The packages in your system cache (/var/cache/apt/archives) are copied to an “archives” directory in the backup directory and a dialog box displays when the backup is finished, indicating that the packages were copied successfully.

There are some packages that are part of your Ubuntu distribution. These are not checked, since they are automatically installed when you install the Ubuntu system. For example, Firefox is a package that is installed by default in Ubuntu and other similar Linux distributions. Therefore, it will not be selected by default.
Packages that you installed after installing the system, such as the package for the Chrome web browser or the package containing Aptik (yes, Aptik is automatically selected to back up), are selected by default. This allows you to easily back up the packages that are not included in the system when installed.
Select the packages you want to back up and de-select the packages you don’t want to backup. Click “Backup” to the right of “Software Selections” to back up the selected top-level packages.
NOTE: Dependency packages are not included in this backup.

Two files, named “packages.list” and “packages-installed.list”, are created in the backup directory and a dialog box displays indicating that the backup was created successfully. Click “OK” to close the dialog box.
NOTE: The “packages-installed.list” file lists all the packages. The “packages.list” file also lists all the packages, but indicates which ones were selected.

To backup settings for installed applications, click the “Backup” button to the right of “Application Settings” on the main Aptik window. Select the settings you want to back up and click “Backup”.
NOTE: Click the “Select All” button if you want to back up all application settings.

The selected settings files are zipped into a file called “app-settings.tar.gz”.

When the zipping is complete, the zipped file is copied to the backup directory and a dialog box displays telling you that the backups were created successfully. Click “OK” to close the dialog box.

Themes from the “/usr/share/themes” directory and icons from the “/usr/share/icons” directory can also be backed up. To do so, click the “Backup” button to the right of “Themes and Icons”. The “Backup Themes” dialog box displays with all the themes and icons selected by default. De-select any themes or icons you don’t want to back up and click “Backup.”
The themes are zipped and copied to a “themes” directory in the backup directory and the icons are zipped and copied to an “icons” directory in the backup directory. A dialog box displays telling you that the backups were created successfully. Click “OK” to close the dialog box.
Once you’ve completed the desired backups, close Aptik by clicking the “X” button in the upper-left corner of the main window.

Your backup files are available in the backup directory you chose.

When you re-install your Ubuntu system or install a new version of Ubuntu, install Aptik on the newly installed system and make the backup files you generated available to the system. Run Aptik and use the “Restore” button for each item to restore your PPAs, applications, packages, settings, themes, and icons.