Is your Android Home screen getting a bit crowded? You’ve probably installed a ton of useful apps and are running out of room. However, there are probably apps you use more often than others. There is an elegant way of curing a crowded Home screen.
A free app, called Bar Launcher, allows you to add app shortcuts to the notification tray on the status bar on you Android device. To install Bar Launcher, touch the Play Store icon on your Home screen.

Search for “Bar Launcher” in the Play Store and touch “Install” on the page for the app.

Once installed, touch “Open” to open the app.

NOTE: You can also open the app from the Home screen, if you have chosen within the Play Store settings to add the shortcut to your Home screen, or from the App Drawer.
To add an app shortcut, touch the plus button in the lower-right corner of the screen.

Scroll through the list of apps and touch an app you want to add to the notification bar. Once you select an app, it’s added to the main Bar Launcher screen. To add another app, touch the plus button again and select the desired app.

You can rearrange the order of the apps by touching and holding an app and sliding it up or down. To remove an app from the list, swipe it to either side.
NOTE: Be sure to activate Bar Launcher by touching the OFF/ON slider button so it reads ON.
When you’ve finished setting up your list of apps, touch the “Home” button on your device to return to the Home screen.

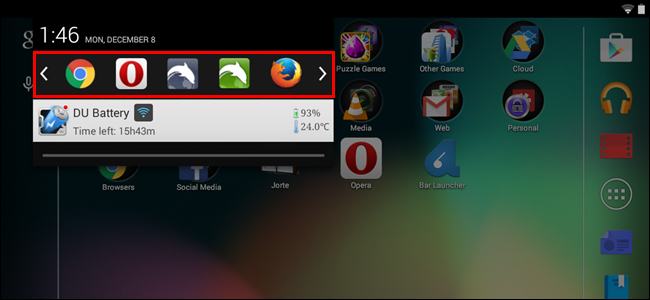
Now, when you swipe down on the left side of the status bar, the apps you chose display on the notification tray of the status bar in the order you specified in Bar Launcher. You can customize Bar Launcher further by adding rows and specifying where on the notification bar the apps display. Read on to find out how.

Back in Bar Launcher, touch the menu button (3 vertical dots) in the upper-right corner and then touch “Settings.”

The “Settings” screen allows you to specify whether the Bar Launcher icon is shown in the status bar, change the priority/position of the apps on the status bar, and change the color of the arrows (for accessing other rows of apps, which we will discuss later).

If you turn off the “Icon” check box, that removes the icon from the status bar.
NOTE: If you choose to hide the Bar Launcher icon in the status bar, the icon is hidden, but a blank space displays in its place.
The “Priority” setting allows you to specify where the app bar is placed in the notification tray on the status bar. “Maximum priority” places the app bar at the top of the notification tray at all times. If you want the app bar below your ongoing notifications, choose “Normal priority.” To place the app bar below any and all notifications, choose “Minimum priority.”

The “Arrow color” setting refers to the color of the right and left arrows that display when you have defined more than one row of apps, which we will show you how to do next. Since the notification tray is generally black, it’s smart to leave the selection for “Arrow color” on “White”. However, if you have a theme that changes the notification bar color to a lighter color, you can select “Black.”
If you want to add many apps to the app bar, you can add more rows. To add a row to the app bar, touch the menu icon in the upper-right corner and touch “Add row.”

Enter a name for the new row on the “Add Row” dialog box and touch OK.

After adding a row, the menu becomes available so you can select a row. Touch the name of the new row.

Use the plus button to add apps, as described above, to the selected row.

You can rename rows as well. To do so, touch the menu button again and then touch and hold the name of the row you want to rename.

On the “Manage Row” dialog box, touch “Rename Row.”

The “Add Row” dialog box displays even though you are not adding a new row. To rename the row, replace the text with the desired name and touch “OK.”

NOTE: You can also use the “Manage Row” dialog box to delete the selected row. Touch “Delete Row” to delete the row. A dialog box displays to make sure you want to delete the row. The action cannot be undone and the apps you had added to the deleted row are NOT moved to another row. You must add them again to another row if you want them on your app bar.

When you have more than one row of apps defined and the first row is displayed, an arrow displays to the right of the app icons in the color you specified in the settings. Touch the arrow to access the next row of apps.

When you have more than two rows of apps defined and one of the middle rows is displayed, there are arrows on either side of the row of apps providing access to the previous and next rows.

Here is an example of a Bar Launcher app bar on a Samsung Galaxy Note 4.

If you decide you don’t want the app bar, you can easily turn it off using the OFF/ON slider button in the Bar Launcher app. The rows and apps you added to the rows are not removed, making it easy to turn on and off as needed.