Quick Links
Whether you're looking for a way to simply extend your Wi-Fi network, bridge your existing Wi-Fi network to a LAN, or create a completely new access point, the Netgear EX6100 can do it all. Read on as we put the multi-faceted little range extender through the paces.
What Is The EX6100?
The Netgear EX6100 (herein referred to as the EX6100 for brevity) is a wall-wart form factor wireless extender. Wireless extenders are intended to extend the reach of your original wireless signal beyond the range of your primary Wi-Fi connection; you place the extender within the current range of your router and it takes that signal and extends it outward.
In addition to providing Wi-Fi extension, the EX6100 sports several other very useful features. The unit has a gigabit Ethernet port built in and in addition to Wi-Fi extension you can also use the EX6100 as a unique access point (by plugging in an Ethernet cable to your physical LAN) and you can use the unit as a Wi-Fi-to-Ethernet bridge by connecting an Ethernet cable to the unit and then to a device (such as a video game console with an Ethernet port). There's a whole lot of useful functionality packed into a very small container here.
The EX6100 is an 802.11ac device and supports both 2.4GHz and 5GHz networks. Read on as we run through the setup and speed tests.
How Do I Set It Up?

Setting up the EX6100 is a breeze. If you're setting up as an extender, toggle the physical switch the side of the unit (seen in the photo above) from "Access Point" to "Extender." Reverse the process if you'll be using it as an access point. If you're using it as an extender, there's no need to do anything but plug it into a power outlet. If you're installing it as an access point locate it near an available Ethernet drop so you can connect it to your LAN, and if you're using it in bridge mode you'll want to position the unit near the device you wish to bridge (e.g. behind your media center where your game console is located).
Once plugged in, regardless of the mode you intend to you, you'll need to connect to the unit with a Wi-Fi enabled device. You can use a laptop or a mobile device for this task as the setup wizard is mobile optimized. The extender will appear on your Wi-Fi list as NetgearEX6100_2GEXT. Connect to it and then point your device's web browser at http://mywifiext.net to login to the extender and start the setup wizard.

The entire process is about as straight forward as it can be. If you're setting the unit up as an extender, as we are in the screenshot above, all you need to do is tell it what the SSID and password is for your 2.4GHz and 5GHz networks and then review the settings at the end before the unit reboots. When setting up the device as a bridge, you perform the exact same setup but finish by plugging the unit, via an Ethernet cable, into the device you want to to bridge to your Wi-Fi network. Access point setup is only slightly different: instead of telling the unit what Wi-Fi network to connect to, you instead plug the unit into your physical LAN via Ethernet cable and then run the setup wizard to instruct it what the SSID and password for the new unique access point should be.
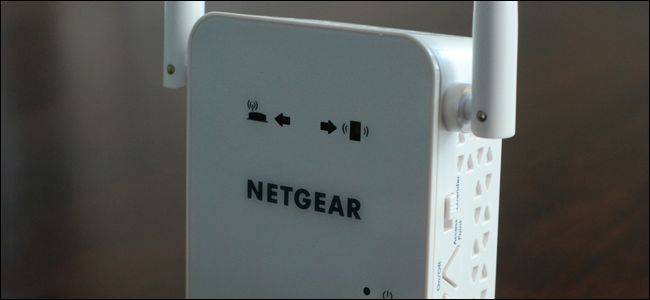
Once you've run through the basic setup, the EX6100's extremely useful LED display comes in very handy in terms of placement and diagnosis of problems.

To date, the EX6100 has the most useful LED display we've seen on any Wi-Fi router, extender, or repeater. At the top of the device there are four illuminated icons. From left to right: the router/base station, two indicators arrows, and the extender. The color of the router and the extender icons indicate signal strength; no light means there is no connection, red is bad, amber is OK, and green is excellent. If the arrows are darkened, it means your extender is located in a good spot and there is no need to move it. If the arrow pointed at the router icon is blinking it means you need to move the extender closer to the router because the signal between the two is weak. If the arrow pointed at the extender is blinking it means the wireless devices the extender is communicating with are too far away from the extender and you should either move them closer to the extender or (if possible) reposition the extender closer to where you're regularly using the devices.
It's a very clever way to provide instant visual feedback to the user and given that you won't routinely need to login to the device after it is initially configured it's a great way to help the user setup the device without a lot of fiddling in the control panel.
Where Should I Position It?
The basic idea, as we mentioned in the introduction to the review, is to place the range extender within the umbrella of the original Wi-Fi signal so that it can capture and extend it. You don't want to put the extender too close to your router (because you don't need an extra signal when you're in range of the router itself), and you don't want to place it too far from the router because it won't have a signal to repeat. The EX6100's manual offers a simple diagram to highlight proper placement.

The placement diagram doesn't apply, obviously, if you're using the device as an access point. In the above example let's pretend the family has an outbuilding like a second garage or workshop that is wired to the main house via Ethernet. They could take the extender from it's current location in the diagram (an upstairs hallway) and plug it in out in the workshop so create a secondary unique access point for WI-Fi access.
How Does It Perform?
Ease of setup and handy indicators aside, the important thing is how well the device performs in day to day use. The EX6100 had no problem blanketing the entire two upper floors of our home with a solid signal. As would be expected the 2.4GHz band had better penetration and signal strength than the 5GHz band but at close ranges the 5GHz band offered significant speed improvements.
Functioning as an extender and at close range (20-30 feet) and on the 5GHz band transmission speeds averaged 76 Mbps. At ranges approaching and exceeding 100 feet away from the unit speeds fell to a mere 6 Mbps. On the 2.4GHz bad it had a close range transmission speed of 32 Mbps and a far range speed of 8 Mbps.
When configured as an access point instead of an extender performance increased (which is expected as connecting it directly to the Ethernet removes the overhead of two-way radio communication). In access point mode the 5GHz speed rose to 109 Mbps and 22 Mbps, respectively, for our close and far range tests. 2.4Ghz tests rose to 31 Mbps and 11 Mbps, respectively.
While the EX6100 didn't outpace other similar devices we've tested and reviewed, the speed should prove satisfactory for most tasks (albeit not for a household that is trying to run multiple stream video devices and game consoles through one extender).
The Good, The Bad, and The Verdict
After putting the device through the paces, what's our verdict?
The Good
- Setup is dead simple.
- External switches for power, function selection, and WPS setup are very user friendly.
- The triple feature of Wi-Fi extension, bridging, and access point creation in a small wall-wart form factor box with 802.11ac Wi-Fi is great.
- The LED indicators on the device are fantastic; by far the best-in-class we've seen.
- The administration panel of the device offers fine tuning for a variety of settings (most extenders have much simpler administration panels with less granular control over the device).
The Bad
- Lackluster speeds, especially on the 5Ghz band.
- Although smaller than a full size access point, the device is still large enough to block the whole outlet.
- No USB port for printer sharing, file sharing, or other extensibility.
The Verdict
At $80 the EX6100 isn't exactly an impulse purchase; is it worth it? While it isn't the fastest extender we've tested the diverse ways you can use it combined with more than adequate transmission speeds make it a compelling solution. While you may run into problems if you attempt to use it in extender mode with multiple streaming systems and game consoles simultaneously at the edge of its range, to extend your network for less demanding tasks it's a great (and flexible) fit. The inclusion of the Ethernet port alone and proper support for bridge/AP mode puts this extender miles above similar devices; combine that with the ease of setup and useful LED indicators and you've got a solid solution for most home network extension needs.