Quick Links
For several reasons, mostly security-related, PowerShell scripts aren't as easily portable and usable as batch scripts can be. However, we can bundle a batch script with our PowerShell scripts to work around these issues. Here, we'll show you a few of those problem areas, and how to build a batch script to get around them.
Why can't I just copy my .PS1 file to another computer and run it?
Unless the target system has been pre-configured to allow running of arbitrary scripts, with the required privileges, and using the right settings, chances are you're going to run into some problems when you try to do this.
- PowerShell is not associated to the .PS1 file extension by default.We brought this up initially in our PowerShell Geek School series. Windows associates .PS1 files to Notepad by default, instead of sending them to the PowerShell command interpreter. This is to prevent accidental execution of malicious scripts by simply double-clicking them. There are ways you can change this behavior, but it's probably not something you want to do on every computer you're carrying your scripts around to - especially if some of those computers aren't your own.
- PowerShell does not allow external script execution by default.The ExecutionPolicy setting in PowerShell prevents execution of external scripts by default in all versions of Windows. In some Windows versions, the default doesn't allow script execution at all. We showed you how to change this setting in How to Allow the Execution of PowerShell Scripts on Windows 7. However, this is also something you don't want to do on just any computer.
- Some PowerShell scripts won't work without Administrator permissions.Even running with an Administrator-level account, you still need to get through User Account Control (UAC) to perform certain actions. We don't want to disable this, but it's still nice when we can make it a bit easier to deal with.
- Some users may have customized PowerShell environments.You probably won't run into this often, but when you do it can make running and troubleshooting your scripts a bit frustrating. Fortunately, we can get around this without making any permanent changes as well.
Step 1: Double-click to run.
Let's start by addressing the first problem - .PS1 file associations. You can't double-click to run .PS1 files, but you can execute a .BAT file that way. So, we'll write a batch file to call the PowerShell script from the command line for us.
So we don't have to re-write the batch file for every script, or every time we move a script around, it's going to make use of a self-referencing variable to build the file path for the PowerShell script. To make this work, the batch file will need to be placed in the same folder as your PowerShell script and have the same file name. So if your PowerShell script is called "MyScript.ps1", you'll want to name your batch file "MyScript.bat" and make sure it's in the same folder. Then, put these lines in the batch script:
@ECHO OFFPowerShell.exe -Command "& '%~dpn0.ps1'"
PAUSE
If it weren't for the other security restrictions in place, that would really be all it takes to run a PowerShell script from a batch file. In fact, the first and last lines are mainly just a matter of preference - it's the second line that's really doing the work. Here's the breakdown:
@ECHO OFF turns off command echoing. This just keeps your other commands from showing on-screen when the batch file runs. This line is itself hidden by the use of the at (@) symbol in front of it.
PowerShell.exe -Command "& '%~dpn0.ps1'" actually runs the PowerShell script. PowerShell.exe can of course be called from any CMD window or batch file to launch PowerShell to a bare console like usual. You can also use it to run commands straight from a batch file, by including the -Command parameter and appropriate arguments. The way this is used to target our .PS1 file is with the special %~dpn0 variable. Run from a batch file, %~dpn0 evaluates to the drive letter, folder path, and file name (without extension) of the batch file. Since the batch file and PowerShell script will be in the same folder and have the same name, %~dpn0.ps1 will translate to the full file path of the PowerShell script.
PAUSE just pauses the batch execution and waits for user input. This is generally useful to have at the end of your batch files, so that you have a chance to review any command output before the window disappears. As we go through testing of each step, the usefulness of this will become more obvious.
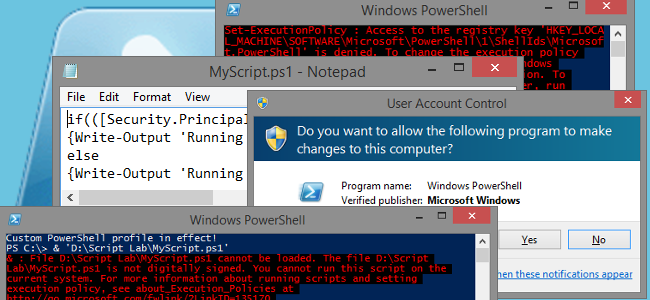
So, the basic batch file is set up. For demonstration purposes, this file is saved as "D:\Script Lab\MyScript.bat" and there's a "MyScript.ps1" in the same folder. Let's see what happens when we double-click MyScript.bat.

Obviously the PowerShell script didn't run, but that's to be expected - we've only addressed the first of our four problems, after all. However, there are some important bits demonstrated here:
- The window title shows that the batch script successfully launched PowerShell.
- The first line of output shows that a custom PowerShell profile is in use. This is potential problem #4, listed above.
- The error message demonstrates ExecutionPolicy restrictions in effect. That's our problem #2.
- The underlined part of the error message (which is done natively by PowerShell's error output) shows the batch script was correctly targeting the intended PowerShell script (D:\Script Lab\MyScript.ps1). So we at least know that much is working properly.
The profile, in this case, is a simple one-line script used for this demonstration to generate output whenever the profile is active. You can customize your own PowerShell profile to do this too, if you want to test these scripts yourself. Simply add the following line to your profile script:
Write-Output 'Custom PowerShell profile in effect!'
The ExecutionPolicy on the test system here is set to RemoteSigned. This allows execution of scripts created locally (like the profile script), while blocking scripts from outside sources unless they're signed by a trusted authority. For demonstration purposes, the following command was used to flag MyScript.ps1 as being from an external source:
Add-Content -Path 'D:\Script Lab\MyScript.ps1' -Value "[ZoneTransfer]`nZoneId=3" -Stream 'Zone.Identifier'
That sets the Zone.Identifier alternate data stream on MyScript.ps1 so that Windows will think the file came from the Internet. It can be easily reversed with the following command:
Clear-Content -Path 'D:\Script Lab\MyScript.ps1' -Stream 'Zone.Identifier'
Step 2: Getting around ExecutionPolicy.
Getting around the ExecutionPolicy setting, from CMD or a batch script, is actually pretty easy. We just modify the second line of the script to add one more parameter to the PowerShell.exe command.
PowerShell.exe -ExecutionPolicy Bypass -Command "& '%~dpn0.ps1'"
The -ExecutionPolicy parameter can be used to modify the ExecutionPolicy that is used when you spawn a new PowerShell session. This will not persist beyond that session, so we can run PowerShell like this whenever we need without weakening the general security posture of the system. Now that we've fixed that, let's have another go at it:

Now that the script has properly executed, we can see what it actually does. It's letting us know that we're running the script as a Limited user. The script is in fact being run by an account with Administrator permissions, but User Account Control is getting in the way. Though details of how the script is checking for Administrator access are beyond the scope of this article, here's the code that's being used for demonstration:
if (([Security.Principal.WindowsPrincipal][Security.Principal.WindowsIdentity]::GetCurrent()).IsInRole([Security.Principal.WindowsBuiltInRole] "Administrator")){Write-Output 'Running as Administrator!'}
else
{Write-Output 'Running Limited!'}
Pause
You'll also notice that there's now two "Pause" operations in the script output - one from the PowerShell script, and one from the batch file. The reason for this will be more apparent in the next step.
Step 3: Getting Administrator access.
If your script doesn't run any commands that require elevation, and you're pretty sure you won't have to worry about anyone's custom profiles getting in the way, you can skip the rest of this. If you are running some Administrator-level cmdlets though, you'll need this piece.
Unfortunately, there's no way to trigger UAC for elevation from within a batch file or CMD session. However, PowerShell does allow us to do this with Start-Process. When used with "-Verb RunAs" in its arguments, Start-Process will try to launch an application with Administrator permissions. If the PowerShell session isn't already elevated, this will trigger a UAC prompt. To use this from the batch file for launching our script, we'll end up spawning two PowerShell processes - one to fire off Start-Process and another, launched by Start-Process, to run the script. The second line of the batch file needs to be changed to this:
PowerShell.exe -Command "& {Start-Process PowerShell.exe -ArgumentList '-ExecutionPolicy Bypass -File ""%~dpn0.ps1""' -Verb RunAs}"
When the batch file is run, the first line of output we'll see is from the PowerShell profile script. Then, there will be a UAC prompt when Start-Process tries to launch MyScript.ps1.

After clicking through the UAC prompt, a new PowerShell instance will spawn. Because this is a new instance, of course, we'll again see the profile script notice. Then, MyScript.ps1 runs and we see that we are indeed in an elevated session.

And there's the reason we have two pauses in here, too. If not for the one in the PowerShell script, we'd never see the script's output - the PowerShell window would just pop up and disappear as soon as the script is done running. And without the pause in the batch file, we wouldn't be able to see if there were any errors launching PowerShell in the first place.
Step 4: Getting around custom PowerShell profiles.
Let's get rid of that nasty custom profile notice now, shall we? Here, it's hardly even a nuisance, but if a user's PowerShell profile changes default settings, variables, or functions in ways you may not have anticipated with your script, they can be really troublesome. It's much simpler to run your script without the profile entirely so you don't have to worry about this. To do that, we just need to change the second line of the batch file one more time:
PowerShell.exe -NoProfile -Command "& {Start-Process PowerShell.exe -ArgumentList '-NoProfile -ExecutionPolicy Bypass -File ""%~dpn0.ps1""' -Verb RunAs}"
Adding the -NoProfile parameter to both instances of PowerShell that are launched by the script means that the user's profile script will be completely bypassed in both steps and our PowerShell script will run in a fairly predictable, default environment. Here, you can see there's no custom profile notice in either of the spawned shells.
If you don't need Administrator rights in your PowerShell script, and you've skipped Step 3, you can do without the second PowerShell instance and the second line of your batch file should look like this:
PowerShell.exe -NoProfile -ExecutionPolicy Bypass -Command "& '%~dpn0.ps1'"
The output will then look like this:

(Of course, for non-Administrator scripts, you could do without an end-of-script pause in your PowerShell script at this point too since everything is captured in the same console window and would be held there by the pause at the end of the batch file anyway.)
Completed batch files.
Depending on whether or not you need Administrator permissions for your PowerShell script (and you really shouldn't be requesting them if you don't) the final batch file should look like one of the two below.
Without Admin access:
@ECHO OFFPowerShell.exe -NoProfile -ExecutionPolicy Bypass -Command "& '%~dpn0.ps1'"
PAUSE
With Admin access:
@ECHO OFFPowerShell.exe -NoProfile -Command "& {Start-Process PowerShell.exe -ArgumentList '-NoProfile -ExecutionPolicy Bypass -File ""%~dpn0.ps1""' -Verb RunAs}"
PAUSE
Remember to put the batch file in the same folder as the PowerShell script you want to use it for, and give it the same name. Then, no matter what system you take those files to, you'll be able to run your PowerShell script without having to muck around with any of the security settings on the system. You could certainly do those changes manually every time, but this saves you that trouble and you won't have to worry about reverting the changes later.
References:
- Running PowerShell scripts from a batch file - Daniel Schroeder's Programming Blog
- Checking for Administrator permissions in PowerShell - Hey, Scripting Guy! Blog