Mushroom biomes, remote villages, temples buried in desert sands, ice spike villages: whatever rare structure or biome that eludes you will elude you no more armed with AMIDST, an external Minecraft tool that's like having a world map and GPS unit rolled into one. Read on as we show you how to search your Minecraft world with Google Maps ease.
Why Use AMIDST?
Hiking around your Minecraft world in search of new things is tons of fun until, well, it isn't. When you're in full-on explorer mode it's a pleasure to hike, hike, and hike some more. When you're looking for a specific biome or feature in the game (like you want to build your base in an ice spike biome), that's when all the hiking gets tedious. Talk to veteran Minecraft players and some of them will tell you that under natural circumstances without special map seeds they've never come across the rare biomes like the mesa or ice spike biomes during normal game play.
Thanks to AMIDST you don't need to spend your entire vacation hiking around your Minecraft world looking for that elusive Mooshroom Island. Want to find a desert island that has a temple and a village side by side? It’ll be a lot easier scrolling around a map than searching for years by hand. Even better, the tool is lightning fast because it loads the general chunk data but doesn’t actually render the chunks (like actually playing the game does). You can zip 10,000 blocks across multiple biomes with a mere flick of your wrist.
Using AMIDST is like using Google Maps to quickly scroll over your entire world's map file with the same speed and ease of use you've come to expect from real-world internet map tools. Explore on foot when you want the thrill of exploring but when you're looking for the biggest mesa biome around it's time to bust out AMIDST.
Search Your Maps with AMIDST
Even if you’re not interested in flashy mapping or 3D renders, we can’t recommend Advanced Minecraft Interface and Data/Structure Tracking (AMIDST) enough. It’s the handiest third-party tool in our Minecraft arsenal.
While part of the fun of Minecraft is exploring, we do love loading a fresh map and just wandering around, sometimes you don’t want to spend hours looking for stuff. If what you want to do, for example, is find a village and fortify it into a sweet medieval fortress then it would be a lot more fun to go right to the village and start working (without all the wandering first). This is where AMIDST comes in.
Installing AMIDST
Installation is really straight forward for all Windows, OS X, and Linux alike. The app is completely standalone and provided as an .EXE for Windows, a zipped .APP for OS X, and a .JAR for Linux users. You can grab a copy of those files here.
It doesn’t even create any support files when executed, you can just throw it in a sub-folder of your general Minecraft collection labeled /AMIDST/ to keep track of it and run it.
One tweak we would suggest you apply immediately (and one that isn’t noted anywhere in the actual application) is to create a “history.txt” file in the same directory. If AMIDST sees this file it will generate a time-stamped log of the seeds of all the maps you look at. If you’re playing around with the seed generator function in the app and you forget to write down the seed, this is a real handy feature.
Using AMIDST
When you first run AMIDST, a profile selector will pop up and prompt you to select a Minecraft version based on the default Minecraft directory for your operating system, e.g. Windows users will see that the Profile Selector function points at \%APPDATA%\.minecraft\.
If you have moved your Minecraft directory or you wish to have it point at an entirely different directory you can execute AMIDST from the command line and use the switch “–mcpath <file>”.
The Profile Selector will display all your profiles like so:

The profile selection process is very important. Whatever profile you select is the map rendering engine AMIDST will use. This means if you select a 1.6.4 profile and then attempt to load a 1.7.10 map (or generate a new seed) the map will be rendered with the 1.6.4 map engine and won’t display things properly for 1.7.10.
Once you select the profile you can load maps from anywhere on your computer with no problem (you’re not restricted to the /saves/ directory of that profile) but you must select the right Minecraft version number for the maps you wish to open and/or load via the seed generator.

When the app loads you’ll just see a gray screen with a menu bar. Click on “File -> New” and then either select “From seed” to enter your own seed; “From file or folder” to open an existing level.dat file; or “From random seed” if you want to live the crazy life and see what the generator creates for you.
We’re going to generate a random seed and take a look around, then take that random seed and use it to generate and actual Minecraft world to show AMIDST off. Our seed is “HTG is awesome” with a “default” world type using a Minecraft version 1.7.10 profile. Here’s what loads once we plug the seed in.

Glorious! It’s a world map that we can scroll around, zoom in and out of, and see biomes, water features, oceans, and the locations of villages, temples, witch huts, and strongholds. The map always loads centered on the spawn point which is shown in the screenshot above as the tiny little red and tan house in the very center.
Let’s say we want a Desert Village with a Desert Temple nearby. It’s easy enough to zoom around the AMIDST map and find the pairing we’re looking for.

Click on the feature you want to visit (in this case the village) and you’ll see the coordinates up in the corner (58976 , -395664). Remember those are the map coordinates, you’ll need a height coordinate in the middle so when it’s time to teleport type /tp 58976 80 -395664 to warp to 80 blocks above bedrock (and about 20 blocks above sea level).
Let’s load up the map in Minecraft and teleport to those very coordinates to see how AMIDST did.

Just like the AMIDST indicated, there’s a Desert Village and in the background, a Desert Temple. A Desert Temple with a small oasis like pond around it, no less! We can see why the villagers built nearby.
One thing worth noting about AMIDST is that while it is nearly always extremely accurate with the location of things like strongholds (which are built underground), it sometimes hiccups with surface features like villages. It all has to do with the way Minecraft renders maps.
First, Minecraft generates a list of locations where features like villages could go, which is the list AMIDST reads, and then it actually generates the villages where they can go. The difference is that sometimes when the game goes to place a village, it thinks “Wait a minute. Nope. This village would cut into that other biome. This won’t work.”
As such, it always pays to actually investigate whether a feature you like actually exists, before committing to a plan for that section of the map. Ninety-nine percent of the time if the village or other feature is on a large land mass, we’ve had no issues. When it comes to hunting for features on small islands though, it’s very much hit or miss (it’s tough to find features on small islands).
Speaking of islands, let’s go hunting for one of the more elusive biomes in the game. In addition to showing features like villages, AMIDST also does a fantastic job identifying biomes. You can mouse over each biome to get the name or you can reference it by color. According to AMIDST there’s a pair of Mooshroom Islands right around the coordinates -115611, 142368 (they’re easy to spot thanks to the hot pink biome color).

Look at them there, lovely and undiscovered. Let’s teleport to the coordinates and look around.

Two Mooshroom Islands, just as promised. Mooshroom Stew for everyone!
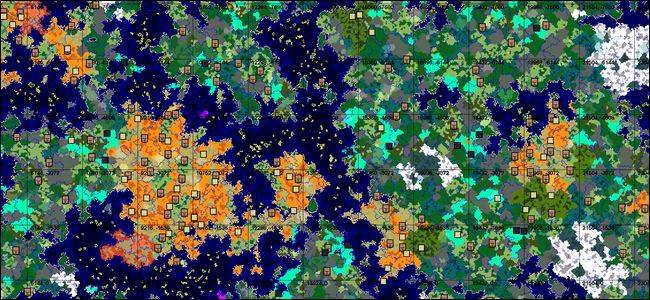
Before we leave AMIDST, let’s take a quick look at some of the other features. Under the “Map” menu there are some handy tools including the Find Stronghold function, the Goto function (you can go to specific coordinates or you can go to the player location if you’ve loaded an already-played map), you can toggle layers, and even save the section of the map you’re looking at as an image to reference later.

In the image above we’ve turned the grid system on (it displays both a grid and coordinates on the grid squares for easy reference) and we’ve turned the “Slime chunks” layer on. The Slime mobs in Minecraft only spawn in specifically designated chunks so if you’re looking to set up a Slime farm or the like, you’ll save yourself a whole bunch of time by using AMIDST to find a chunk to farm.
If you’ve ever wondered who all those guys doing “map showcases” on YouTube happen to find such amazing locations (like Villages next to Ice Spike biomes and the like) wonder no more. They’re not spending hundreds of hours hiking around, they’re zipping around maps using AMIDST, and now you can too.