Quick Links
Some people love Minecraft's 8-bit chunky look, while others can’t believe a game would look like that these days. Whether you want to make Minecraft look chunkier, smoother, or somewhere in between resource packs make it easy to do so on the PC, pocket, and console editions of Minecraft.
For those of you with a bit of video game experience under your belt, you’re likely well familiar with the concept of “skin packs,” “texture packs,” and “resource packs” as the things have been known over the years and across various video game genres.
Many videos games have distinct directories and locations within the game’s resource archives devoted just to providing visual and audio assets for the game. Typically, these assets are identified by file name and are not otherwise verified in any way such as by file size or creation date.
As such, it’s pretty easy in many cases to simply swap one asset file for another asset file as long as the filename remains the same. Let’s say you’re playing an old simulation game like Command and Conquer wherein a simple file like “completed.wav” announces the completion of a new base by saying “Base deployed!” or the like. All you’d need to do to jazz up your experience and say, have the game scream, “Goooooood morning, Vietnam!” in Robin William’s voice, would be to download a .wav file of said clip from the 1987 film of the same name and rename it “completed.wav” to replace the old game asset.
Minecraft, like many other games past and present, supports resource packs. Let’s take a look at what we can accomplish with them (no game modification necessary).
Understanding the Terminology
Before we proceed, let’s clear up the different terms used past and presently, and for different editions of Minecraft.
Prior to Minecraft PC Edition 1.6.1, the packs were known as “texture packs” because at the time, they simply replaced the surface textures of in-game objects. After the 1.6.1 release they were renamed to “resource packs” because they not only replaced the in-game textures but language packs and audio files as well. Despite the change many sites that catalog and organize resource packs still refer to them (both in the site name and on the site itself) as “texture packs.”
Be aware that resource packs for the PC edition will list not only the version number of the game they should be paired with but also typically, the resolution of the textures inside the pack. The default texture resolution in Minecraft PC Edition is 16x16 pixels per block-face. Textures can be increased incrementally from that original 16x16 pixel size all the way up to 512+ pixels on a side.
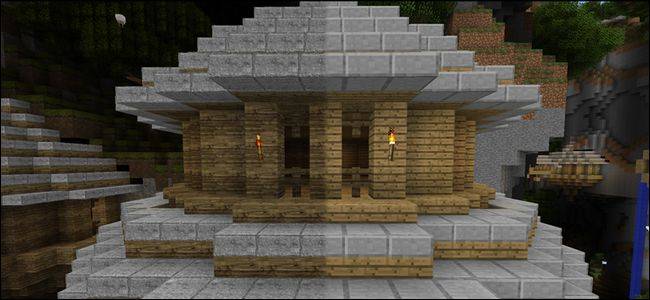
It should be noted that high-resolution textures are pretty but do increase the load on your GPU as they require more rendering. The 256x texture back seen below on the left half of the screenshot for example, took almost a minute to load on our more-than-powerful-enough gaming PC but offers a significant step up the realism scale from the basic Minecraft look.
The Pocket Edition supports texture packs, but unlike the PC Edition, there is no way to easily swap them. You have to manually replace the “terrain.png” file in the Minecraft system directory and restart the game to replace the textures. If you want to return to using the old textures, you need to replace the updated texture with the original. We recommend making a copy of the original texture named “terrain.old” so you always have a local backup.
The Console Edition also supports packs, known as “texture packs,” but these are distributed via the marketplaces and range in price from free to a dollar or two. Be advised that the Xbox Live marketplace is littered with scummy looks-like-a-texture-but-isn’t entries that are actually just wallpaper collections of texture packs applied so shop cautiously.
With that clarification out of the way, let’s look at where to find texture packs for the PC.
Discovering Texture Packs for the PC Edition
As you may recall from our original Minecraft series, version numbers can be quite important when dealing with Minecraft as the game has undergone many minor modifications and several major overhauls in the last few years.
When browsing resource pack websites or reading forum entries about them, make sure to keep an eye out for what version of Minecraft the pack is intended for (remember, the pack system was totally overhauled between 1.6 and 1.6.1.)
Before we start recommending sites to visit, let’s highlight one of the cardinal rules of downloading any kind of Minecraft mod (even light non-permanent modifications like resource packs): never download an .exe file (or the equivalent for your operating system) when searching for Minecraft stuff.
There is no reason for a resource pack to be packaged in any sort of installation file. Resource packs should be .ZIP archives that you absolutely do not need to interact with or install beyond extracting them to your Minecraft folder so that the Minecraft app itself can handle them. It’s unfortunate, but there are a lot of web sites out there that take advantage of Minecraft’s popularity with children to serve up viruses, malware, and other nasty content because the kids downloading it don’t know any better.

With that said, there are some pretty fantastic and legitimate resources to find Minecraft resource packs.
The Official Minecraft Forums: The first and most active place to find resource packs is the official Minecraft forums. If you’re not active in the forums or very familiar with modding, it will take you a little while to get your bearings and learn to read all the shorthand codes in the subject lines, but the forums offer the most diverse and frequently updated source of resource packs around.
Planet Minecraft: We introduced you to this resource in the previous guide as a great place to find maps. It’s also a great place to find resource packs (labeled as “texture packs” on the site) with plenty of sorting features and clear labeling.
MinecraftTexturePacks: More minimalistic in design and content than Planet Minecraft, it still has a wide assortment of great skins to pick from.
ResourcePack.net: ResourcePack.net’s strong suite is clear categories. Whether you’re looking for modified default skins, realistic skins, RPG or horror-themed, or other genres, it’s easy to find what you’re looking for.
Again, let us emphasize that resource packs should always be .ZIP files, and in the case of downloading packs for Minecraft PE, they may just be a plain .PNG file with no compressed container at all. Don’t download resource packs from websites that want you to download an executable!
Activating Resource Packs in Minecraft PC Edition
Once you’ve found a resource pack you’d like to try, simply download it and save it to the /resourcepack/ subdirectory of the Minecraft profile you wish to apply the resource pack.
Fire up Minecraft and open a world or join a server. Because resource packs are a completely client-side modification that don’t alter any gameplay mechanics you can use resource packs on both local and server-based worlds without any issue.

Once you’ve saved the resource pack .ZIP file to the proper folder and started Minecraft, you can load and unload your resource packs on the fly by pressing “ESC” to bring up the in-game menu and selecting “Options.”

Under the Options menu, select “Resource Packs…” at the bottom of the left hand column.

The resource packs system is laid out clearly. All available packs are listed on the left and all loaded packs are listed on the right. Hover over the pack you want to load or unload and click the arrow that appears, as seen in the screenshot above.
The default resource pack is always loaded and cannot be unloaded. As of Minecraft 1.7 you can load multiple resource packs but the last loaded pack will take precedence in any conflicts that arise. This is useful if you have a resource pack with textures you really like, but you’ve found another resource pack that’s just new background music -- you can load the first pack with the textures and then the second pack with the music to get the best of both worlds.
For our demonstration we’re using the Legend of Zelda: Majora’s Craft resource pack by Koa_Neuva. Here we are at a lovely little desert village before loading the pack:

After loading the pack, the village takes on a much darker appearance with textures heavily influenced by the Legend of Zelda game Majora’s Mask.

Not only are the in-game textures changed, but this comprehensive resource pack also changes the in-game sounds to those from Majora’s Mask and other popular Zelda games. It also changes the menus, on-screen display, and in-game objects and resources to match the styling of the Zelda game too.
Here’s the default combat menu in a Minecraft creative-mode game, for example.

Here is that same menu with the resource pack loaded.

Fans of the Zelda franchise will find quite a few familiar sights just in this sub-menu alone, let alone in all the music, in-game sound effects, and other fun little Zelda-esque references sprinkled throughout the pack. You may notice that the redstone tab seen in the screenshot above, for example, is marked by a red rupee – this skin changes the piles of redstone dust into Hyrulian rupees.
That's all there is to it! With very little effort (and typically little strain on performance) you can completely change the look of Minecraft with a resource pack.