Quick Links
Deleting files from your Recycle Bin doesn’t mean they are gone forever since a myriad of file restoration programs exist to recover deleted data; which is why you may need to use a program like Eraser to securely delete your personal data.
Note: While we will focus on Eraser today, there are actually several different free and paid programs you can use to securely delete your data. The advantage of this particular freeware application is that it integrates into Windows Explorer so you can just right-click on the Recycle Bin and securely delete the trash.
What is Eraser?
Eraser is an easy to use program that allows you to delete files and folders securely while overwriting the files with carefully selected random data, rendering them useless. Eraser allows you to delete files on demand or schedule file deletion at a specified time in the future.
The program offers 13 different deleting techniques that will ensure that your deleted data is completely irrecoverable. The first method is Eraser’s default setting and the two DoD methods are the second and third most commonly used methods.
- Gutmann method 35-pass Method
- US DoD 5220.22-M standard 3-pass Method
- US DoD 5220.22-M standard 7-pass Method
While many websites will try to perpetuate the myth that you need to perform a multi-pass deletion technique, a single pass secure delete for a disk is generally sufficient.
Downloading and Installing Eraser
Eraser is available in two main forms. The first is the portable version which only takes up 3 MB when installed to a flash drive or on your computer. You can download it from PortableApps. Simply copy the executable file to your flash drive and run it to perform the portable install.
The full version of Eraser comes in three main forms. There are the nightly builds which are precursors for beta testing versions and the beta versions for testing. In addition to these, they offer the latest stable build on their website.
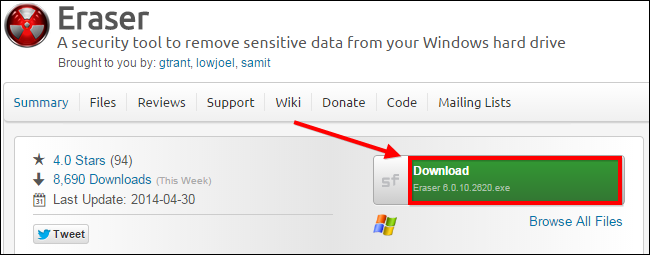
For the purposes of this example, we will download the latest stable build of Eraser from their official SourceForge page, but do be careful because SourceForge has recently been bundling crapware into their installers.
Once you have downloaded the program installation file, run the installer to completion, making sure to carefully read just in case SourceForge decides to bundle this application in the future. The benefits of the full version of the program compared to the portable app is that you can add Eraser to the Context menu so that you can also erase files securely without having to send them to the Recycle Bin first.
Selecting Your Deletion Method
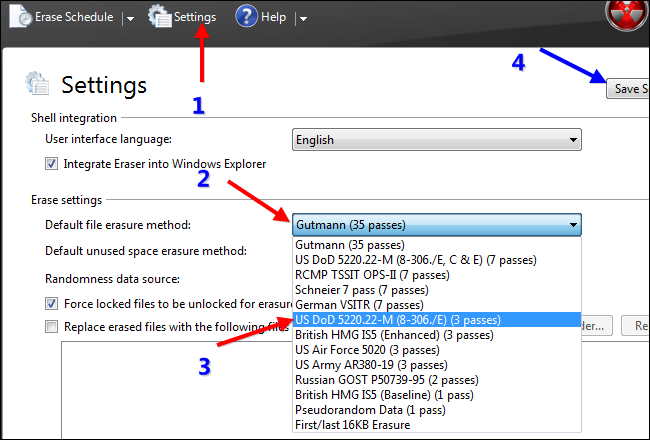
Unless you are working on ultra-classified, if I told you, I’d have to kill you, type of documents, the US DoD 5220.22-M standard 3-pass or 7-pass methods are a faster choice than the default Eraser setting of: the Gutmann method 35-pass. For speed reasons, we will change the settings of Eraser to use the 3-pass DoD method instead.
Simply double-click on the Eraser desktop icon and click on “Settings.” Change the erasure setting, and then press the “Save Settings” button.
Secure Delete Files in Explorer or From Your Recycle Bin
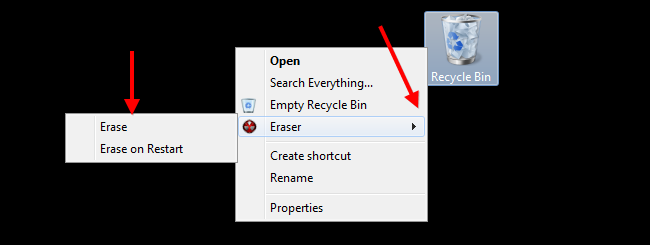
If you don’t want to create a schedule, and you just want to delete individual files from Explorer, you can do that with the right-click context menu. Simply find a file you want to delete, then right-click on it. After that, select the Eraser context menu and choose whether you want to erase the file now or on the next computer restart.
You can also do the same thing with files in the recycle bin by following the same process described above.
Optional: Creating a Delete Schedule
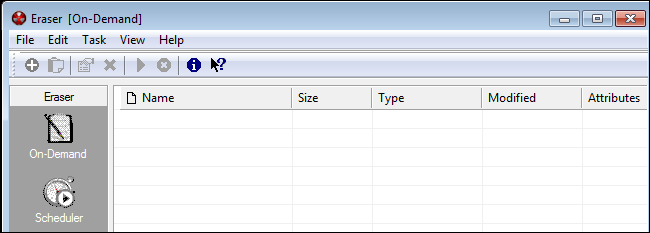
Once you have installed Eraser, simply double-click the desktop icon to run the program. The first screen you see is the Erase schedule. If you click on the arrow on the top, you can create new tasks and import or export task lists.
This is useful if you want to schedule regular deletion of files or folders like your Windows history. For this example, we will select the browsing history folder for Google Chrome and schedule it to be deleted once every week.
Windows XP – C:\Documents and Settings\USER\Local Settings\Application Data\Google\Chrome\User Data\Default\Windows Vista – C:\users\USER\Local Settings\Application Data\Google\Chrome\User Data\Default\
Windows 7 and 8 - C:\Users\USER\AppData\Local\Google\Chrome\User Data\Default
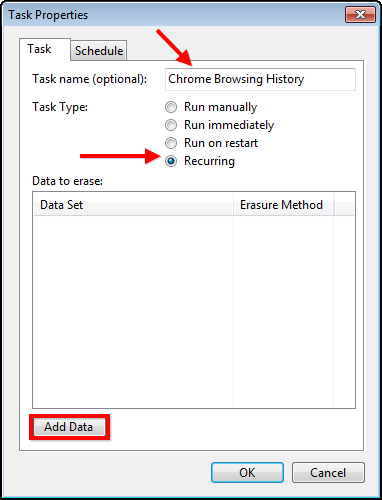
Create a new task, give the task a name, then select the schedule command for deletion, and lastly, click on “Add Data” to specify folders.
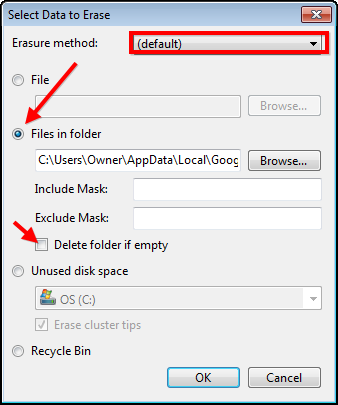
Now you can select a deletion method or simply leave it as is to use the default method. Select the folder where your chrome browsing history is stored. Lastly, deselect the “Delete folder if empty” option.
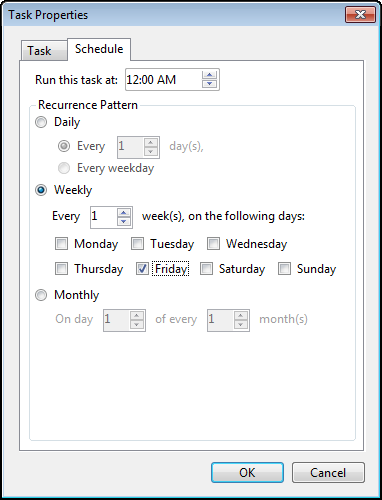
Next, you will press OK and then create a schedule by editing the Schedule. For this example, we will delete the history every Friday at midnight.
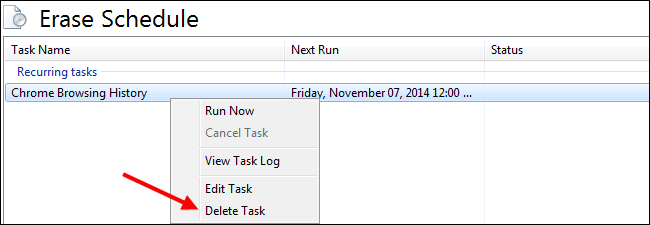
Simply implement the changes and you will see your task in the schedule as a recurring task that will be carried out weekly. If you ever want to remove a task, simply go to the Erase Schedule, right-click on the task and select the “Delete Task” option.
Optional: Using the Portable App
Using the scheduler on the portable app works in the same manner, but you will need to have your flash drive plugged in at the time when the tasks are supposed to be carried out. As we mentioned earlier, the portable version of Eraser has no right-click context menu entry, which makes it a bit harder to erase files in Explorer; but not too much harder. You will first need to run the app by double-clicking the “EraserPortable.exe” from the folder where it is installed.
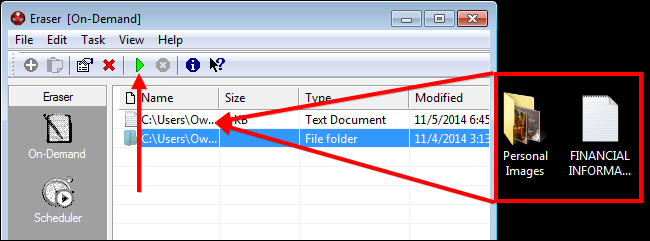
Once you have opened the app find the files you want to securely delete using Windows Explorer and drag them into the Eraser window. After they show up on the list, simply click the green play button to securely delete the files.
Now that you know how to securely delete your files, you can proceed with your top secret spy work with the peace of mind that the rebels will never be able to access your documents.
Image Credit: Will Taylor on Flickr


