Outlook 2013 allows you to customize the font used to display the sender’s name, subject, date received, and size of each message in your message list. Maybe you want to just change the size to make the font bigger or smaller, or change the font to one you like better.
To change the font settings for your message list, open Outlook and click on the View tab.
NOTE: Even if you closed Outlook when another module was active, such as Calendar or Tasks, Outlook opens by default with the Mail module active.
![01_clicking_view_tab[2]](https://static1.howtogeekimages.com/wordpress/wp-content/uploads/2013/09/01_clicking_view_tab2_thumb.png?q=50&fit=crop&w=750&dpr=1.5)
Click the View Settings button in the Current View section of the View tab.
![02_clicking_view_settings[2]](https://static1.howtogeekimages.com/wordpress/wp-content/uploads/2013/09/02_clicking_view_settings2_thumb.png?q=50&fit=crop&w=750&dpr=1.5)
On the Advanced View Settings dialog box, click Conditional Formatting.
![03_clicking_conditional_formatting[2]](https://static1.howtogeekimages.com/wordpress/wp-content/uploads/2013/09/03_clicking_conditional_formatting2_thumb.png?q=50&fit=crop&w=750&dpr=1.5)
On the Conditional Formatting dialog box, click Add to add a new rule.
![04_clicking_add[2]](https://static1.howtogeekimages.com/wordpress/wp-content/uploads/2013/09/04_clicking_add2_thumb.png?q=50&fit=crop&w=750&dpr=1.5)
Enter a name for the new rule, such as “List Font Size,” in the Name edit box and then click Font.
![05_clicking_font_button[2]](https://static1.howtogeekimages.com/wordpress/wp-content/uploads/2013/09/05_clicking_font_button2_thumb.png?q=50&fit=crop&w=750&dpr=1.5)
Change the Font, Font style, and Size, and select other settings such as Effects and Color, as desired. Click OK when you have made your changes.
![06_changing_font[2]](https://static1.howtogeekimages.com/wordpress/wp-content/uploads/2013/09/06_changing_font2_thumb.png?q=50&fit=crop&w=750&dpr=1.5)
Because we are applying the same font to all parts of the message list (sender’s name, subject, date received, and size of each message), we are not specifying a condition. A dialog box displays, warning you of that fact. Click Yes.
![07_confirmation_create_rule_with_no_conditions_condformdialog[2]](https://static1.howtogeekimages.com/wordpress/wp-content/uploads/2013/09/07_confirmation_create_rule_with_no_conditions_condformdialog2_thumb.png?q=50&fit=crop&w=750&dpr=1.5)
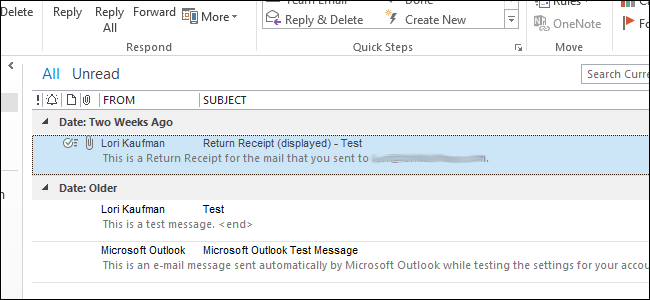
The font for all parts of each message in the message list (except for the excerpt of the message text) is changed to the font and size (and other font settings) you selected.
![08_font_changed[2]](https://static1.howtogeekimages.com/wordpress/wp-content/uploads/2013/09/08_font_changed2_thumb.png?q=50&fit=crop&w=750&dpr=1.5)
You can delete the rule you created to go back to the default settings, or you can deselect it in the list of Rules for this view on the Conditional Formatting dialog box.