Quick Links
Have you ever wished you could get the "Windows Recovery Console" running for that one maintenance procedure or program you want to use, without having to remember where you've forgotten the CD? HTG explains how to boot WinPE from PXE.
Photo Credit: Alfred Hermida via Compfight cc
Windows Pre-execution environment (WinPE) is the version of windows that most people know as the one that boots off of the install CD. Over the years, entire projects have been created to give one the ability to have a sort of "Windows Live" environment like many Linux distros. In this guide, we will have the windows PE from the install CD boot from PXE just so we can use it to run the Dell BIOS update utility. You are encouraged to continue the exploration of this bottomless pit of geek goodness...
Overview
We've shown you what PXE is and how you can easily install a server for it (and much more) with FOG, today we will be adding yet another extension to FOG. Generally today's procedure will be:
- Update PXElinux to v5.01 or higher, if not already installed.
- Add the wimboot module.
- Copy the WIM image and supporting files from the windows install CD.
- Add the menu entry.
- Use the booted WinPE to get a working "Windows recovery console".
We are going to do the above, because going the "regular" Windows Automated Installation Kit (WAIK) way forces you, at best, to install it on your machine and go through a not so straightforward process to mangle the WIM file and its support files into their WDS/RIS form. While Linux alternatives do exists, like the UDA project's one (which is the PXE server I used before FOG came along), using this way you simply replace some files on the PXE server once (which you probably would have eventually anyhow) and copy the unaltered WIM file and support files directly from the Windows CD into the PXE server.
The one thing to note, is that while it will look like you can start the windows install procedure this way, you actually can't complete it, and making that possible is beyond the scope of this guide.
Lets get cracking :)
Update PXElinux to V5.01
As of the time of this writing, the version of Syslinux in the Ubuntu repository is still 4.05. I'm guessing this is because the Syslinux team decided to shake things up with the V5 branch and have changed the way their COM32 modules work (now based on ELF) and changed the "core" to require a library (ldlinux.c32) for anything beyond "pure boot". This makes it very possible to encounter breakage, for anyone who's used to the "old way". Don't fret, we will download the required files manually and make it so your FOG installation doesn't loose a beat.
We will be using version 5.01 as it is the latest stable release from the V5 branch at the time of this writing and it is the one on which the Syslinux team worked together with the wimboot team to make this specific procedure work.
Note: Another reason that the latest version isn't part of the Ubuntu repository yet (IMHO), is that at least on Citrix-Xen, the HVM guests can't boot anything beyond the PXE menus. Other hypervisors like VMware, Hyper-V & VirtualBox, as well as physical machines are just fine with the new version.
If the note above doesn't affect you, proceed.
Obtain version 5.01 of PXElinux directly from Kernel.org and extract it on the FOG server by:
        wget https://www.kernel.org/pub/linux/utils/boot/syslinux/syslinux-5.01.tar.bz2
tar xvhf syslinux-5.01.tar.bz2
Create the directory that will hold the newly required libraries:
mkdir -p /tftpboot/howtogeek/libs
Copy the required library files to this directory, so they will be available for the clients at runtime:
        cp -av syslinux-5.01/com32/lib/libcom32.c32 /tftpboot/howtogeek/libs/
cp -av syslinux-5.01/com32/libutil/libutil.c32 /tftpboot/howtogeek/libs/
cp -av syslinux-5.01/com32/modules/linux.c32 /tftpboot/howtogeek/libs/
Append the "path" to this directory, to the already existing "default" configuration file, by either editing it or issuing the below:
echo "PATH howtogeek/libs" >> /tftpboot/pxelinux.cfg/default
Copy the newly required ldlinux.c32 to the root of the TFTP server by issuing:
cp -av syslinux-5.01/com32/elflink/ldlinux/ldlinux.c32 /tftpboot/
Update the graphical engine (vesamenu.c32) to correspond to this new version:
cp -av syslinux-5.01/com32/menu/vesamenu.c32 /tftpboot/
Congratulations, your PXE server is now updated to v5.01 and everything that was already working (unless you are affected by the "note" from the start of this segment) should continue to do so.
WIMboot
This bootloader is part of the iPXE project and they describe it like so:
wimbootis a boot loader for Windows Imaging Format (
.wim) files. It enables you to boot a Windows PE (WinPE) environment from a RAM disk, without wasting the memory used for the RAM disk image.
Download the latest version from their site:
wget http://git.ipxe.org/releases/wimboot/wimboot-latest.zip
Install unzip on your FOG server if it is missing:
aptitude install unzip
Unzip the wimboot package:
unzip wimboot-latest.zip
Copy the wimboot module to the "libs" directory we created in the previous segment:
cp -va wimboot*/wimboot /tftpboot/howtogeek/libs/
That is all. The wimboot bootloader is ready to be called upon.
Windows CD files
Create a new directory on the FOG server to hold the files we will copy over:
mkdir -p /tftpboot/howtogeek/WinPE/
Put the original Windows 7 install CD in your CDROM drive and copy the files listed below into this directory:
\bootmgr
\boot\bcd
\boot\boot.sdi
\sources\boot.wim
Yes, it is that simple and you don't need to keep the directory structure on the CD for this to work.
Note: in order to have the Dell BIOS updates work, I've found it to be necessary to use a 32-bit version of Windows.
Add the menu entry
Create the PXE menu entry by editing the “Utils” menu:
sudo vim /tftpboot/howtogeek/menus/utils.cfg
Append to it the following:
        label WinPE
com32 linux.c32 howtogeek/libs/wimboot
APPEND wimboot initrdfile=/howtogeek/WinPE/bootmgr,/howtogeek/WinPE/bcd,/howtogeek/WinPE/boot.sdi,/howtogeek/WinPE/boot.wim
Congratulations, You now have WindowsPE on your PXE server. :)
Note: it may look like its hanging on the "wim" file, but it isn't. It is actually transferring the 140MB of a file to the client over TFTP, which takes longer than the usually small files that are transferred this way.
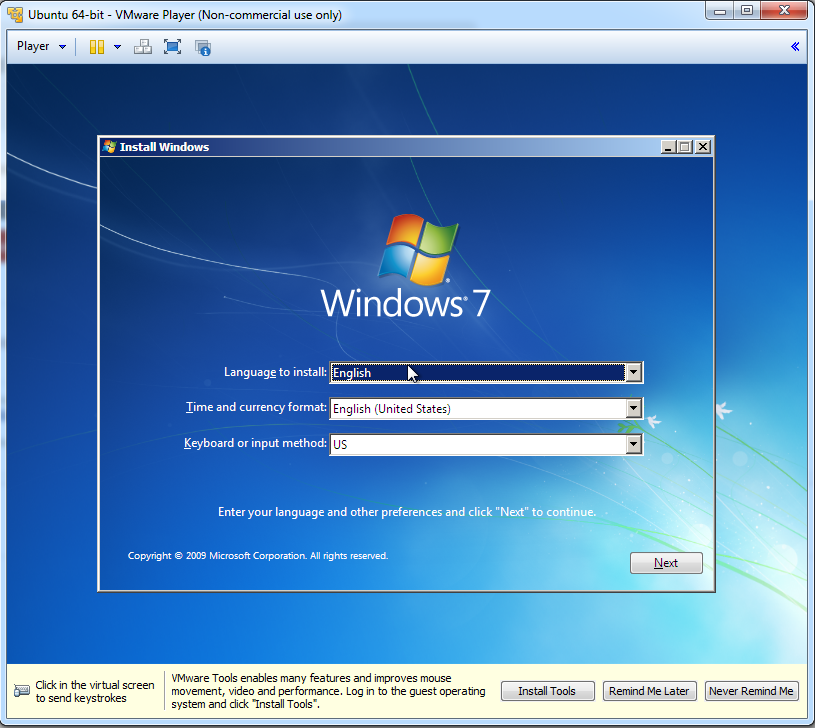
Here is the screenshot to prove that it did happen.
The VM above, was run using VMware-player, had Ubuntu installed on its HD and was PXE booted into WinPE.
Windows Recovery Console
Again, as mentioned in the overview, while it looks like you can start the windows install procedure this way, you actually can't complete it, and making that possible is beyond the scope of this guide.
With that said, just to give one example of why this would be useful, we will use this environment to perform a Dell BIOS update.
Get the update you need to perform from Dell's website and put it on a Disk-On-Key. Put the Disk on key and PXE boot the client.
In order to reach the recovery console, in the main window as in the screenshot above, click "Next".
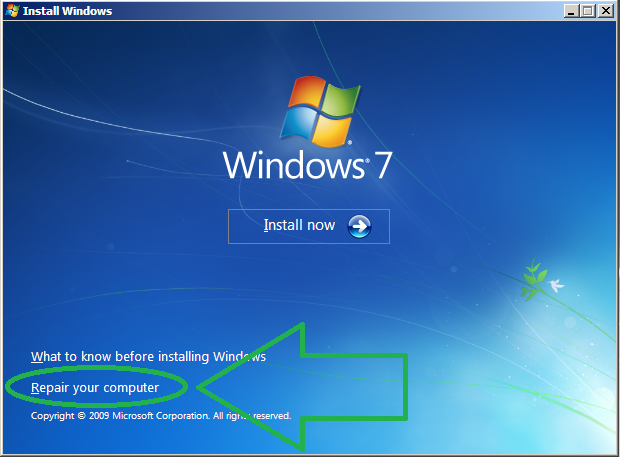
Click on "Repair your computer".
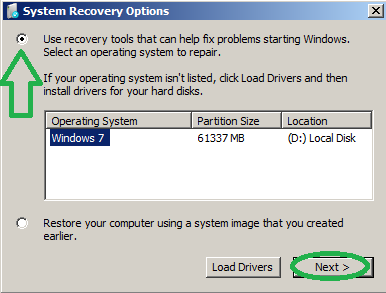
Choose "Use recovery tools" and click on "Next".
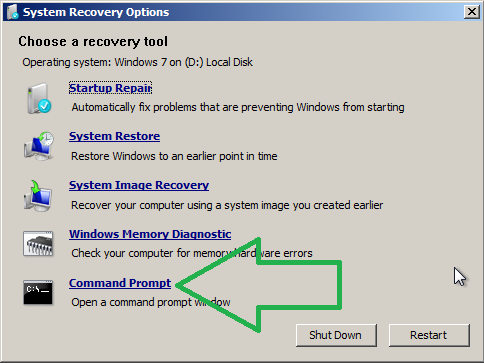
Click on "Command Prompt".
Once in the command prompt, you will have to find out what "drive letter" WinPE decided to designate to your Disk-on-Key. To do this, have the system enumerate all of the currently assigned drive-letters by issuing:
wmic logicaldisk get name
Now excluding the letters A: and X: and perhaps even C: (though its not a given), cycle through the drive letters and look for the Disk-on-Key by issuing:
        Driveletter:
dir
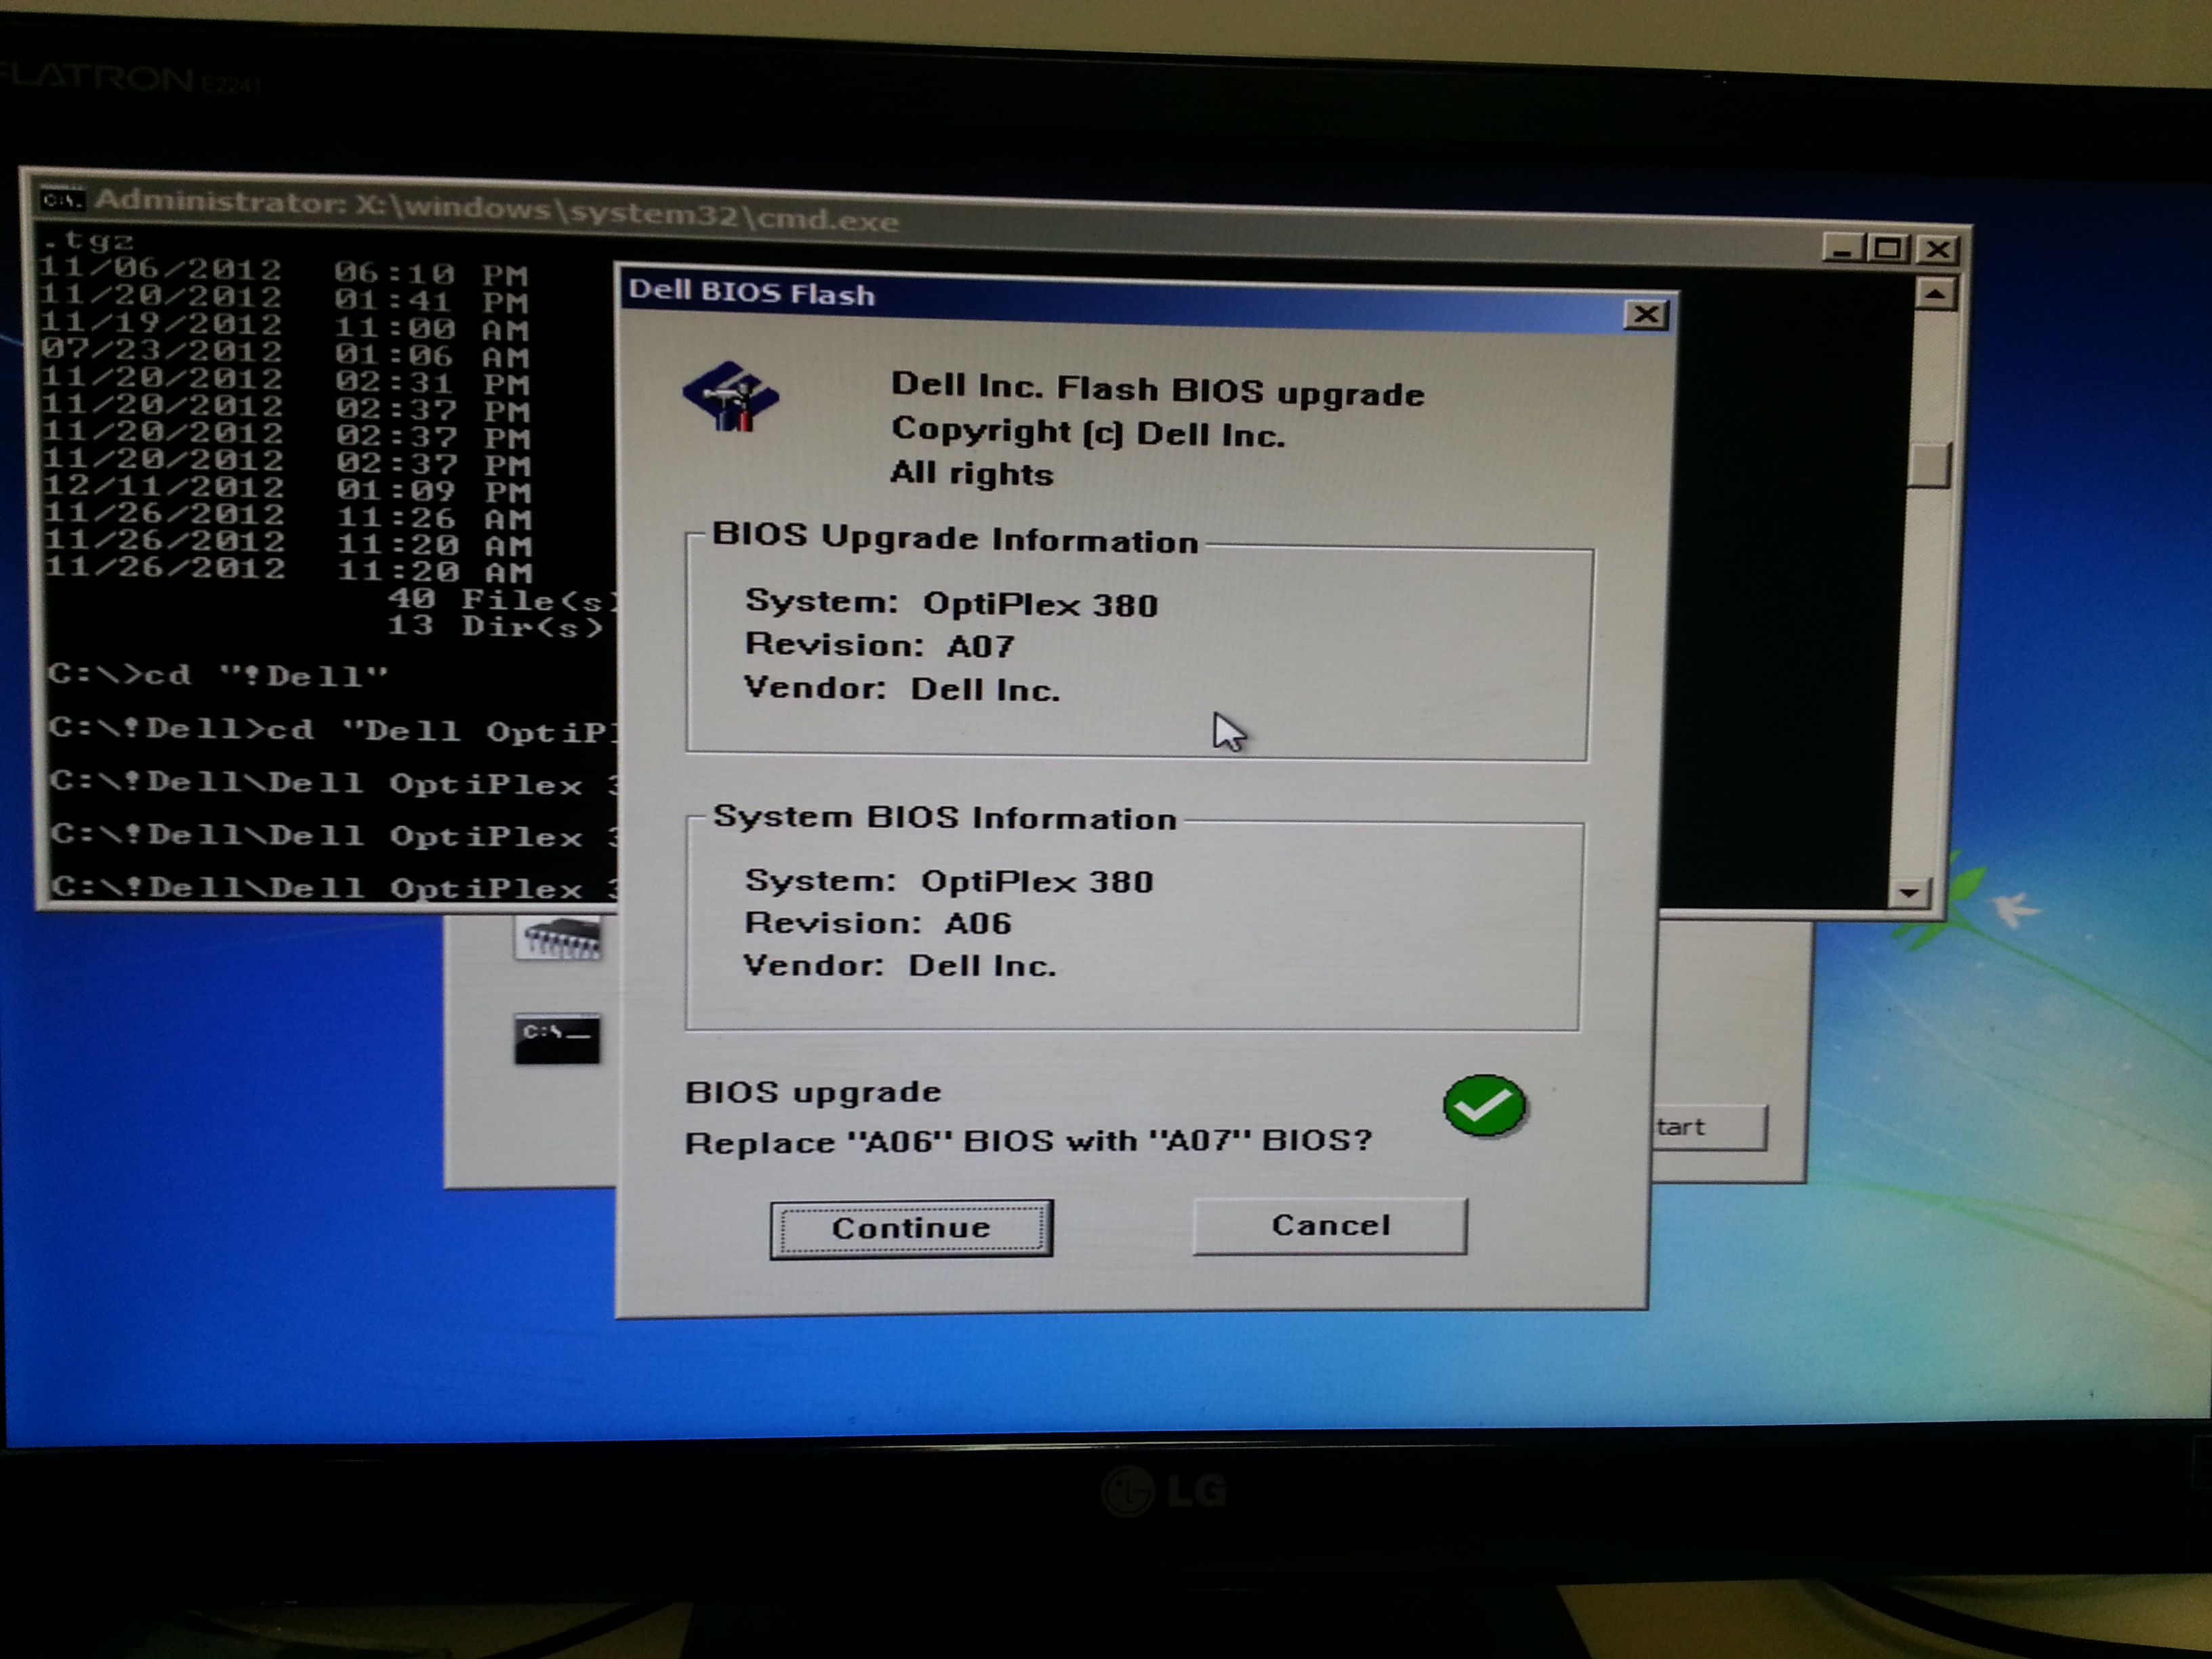
Once you've found the correct drive, execute the file and you should see something like the below:
Congratulations, you are all set to upgrade :)


