Quick Links
There are ways to run a screen capture utility – or any other program – from the welcome screen. Windows doesn’t make this easy, but it’s possible. The logon screen runs on the Winlogon desktop, an isolated Windows desktop.
Whether you’ve set a custom logon screen background and want to show it off, need a screenshot for your tutorial, or want to capture an error message, any of these methods will work for you.
Launch Programs on the Winlogon Desktop
We can launch other programs on the Winlogon desktop with the PsExec command, available on Microsoft’s website. The PsExec command is part of the Sysinternals suite of utilities.
After downloading the PSTools package, place the PsExec.exe command into your path – for example, in the C:\Windows\System32 directory.

Next, launch a Command Prompt as administrator by right-clicking the Command Prompt shortcut and selecting Run as administrator.

From the administrator Command Prompt, run the following command to launch a command prompt window on the Winlogon desktop:
psexec -sx cmd.exe
The s option tells psexec to launch the process as the system user account, while the x has it launch the process on the local Winlogon desktop.

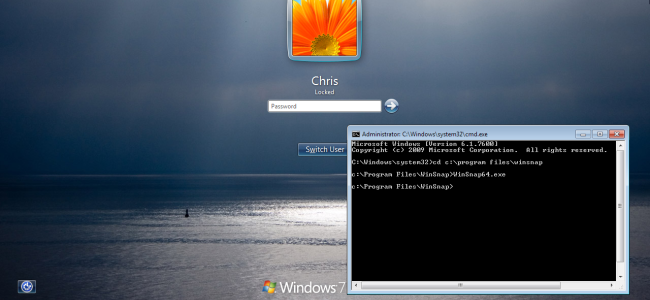
Lock the screen with WinKey+L and press Alt-Tab to reveal the Command Prompt running on the Winlogon desktop. You’ll also see the command prompt if you press Ctrl-Alt-Delete and Alt-Tab on the Ctrl-Alt-Delete screen, which also runs on the Winlogon desktop.

Use the Command Prompt to launch screenshot utilities and other applications on the secure desktop.
Hijack the Ease of Access Button
Windows displays an Ease of Access button at the bottom left corner of the login screen. When clicked, this button opens the Utilman.exe program, allowing you to start accessibility utilities from the login screen. You can actually replace the Utilman.exe file with another EXE file – like a screenshot utility – to easily take a screenshot of the login screen.
You’ll find the Utilman.exe file in the %WINDIR%\System32 directory, which is C:\Windows\System32 by default.

We’ll need to rename the Utilman.exe file so we can replace it with another EXE file, but we can’t rename it until we take ownership of it. To take ownership of this file, right-click it and open its Properties window.

Select the Security tab in the Properties window and click the Advanced button to access its advanced settings.

Select the Owner tab in the Advanced Security Settings window and click the Edit button. I’ve already taken ownership of the file here – by default, it’s owned by TrustedInstaller.

Select your administrator account and click OK to take ownership.

After you’ve taken ownership of the file, you can rename it to something like Utilman_backup.exe

You’ll need a screenshot utility to put in Utilman.exe’s place. I tested Win 7 Logon Screen Capture, which worked well. Put the file in Utilman.exe’s place.

After it’s installed, go back to the logon screen (WinKey+L) and click the Utilman.exe file to take your screenshot. Clicking the button will bring up a save dialog if you’re using Win 7 Logon Screen Capture.

Use a Virtual Machine
Most screenshots of the Windows logon screen you see online were taken using virtual machine software. This is the simplest way to take these screenshots, as the virtual machine software displays the guest operating system’s logon screen in a window on your desktop.
To get started with virtual machines, check out our list of articles for learning virtual machines.