Zenity adds graphical interfaces to shell scripts with a single command. Shell scripts are a great way to automate repetitive tasks, but they’re normally confined to the terminal -- Zenity brings them out of the terminal and onto your desktop.
We’ve given an introduction to shell scripting in the past. You don’t have to be a programmer to get started with shell scripts -- they require little more than knowledge of Linux terminal commands.
Getting Zenity
Zenity comes with Ubuntu by default. If you use an Ubuntu derivative, Such as Kubuntu, you may have to install it manually with the following command:
sudo apt-get install zenity
Zenity is a part of GNOME, so it should already be included on Linux distributions that use the GNOME desktop. Check your package manager for the zenity package if you don't have it.
Using Zenity
You can play around with Zenity from the terminal. Let’s say you want to create an error window when a problem occurs with your shell script. Here’s an example command you could use:
zenity --error --title=”An Error Occurred” --text=”A problem occurred while running the shell script.”

Run the command and you’ll see a window with the message.
Put this single command into your shell script at the correct place and you’ll have a graphical error message. You could also use variables to include more information about the error.
Let’s say you want to ask a yes or no question. You could use a command like this one:
zenity --question --title=”Query” --text=”Would you like to run the script?”

You can catch the yes or no response in your shell script and perform different commands based on which button the user clicks.
There’s also a text entry dialog:
zenity --entry --title=”Favorite Website” --text=”What is your favorite website?”

Catch the user's input in a shell script and you could store it as a variable.
There’s also a file picker, calendar, and other types of dialogs. For a full list of dialog types and their options, consult Zenity’s manual page.
An Example Script
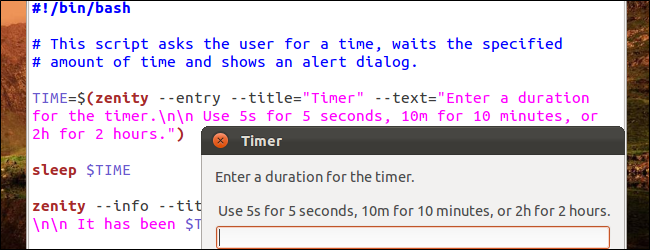
Let’s try using Zenity to create a simple graphical shell script. With just three commands, we can create a graphical timer program:
#!/bin/bash
# This script asks the user for a time, waits the specified amount
# of time, and shows an alert dialog.
TIME=$(zenity --entry --title=”Timer” --text=”Enter a duration for the timer.\n\n Use 5s for 5 seconds, 10m for 10 minutes, or 2h for 2 hours.”)
sleep $TIME
zenity --info --title=”Timer Complete” --text=”The timer is over.\n\n It has been $TIME.”

We’re using some extra tricks here. We get the value of the TIME variable from the first zenity command and feed it to the sleep command. We’re also using /n to create new lines of text in the zenity dialogs.
After saving the shell script and running the chmod +x command on it to give it executable permissions, we can launch it.

Enter a duration and the script will use the standard sleep command to count down in the background. When the sleep command's timer finishes, the script will display the zenity info message.

You could create a desktop or panel shortcut for this script and run it without even touching the terminal.
This is just scratching the surface of what you could do with zenity; you could use it to make much more complicated programs. If you’re looking for more information on shell scripting, check out our guide to using for loops in shell scripts.