While falling under the "just for fun" category, faking a tattoo in Photoshop or GIMP is an exercise that can teach you quite a lot about the program. Here's how we made a convincing image from a few minutes work. Whether you want to see yourself with your new tattoo before you commit to it, or whether you're just wanting to safely put prison tats on your toddler, you can learn a lot about how to use Photoshop with this how to with the beginner in mind. And if you're a fan of open source software, rejoice, as this howto is GIMP friendly, with nearly every step compatible with GIMP tools and filters. Keep reading!
Turning Two Images Into A Fake Tattoo


We're starting with two images we want to merge together as a convincing Photoshop fake tattoo. Using good quality images for both of your elements is the easiest and best way to ensure you have a quality result.

You can follow along in Photoshop, although most of these steps are GIMP friendly. We'll let you know when they aren't.

We begin by pasting in our tattoo as a new layer. You can include any white backgrounds you want, as we'll be working around those today.

Go to your layers panel and set your blending mode to "Multiply." You'll notice that all of the white around the edges has now disappeared.

If you're not sure where the blending mode is, you can find it in the layers panel, where you see "Multiply" above. Ordinarily it says "normal."


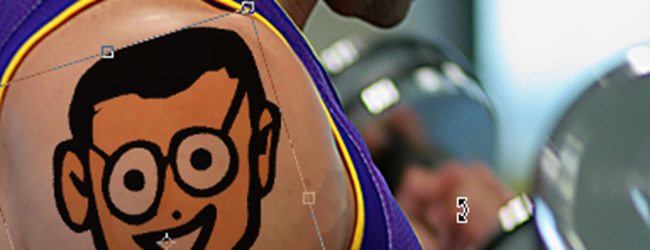
to free transform your tattoo layer. Roughly rotate and size it with your mouse, but DO NOT hit enter to commit the layer. Leave the transform tool running before going on to the next step. (If you're following along in GIMP, you'll have to use the scale and rotate tools.)

Without committing to the free transform, we're going to add a Warp Transformation. Find it under Edit > Transform > Warp.

Your Warp tool will load up rotated along with your layer. If you've ever had to do complex transformations, you'll know why this is important. If not, you've just learned the easy way to transform your images.

The warp tool uses a number of anchor points (similar to the pen tool) to distort the image. Use them to realistically apply the tattoo image to the shape it's lying on.

Our image is looking convincing. If you've been following along in the GIMP, you're probably frustrated that there's no mesh-based Warp tool like in Photoshop. There is, however, a tool similar to the puppet warp that can be used for exactly this method.
More Advanced Tweaks for A Great Looking Image

When using the "Multiply" blending mode, colors tend to get oversaturated and very dark red in a hurry. You can fix this by adjusting the tattoo layer with "Selective Color." Find this by going to Edit > Adjustments > Selective Color. You may find your image requires a different set of adjustments, although you're likely to find your best results by setting your "Colors" selection (shown above) to "Neutrals" and reducing the values. We get a much more natural skin tone and a look much closer to the appearance of real ink on flesh.

Now we start to tackle the problem of sharpness. Chances are your photograph is going to be considerably more blurry, even if it is a sharp photo. Notice the hard lines from the image compared to the less precise lines in the face.

We make some adjustments with a quick Filter > Blur > Gaussian Blur, using a high enough setting to smear our edges around a bit.

Adding a second Motion Blur (found under Filter > Blur > Motion Blur) can be helpful if your image has a little bit of blurriness from motion, like this one does. Adjust your angle to fit with that line of motion and use a subtle setting for the "distance." Both of these blurs are also in the GIMP toolkit.

One final filter that you can run is a "Poster Edge" filter, found under Filter > Artistic > Poster Edge. The stock setting is fine here---this will help create the illusion of smeary, hand-drawn edge tattoos often have.

For one final addition, let's add a subtle effect to the tattoo to make it mesh better with our image.

Reducing your opacity slightly can help to meld your tattoo image to your photograph, but the addition of a Layer Mask (both shown above) can allow you to selectively reduce the amount of "pigment" you're seeing in your tattoo image. Create a layer mask by clicking the

in the layers panel.

ind the areas you want to paint over. Tattoo ink tends to reflect light in a way that is consistent with skin, so try and soften some areas to show some skin color coming through and allow highlights to poke through.

Grab your brush tool

and get ready to paint! You can set your brush to "soft" as shown above by right clicking and reducing the "hardness" to zero. And, when painting in a layer mask, make sure you're using the color black in your foreground color

in your toolbox.

Reducing your brush opacity in your options panel at the top of your screen can be helpful to brushing in the correct amount of black into your layer mask.


And there's our before and after. Notice how the subtle changes help the tattoo image conform to the body shape better and make the illusion more convincing.
Not convinced by our results? Got a better method for making Photoshop tattoos? Give us a shout in the comments section and let us know your methods, or tell us about them at ericgoodnight@howtogeek.com. Image Credit: Bicep curl by sportsandsocial, Creative Commons.