The fdisk command is a text-based utility for viewing and managing hard disk partitions on Linux. It's one of the most powerful tools you can use to manage partitions, but it's confusing to new users.
This tutorial will go through the basics of using fdisk to manage a partition table. After using fdisk, you'll have to use a mkfs command to format new partitions with a file system.
Sudo vs. Su
On Ubuntu, Linux Mint or other Ubuntu-derived distributions, the fdisk and mkfs commands must be prefixed with sudo. On distributions that don't use sudo, use the su - command first to get a root shell, then type every command without sudo.
List Partitions
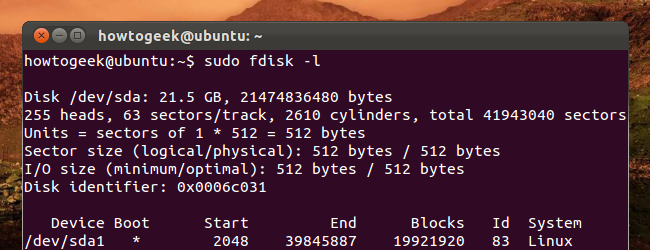
The sudo fdisk -l commands lists the partitions on your system.

You can add a disk's device name to list only partitions on it. For example, use the following command to only list partitions on the first disk device:
sudo fdisk -l /dev/sda
Entering Command Mode
To work on a disk's partitions, you have to enter command mode. You'll need the device name of a disk from the fdisk -l command. The following command enters command mode for the first disk device:
sudo fdisk /dev/sda

Don't edit partitions while they're in use. If you want to edit system partitions, boot from a live CD first.
Using Command Mode
In command mode, you use single-letter commands to specify actions you want to take. Type m and press Enter to see a list of the commands you can use.

Viewing the Partition Table
Use p to print the current partition table to the terminal from within command mode.

Deleting a Partition
Use the d command to delete a partition. You'll be asked for the number of the partition you want to delete, which you can get from the p command. For example, if I wanted to delete the partition at /dev/sda5, I'd type 5.

After deleting the partition, you can type p again to view the current partition table. The partition appears deleted, but fdisk doesn't write these changes to disk until you use the w command.
Creating a Partition
Use the n command to create a new partition. You can create a logical or primary partition (l for logical or p for primary). A disk can only have four primary partitions.

Next, specify the sector of the disk you want the partition to start at. Press Enter to accept the default sector, which is the first free sector on the disk.
Last, specify the last sector of the partition on the disk. If you want to use up all available space after the initial sector, just press Enter. You can also specify a specific size, such as +5G for a five gigabyte partition or +512M for a 512 megabyte partition. If you don't specify a unit after the + sign, fdisk uses sectors as the unit. For example, +10000 results in the end of the partition being 10000 sectors after its beginning.
System ID
The n command I just ran recreated the swap partition I deleted earlier -- or did it? If I run the p command again, I'll see that the new /dev/sda5 partition is a "Linux" partition instead of a "Linux swap" partition.
If I want to change its type, I can use the t command and specify the partition's number.
I'll be asked for the hex code of the type. I don't know it, so I can type L to view a list of hex codes.

It says 82 is the code for Linux swap partitions, so I can type that.

This doesn't format the partition with the file system you select. You'll have to do that later with the appropriate mkfs command.
Writing Changes
Use w to write the changes you've made to disk.
Use q if you want to quit without saving changes.
Formatting a Partition
You must format new partitions with a file system before you can use them. You can do this with the appropriate mkfs command. For example, this command formats the fifth partition on the first disk with the ext4 file system.
sudo mkfs.ext4 /dev/sda5

Use the mkswap command if you want to format a partition as a swap partition:
sudo mkswap /dev/sda5
Fdisk contains a variety of other commands, including expert commands you can access by running the x command first. Check out fdisk's man page with the man fdisk command for more detailed information.