Quick Links
Wireshark has quite a few tricks up its sleeve, from capturing remote traffic to creating firewall rules based on captured packets. Read on for some more advanced tips if you want to use Wireshark like a pro.
We've already covered basic usage of Wireshark, so be sure to read our original article for an introduction to this powerful network analysis tool.
Network Name Resolution
While capturing packets, you might be annoyed that Wireshark only displays IP addresses. You can convert the IP addresses to domain names yourself, but that isn’t too convenient.

Wireshark can automatically resolve these IP address to domain names, although this feature isn't enabled by default. When you enable this option, you’ll see domain names instead of IP addresses whenever possible. The downside is that Wireshark will have to look up each domain name, polluting the captured traffic with additional DNS requests.

You can enable this setting by opening the preferences window from Edit -> Preferences, clicking the Name Resolution panel and clicking the “Enable Network Name Resolution” check box.

Start Capturing Automatically
You can create a special shortcut using Wirshark's command-line arguments if you want to start capturing packets without delay. You'll need to know the number of the network interface you want to use, based on the order Wireshark displays the interfaces.

Create a copy of Wireshark’s shortcut, right-click it, go into its Properties window and change the command line arguments. Add -i # -k to the end of the shortcut, replacing # with the number of the interface you want to use. The -i option specifies the interface, while the -k option tells Wireshark to start capturing immediately.

If you’re using Linux or another non-Windows operating system, just create a shortcut with the following command, or run it from a terminal to start capturing immediately:
wireshark -i # -k
For more command-line shortcuts, check out Wireshark’s manual page.
Capturing Traffic From Remote Computers
Wireshark captures traffic from your system’s local interfaces by default, but this isn’t always the location you want to capture from. For example, you may want to capture traffic from a router, server, or another computer in a different location on the network. This is where Wireshark’s remote capture feature comes in. This feature is only available on Windows at the moment -- Wireshark’s official documentation recommends that Linux users use an SSH tunnel.
First, you’ll have to install WinPcap on the remote system. WinPcap comes with Wireshark, so you don't have to install WinPCap if you already have Wireshark installed on the remote system.
After it's isntalled, open the Services window on the remote computer -- click Start, type services.msc into the search box in the Start menu and press Enter. Locate the Remote Packet Capture Protocol service in the list and start it. This service is disabled by default.

Click the Capture Options link in Wireshark, then select Remote from the Interface box.

Enter the address of the remote system and 2002 as the port . You must have access to port 2002 on the remote system to connect, so you may need to open this port in a firewall.

After connecting, you can select an interface on the remote system from the Interface drop-down box. Click Start after selecting the interface to start the remote capture.

Wireshark in a Terminal (TShark)
If you don’t have a graphical interface on your system, you can use Wireshark from a terminal with the TShark command.
First, issue the tshark -D command. This command will give you the numbers of your network interfaces.

Once you have, run the tshark -i # command, replacing # with the number of the interface you want to capture on.

TShark acts like Wireshark, printing the traffic it captures to the terminal. Use Ctrl-C when you want to stop the capture.
Printing the packets to the terminal isn't the most useful behavior. If we want to inspect the traffic in more detail, we can have TShark dump it to a file that we can inspect later. Use this command instead to dump traffic to a file:
tshark -i # -w filename

TShark won’t show you the packets as they’re being captured, but it will count them as it captures them. You can use the File -> Open option in Wireshark to open the capture file later.
For more information about TShark’s command line options, check out its manual page.
Creating Firewall ACL Rules
If you’re a network administrator in charge of a firewall and you’re using Wireshark to poke around, you may want to take action based on the traffic you see -- perhaps to block some suspicious traffic. Wireshark’s Firewall ACL Rules tool generates the commands you'll need to create firewall rules on your firewall.
First, select a packet you want to create a firewall rule based on by clicking on it. After that, click the Tools menu and select Firewall ACL Rules.

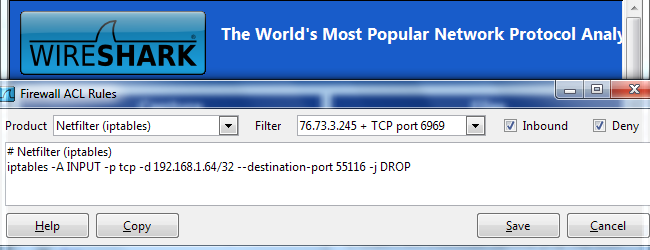
Use the Product menu to select your firewall type. Wireshark supports Cisco IOS, different types of Linux firewalls, including iptables, and the Windows firewall.

You can use the Filter box to create a rule based on either system’s MAC address, IP address, port, or both the IP address and port. You may see fewer filter options, depending on your firewall product.

By default, the tool creates a rule that denies inbound traffic. You can modify the rule's behavior by unchecking the Inbound or Deny checkboxes. After you’ve created a rule, use the Copy button to copy it, then run it on your firewall to apply the rule.
Do you want us to write anything specific about Wireshark in the future? Let us know in the comments if you have any requests or ideas.