Quick Links
We've already put your DD-WRT router in first gear with the power of the Opkg package manager. It's time to install a Transmission and shift gears. How-To Geek explains how to install the BiTorrent client Transmission on DD-WRT.
Image by Nathan E and Aviad Raviv
If you haven't already, be sure and check out previous articles in the series:
- Turn Your Home Router Into a Super-Powered Router with DD-WRT
- How To Install Additional Software On Your Home Router (DD-WRT)
- How to Remove Advertisements with Pixelserv on DD-WRT
Assuming you are familiar with those topics, keep reading. Keep in mind that this guide is a little more technical, and beginners should be careful when modding their router.
Prelog
While Transmission isn't the only BiTorrent client that can be installed from the OpenWRT OPKG repository, due to the fact that it is the De facto standard for all the major Linux distributions (like Ubuntu and Mint for example), it is stable, actively maintained and very versatile. As part of its versatility, it can be remotely controlled by a number of programs, including at least two Windows ones and a web-interface.
In this guide, we will: Install Transmission on the router, have it load automatically on the routers boot and make it remotely controlled on your local network by a windows machine and a web-interface.
Prerequisites & Assumptions
- It is assumed that you haven't reached this article at random and that you have already followed the procedures described in "How To Install Additional Software On Your Home Router (DD-WRT)", fulfilling that guide's prerequisites in the process.
- It is strongly recommended that you connect a HardDrive(HD) to the router, and for the instructions below, it is assumed that you have.
- It is assumed that said HD is already formatted.Note: While partitioning + formatting (1, 2) the HD is beyond the scope of this guide, because DD-WRT as of version 17798, supports all common FileSystems such as FAT32 + ext2/3 and NTFS, you shouldn't have to do anything special.
With that out of the way...
Let's get cracking
Enable UPnP
UPnP is a mechanism by which programs on your network can request the router to forward ports to them automatically. doing so will absolve you from opening/forwarding the ports on your router to the transmission daemon on your own.
To do this, go to the router's web-gui:
- Go to "NAT/QoS" - "UPnP".
- For "UPnP Service", select the "enable" radio button.
-
Optionally select the "enable" radio button for "Clear port forwards at startup".
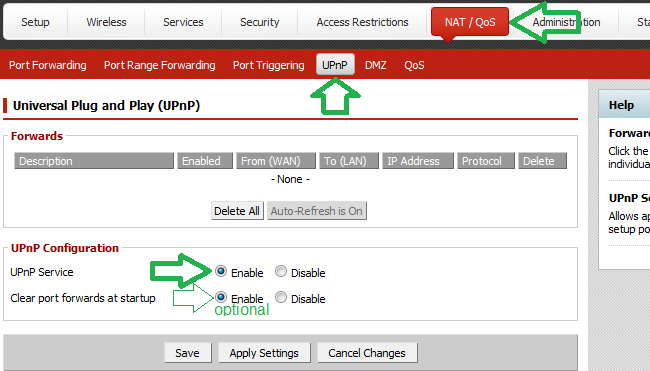
- Save & Apply Settings.

Mount the HardDrive(HD)
If you haven't already, mount the HD using the router's web-gui. To do this, go to the router's web-gui:
- Under the "Services" tab go to the "USB" tab.
-
Select the Enable radio buttons for "Core USB Support", "USB Storage Support" & "Automatic Drive Mount".
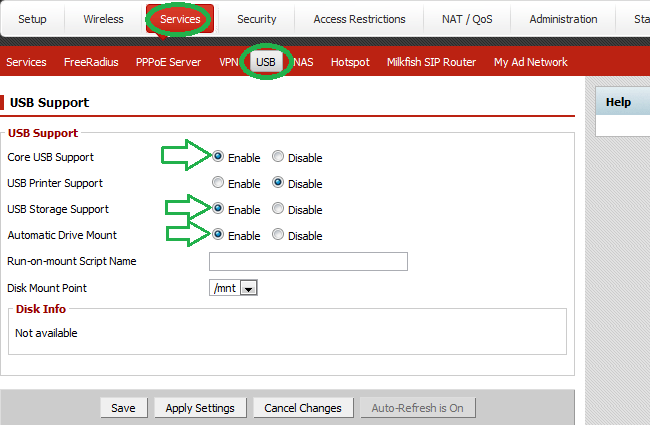
- Save & Apply Settings.

Installing the package
We will install the daemon package by issuing from a terminal:
opkg update; opkg install transmission-daemon
Package configuration
With Transmission now installed, run the daemon once so that it creates the default settings file template for us. We will run it in the foreground (the "-f" flag) so its easier to see when its stabilized and quit once it has. Issue:
transmission-daemon -f
Once the program has been up for about 10 seconds, it should be ready to be quitted out of by hitting "Ctrl+C".
Directories
Create the directories that will hold the torrent pointers, parts, configurations and downloads. For my setup this is:
        mkdir -p /mnt/sda_part1/torrents/parts/
mkdir -p /mnt/sda_part1/torrents/config/
Note: The above assumes one HD is connected to the router and that it has a partition layout with a filesystem on the first partition. While this is a very common default setup, in accordance with your HD's partitioning and formatting layout, this is subject to change.
Copy the configuration file created by the first run of the daemon:
cp /tmp/root/.config/transmission-daemon/settings.json /mnt/sda_part1/torrents/config
Note: despite representation, this is one continues line.
The command below, will add the "192.168.11.*" network to the rpc-whitelist parameter. This will allow us to connect from any computer on the local network (using the remote gui program) to the daemon on the router.
sed -i "s/127.0.0.1/127.0.0.1,192.168.11.\*/g" /mnt/sda_part1/torrents/config/settings.json
Note1: despite representation, this is one continues line.
Note2: If your network subnet is different, you will have to adjust accordingly.
Execute the daemon again, this time direct it to use the alternative configuration directory (the "-g" flag).
transmission-daemon -f -g /mnt/sda_part1/torrents/config
You should see that the daemon has started and if you look closely, you should see that the paths used by the program have also changed to the new path. Leave the daemon open for now, we'll need it up and running for the GUI segment.
Remote GUI
There are two Windows programs to control the daemon remotely, they are: Transmisson-remote-gui & Transmission-remote-dotnet. Both seem to be fully featured and actively maintained. While you may choose any one of them, we will use "transmission-remote-dotnet" for the sake of this article, because other then cosmetic differences, they are virtually identical.
We will install the client and then use it to change the settings on the server, as it is easier then manually editing the settings file.
Configure local settings
- Download the latest Transmission-remote-dotnet from the project's site, and install normally.
-
Launch the program and go into "Local settings" either from the Options menu, or the wrench icon.

-
Go to the "Servers Settings" tab.
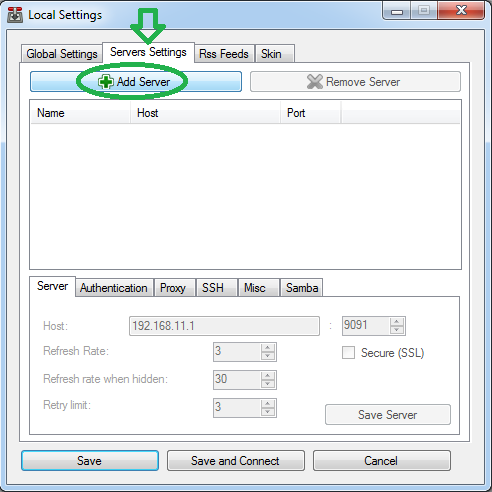
- Click on "Add Server".
- Then click on the "Server 0" name that has just been added so we can change its settings.
- In the host field put your router's IP.
-
Click on "Save".

-
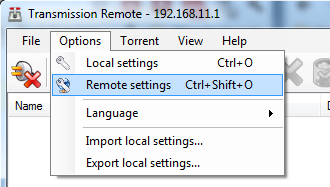
Connect to the daemon running on your router by clicking on "File" -> "Connect" or the connect Icon.


Configure the remote daemon
-
Click on "Options" Select "Remote Settings".
- In the download to textbox put: "/mnt/sda_part1/torrents"
- Check the "Incomplete download to" checkbox.
- In the incomplete textbox put: "/mnt/sda_part1/torrents/parts"
-
Change the Encryption dropdown list to slect "preferred".
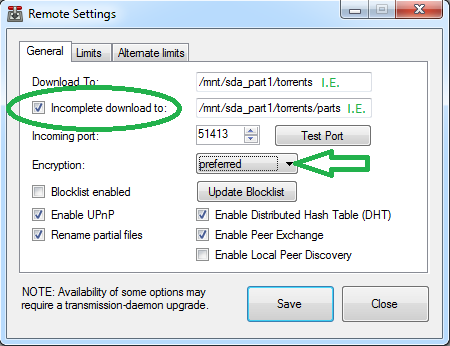
- Click on "Save".


That's it, you should be able to use the program just like any other BiTorrent client you would install on your computer.
Enable the web interface (Optional)
While using one of the remote-gui programs above would have been sufficient, you may want, a way to access the daemon without being bound to a program on a specific device. This is because with today's pleura of personal devices, it is becoming a daunting task to keep track of what is available where, and simply pointing a web browser to the router should be (if you're a loyal DD-WRT user) second nature to you by now. Also having a web-interface makes it really easy to add downloads while you're "on the go". While making the web-GUI publicly accessible is beyond the scope of this guide, we will show how to install and configure the web interface and you can chisel the public accessibility later.
Install the package by issuing in a terminal:
opkg update; opkg install transmission-web
Transmission will automatically look for the web interface in several default locations. We've ran transmission in a "foreground" mode (the -f flag) in the last step so you can see these locations, if you try to access the web interface. While right now, you will fail, you will see that one of these locations is "/tmp/root/.local/share/transmission/". Fortunately for us, this location is on the routers RAM which is read-writable. So all we actually have to do, is create a symbolic link between this location in RAM to the location the web interface has been installed to as part of the package on JFFS . To do this, create the location (manually for now) by issuing:
mkdir -p /tmp/root/.local/share/transmission/
Create the symbolic link, again manually for now, by issuing:
ln -s /jffs/opt/usr/share/transmission/web/ /tmp/root/.local/share/transmission/web
Note: despite representation, this is one continues line.
Try to access the web interface again at: http://your-router's-ip-or-dns:9091. For my setup this would be, with IP: "http://192.168.11.1:9091" or with local dns name: "http://buffalo.aviad.lan:9091".
If all went well and you add something to be downloaded, you should see something like:

Creating and using a Swap File (Optional)
A "Swap File" is just like the Windows "Page file" and in fact in the past Microsoft used to call it a "Swap File" too. When drafting this article I've found one situation, in which the daemon, would encounter a memory leak and crash (see remarks section). To try and overcome this issue, I've setup Swap (both as a partition and as a file). While this had only served to prolong the inevitable, in regards to the memory leak, because I've already invested the effort of making this a simple to follow procedure, I see no reason, to not pass on the information. With that said, as stated in the headline, this step is optional, and I can vouch that the daemon has been running fine for over a week straight and without interruptions while working on at least 5 different torrents. But then again, my router has 128MB of RAM (which is considered a lot in router circles) so you may have to perform this step if your router is memory starved. Also there shouldn't be a penalty if you do decide to implement Swap, despite not "needing" it, as Linux shouldn't try to use Swap just because it is there (unlike Windows).
While in Linux it is customary to use a Swap "partition", doing so would require one to perform the partitioning before hand, or even worse, change the current layout. As this may be inconvenient if you already have data on the HD, Using a file, on the already existing format of the drive, is much easier. Moreover I haven't found any significant difference in performance while comparing the two Swap utilization schemas.
We will create a 256MB file to work on. To do this, "DD" a file into existence by issuing in a terminal:
dd if=/dev/zero of=/mnt/sda_part1/swap.page bs=1M count=256
WARNING: This command ("DD") is extremely powerful and potentially destructive. The "Output File" (of) directive should not be taken lightly, as an incorrect parameter here might cause you to lose data.
Install the package that would enable us to create swaps by issuing:
opkg update; opkg install swap-utils
Once the swap-utils have been installed, create the swap file by issuing:
mkswap /mnt/sda_part1/swap.page
Now test that the system is able to imply the swap file by examining the memory usage with the "free" command.
free
Note that the parameters in the "Swap" row are all zeros.
Now activate the swap file by issuing:
swapon /mnt/sda_part1/swap.page
And issue the free command again:
free
You should now see that the parameters in the "Swap" row, have changed to reflect that there is now a total of 256MB of available swap space.
Starting the daemon automatically
In order to have the Transmission daemon automatically start with the router's reboot, one only needs to add it to the "geek-init" script which has been installed in the OPKG article. Open the geek-init script in an editor of your choice:
vi /jffs/geek/etc/geek-init.sh
If you've followed all the steps in this guide (including the optional ones) you can append the below script snippet to the end of the geek-init file:
logger_general "transmission setup-er: setting 'home'"
export HOME='/tmp/root'
logger_general "transmission setup-er: Creating the directory and symbolic-link for the web interface"
mkdir -p /tmp/root/.local/share/transmission/
[ ! -L /tmp/root/.local/share/transmission/web/web ] && ln -s /jffs/opt/usr/share/transmission/web/ /tmp/root/.local/share/transmission/web
logger_general "activating swap"
swapon /mnt/sda_part1/swap.page
logger_general "transmission setup-er: Starting the transmission-daemon with the alternate configuration directory."
/opt/usr/bin/transmission-daemon -g /mnt/sda_part1/torrents/config
logger_general "transmission executed"
However if you've skipped optional steps, while there shouldn't be any problem with leaving the above "code" as is, you may want to take out anything superfluous. In fact, if you've skipped both the optional steps and you forgo the comments, you would only require to append:
/opt/usr/bin/transmission-daemon -g /mnt/sda_part1/torrents/config
Final remarks
- While this may be just FUD, one better keep in mind that BiTorrent has become something of a target for litigation, and that it has been said time and time again, that the network is being scrutinized. Case in point the site http://www.youhavedownloaded.com/. Therefore you are advised to only use this torrent client, as we have, for legal torrents.
- During the writing of this article, I have found one torrent that would cause the transmission daemon process to crash due to a memory leak. I have described the issue on the OpenWRT forum, however at the time of this writing, there has been no answer to my hail.
May you have a smooth transition into transmission :)
Because we know it to be transitory, of the moment... we know it will turn to ASH.