Quick Links
You might know that there are special cameras for shooting panoramic pictures. Today, we’ll put one together in seconds that we shot with a regular digital camera and a tripod. Grab your favorite image editor and camera, and let’s go!
Even if you don’t have Photoshop, you’ll be surprised at how easy it can be to take some good shots, merge them, and get a convincing panorama. With our simple tips, you’ll have a much easier time shooting the right kind of images, and splicing them together to make the perfect panorama. Keep reading!
Setting Up Your Panoramic Shot

The most difficult part of creating a panoramic image with a non-panoramic camera is simply shooting the images—properly. Assuming some general guidelines are followed, it can be very easy to put together a great panorama.
The first part of the process involves getting a tripod that your camera can mount on and find a relatively level place to shoot your image. If you use an inferior second-hand tripod (like your author) pennies can make a great, cheap fix to level a wobbly mount.

Rotate your shot horizontally on a fixed axis and take multiple shots that overlap. Don’t stop at four if you want more! You can create a full 360 if you prefer. But when taking your pictures, remember you want to keep them consistent, so it is important to use the same focus, shutter speed, and aperture settings, so automatic shooting will make your life more difficult.

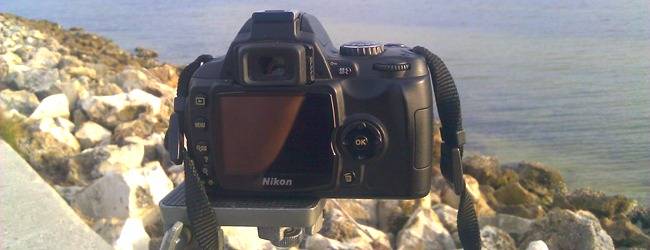
Most lenses on DSLRs have manual and automatic settings, as shown above. Take a test picture with fully auto focus, then switch to fully manual to keep the lens from adjusting as you rotate on your axis.
If you aren’t using a DSLR, you may have to refer to your camera’s manual to see if you can disable the auto focus, or simply shoot around it.

Similarly, you don’t want changes in light to affect your shots. Use your own manual settings, or take a test automatic shot, and copy those shutter speed and aperture settings. If you’re unfamiliar with how to use manual settings, you may want to start by reading HTG’s guide to the elements of exposure.
If your camera doesn’t have a full on manual mode, you can use program mode to control as many of the elements of exposure as possible.
Merging Your Pictures

As long as you bracket your images, you’ll probably end up with a set of good, usable pics to make a panorama from. Pick your best set of four or more (although you can merge as few as two!) and pop them into Photoshop.

Make sure all of your images are open in Photoshop, as shown here, all open in multiple tabs. You can make adjustments at this stage if you want to develop the Raw images—since you can adjust all the images at once, you can ensure they stay as consistent as possible. When they’re all open, you can proceed to the next step.

Navigate to File > Automate > Photomerge. This is a feature for newer versions of Photoshop, but don’t dismay if you’re using an older version or even the GIMP, we’ll address that later.

Photomerge has a dialog box like this one. We’ll add our files to the tool, then select how we’d like Photoshop to make our panorama.

“Add Open Files” is straightforward and saves you the time of digging through your pics again.

While you can use any of the various “layout” settings to get a panorama, we used “reposition” in this case. Try them all to check out the various effects included with the tool. Click “OK” when you’re finished.

This was our first result using only this tool—a perfectly acceptable starting point. We crop our image and we’ve got our panorama completed.

Seriously, after only a single crop, this is what we’re left with. Our panorama is high resolution, and pretty convincing. Let’s take a look at what’s going on to create the image.


Photoshop has aligned the images in a single file and created image masks to stitch them together nearly seamlessly. Here are two screenshots of two separate layers. You can clearly see where Photoshop fit the two layers together.

This is what your new file’s layers will look like. This is important, because you can do this manually, and you don’t even need Photoshop. Let’s briefly take a look at that.
What if I Don’t Have Photoshop? (or Photomerge?)

Even though Photomerge makes making a panorama ludicrously easy, it’s not terribly difficult to manually align and mask images in Photoshop or even GIMP.
Start by using the move tool and nudge the images until they more or less fit together as shown. They don’t have to be (nor will they be) perfect. All manner of things could cause problems—your lens could be distorting the image, your tripod could have moved, etc. Just do your best and trust that you can mask out the worst parts later.

Find these areas that appear incongruous in your image, create masks and use soft edged paintbrushes to gently blend them together. Don’t follow hard edges or the edge of your photograph! Simply paint weird organic shapes like the ones shown here in the selection to smoothly and invisibly mask out the parts of your panorama that don’t fit together perfectly. You’ll get a result very much like the automated image.
Results and a Final Image

You can tweak your image and spend all manner of time fixing it, just like any photograph, but you’ll probably be pleasantly surprised when you put your images together just how easy it can be, providing you take the proper precautions when you take your images. I really can’t stress how important that is.
Enjoy making your own panoramic photographs! Join the discussion, and address questions on the process or tell us about your own tricks and methods for making panoramas in the comments section below. And if you make some fun panoramic images, feel free to send them along to ericgoodnight@howtogeek.com, and we may choose your pictures to share with all of How-to Geek’s readers.
Image Credits: All images by the author, protected under Creative Commons, attribution to Eric Z Goodnight.